How to Use Recoverit
1. Overview
1.1 Overall Features
Recoverit Data Recovery is well-recognized among more than 5,000,000 users the world over. Let’s have a snapshot of the software and get to know why it is recognized as the #1 data recovery software.
- Recover 1000+ types and formats of data and files
- Support to recover a single file or multiple files
- Repairs all kinds of inaccessible corrupt, broken or damaged videos
- Intuitive interface and straightforward recovery process
- Deep, intelligent and fast scan for all lost data
- Preview and thumbnails available before recovery
- Preview documents, photos, videos, audios, etc.
- Recover data in different situations from all devices
- Multiple options of different locations to save time
- Personalized specific file path available for scanning
- Excellent search and filtering options to pinpoint lost data
- Support the computer screen with different resolution (100%, 125%, 150%)
- Design the scanning progress bar to know the scanning time left, the amount of files found and hard drive sectors that have been scanned.
- Work on Windows 10/8.1/8/7/Vista, Windows Server 2016/2012/2008/2003, and Mac macOS X 10.15 - 10.9 computer operating systems
- Compatible with almost all file systems like NTFS, FAT32, FAT16, exFAT, APFS, encrypted APFS, HFS+, encrypted HFS, HFSX, RAW, RAID, etc.
1.2. Supported File Types
Recoverit can recover 1000+ types and formats of files. Also, it makes the preview of different types and formats of data available.
1.2.1. File Types to Preview
What is the preview function for a data recovery program? Well, it is the feature that can help you view the file information before selecting and recovering files. The information includes file size, file name, file path and even the concrete content inside it.
Recoverit can preview files stored or displayed on a Windows or Mac computer. But in order to keep your software working on the computer without any data damage, there are some limitations.
Mac Preview data less than 15 MB on Mac
Generally speaking, as long as the files can be viewed on your Mac computer, they can be previewed via Recoverit Data Recovery for Mac Wizard.
- All formats and types of data on your Mac
- The file size should be less than 15 MB
- If the file itself is corrupted, it fails
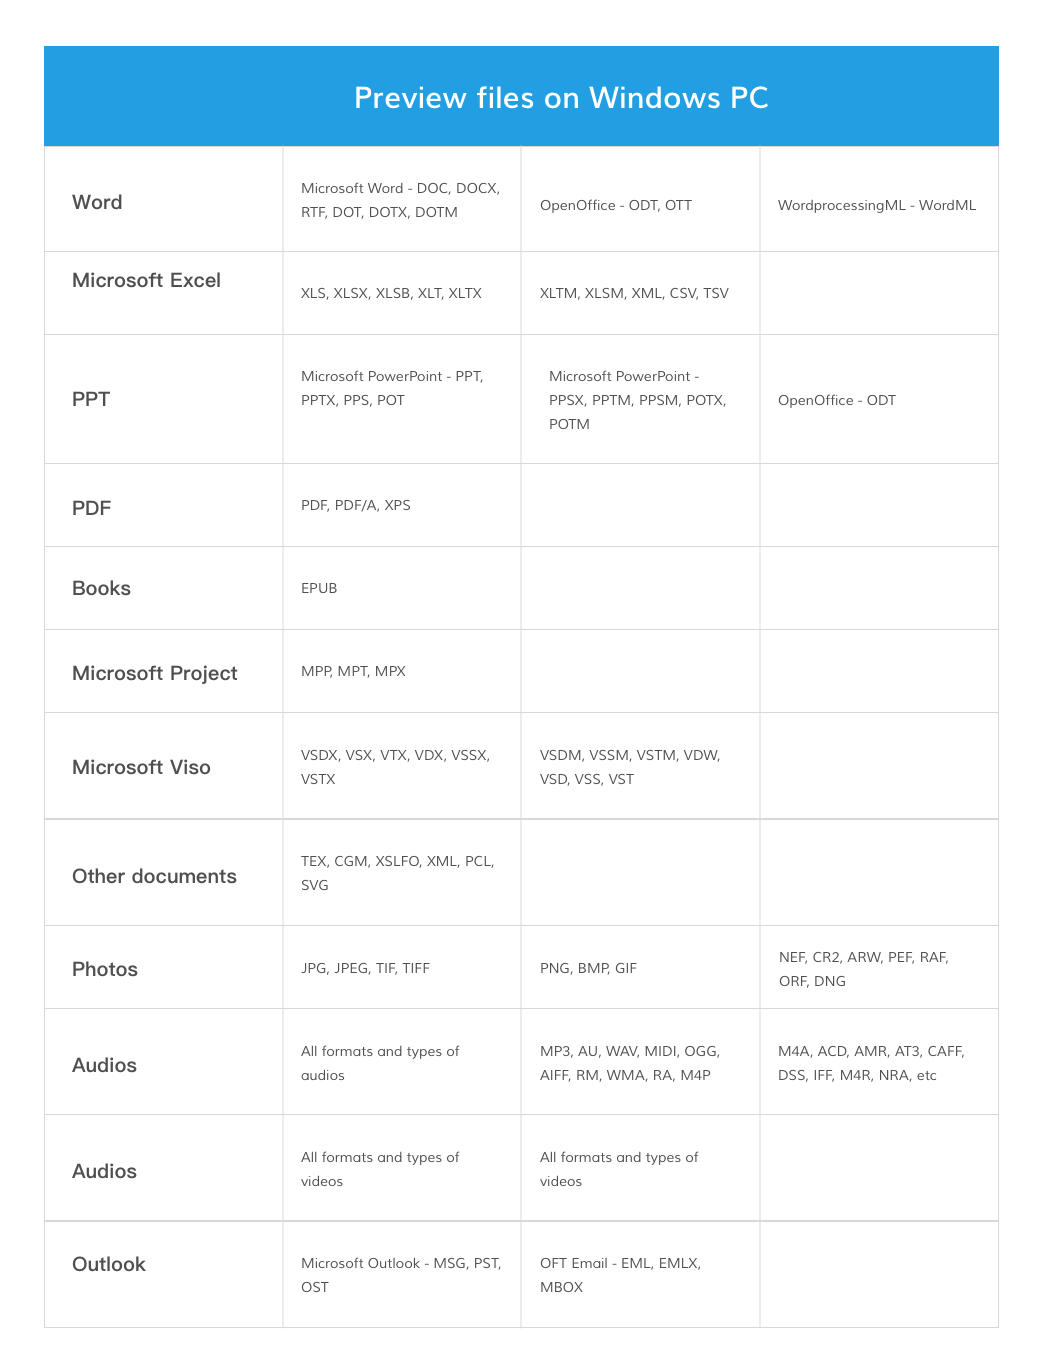
Windows Preview data less than 30 MB on Windows
All the following types and formats of data and files can be previewed, as long as the file size is smaller than 30 MB and the data is intact. The file size limit is to make sure the software can keep working healthily and normally on your computer, in case of the crashed or sluggish software.
1.2.1. File Types to Recover
Recoverit Data Recovery supports 1000+ formats and types of files to be recovered. The specific ones are as follows.

1.3. Supported Storage Devices
With the advance of the technology, Recoverit can work with more and more devices, like GoPro camera, Drone camera and RAW drive. Now, almost all the devices are available for data recovery now.
- Hard drive, USB drive, Pen drive, floppy disk, Solid State Drive, Zip drive
- Memory card, CF card, xD card, MultiMedia card, SD card, microSD card
- Digital camera, Drone camera like DJI Drone, action camera like GoPro
- Camcorder, Audio recorder, Music player, iPod (Nano, Classic & Shuffle)
- External hard disk, hard drive disk (HDD) and other storage media
1.4. Supported Systems
To meet different needs of digital users, an increasing number of computer and file systems are produced. Recoverit Data Recovery always keeps pace with the trending technology. Hence, undoubtedly, it is compatible with even the latest systems to help users recover their important data.
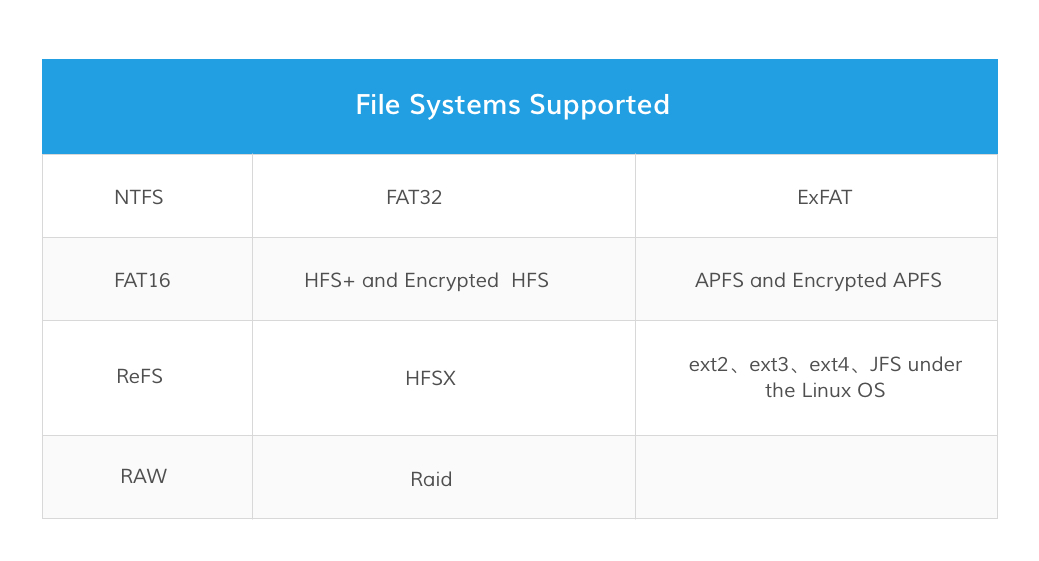
1.4.1. Supported File Systems
Recoverit Data Recovery supports almost all the file systems in the field, let alone the most common ones, for example:
1.4.2. Supported Computer Systems
Recoverit Data Recovery comes with both Windows and Mac versions.

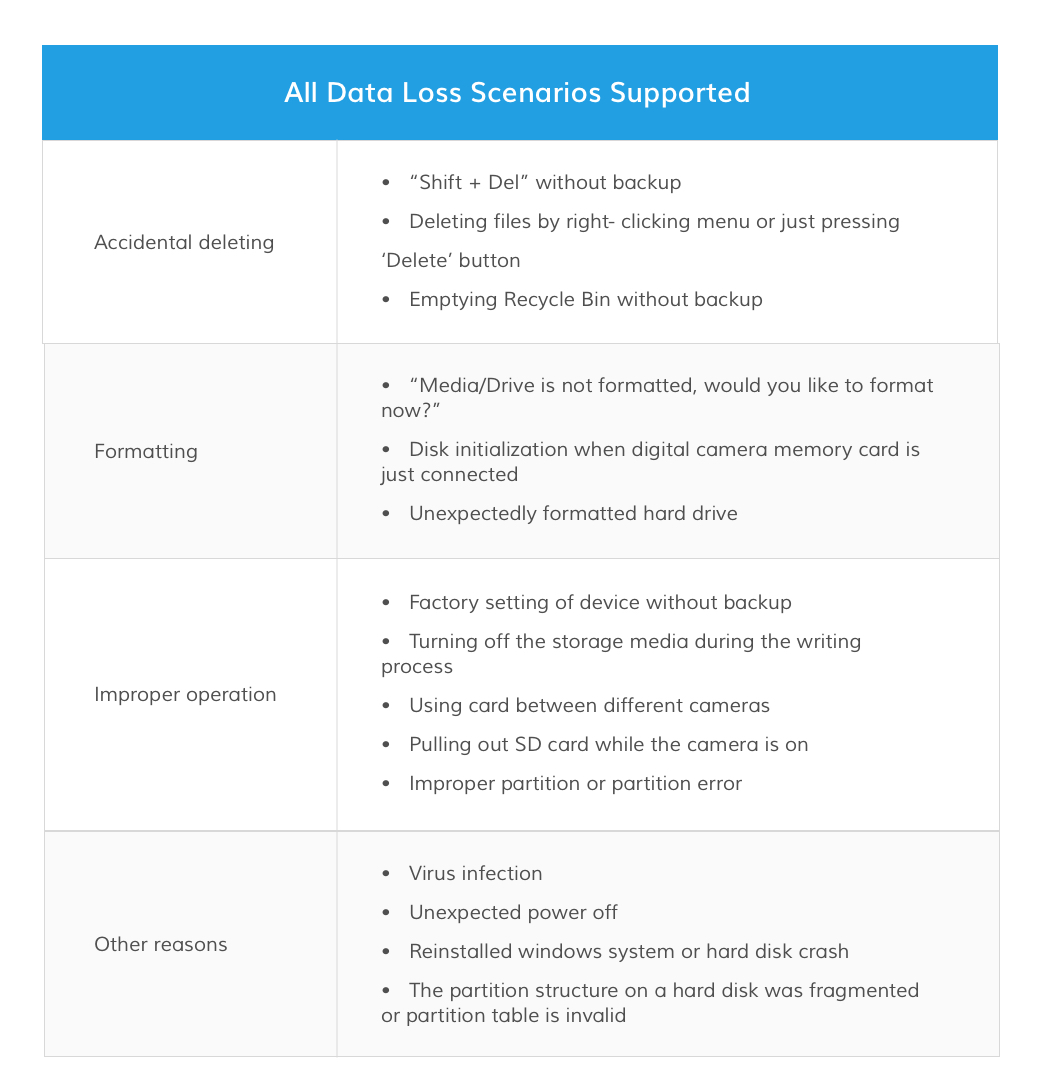
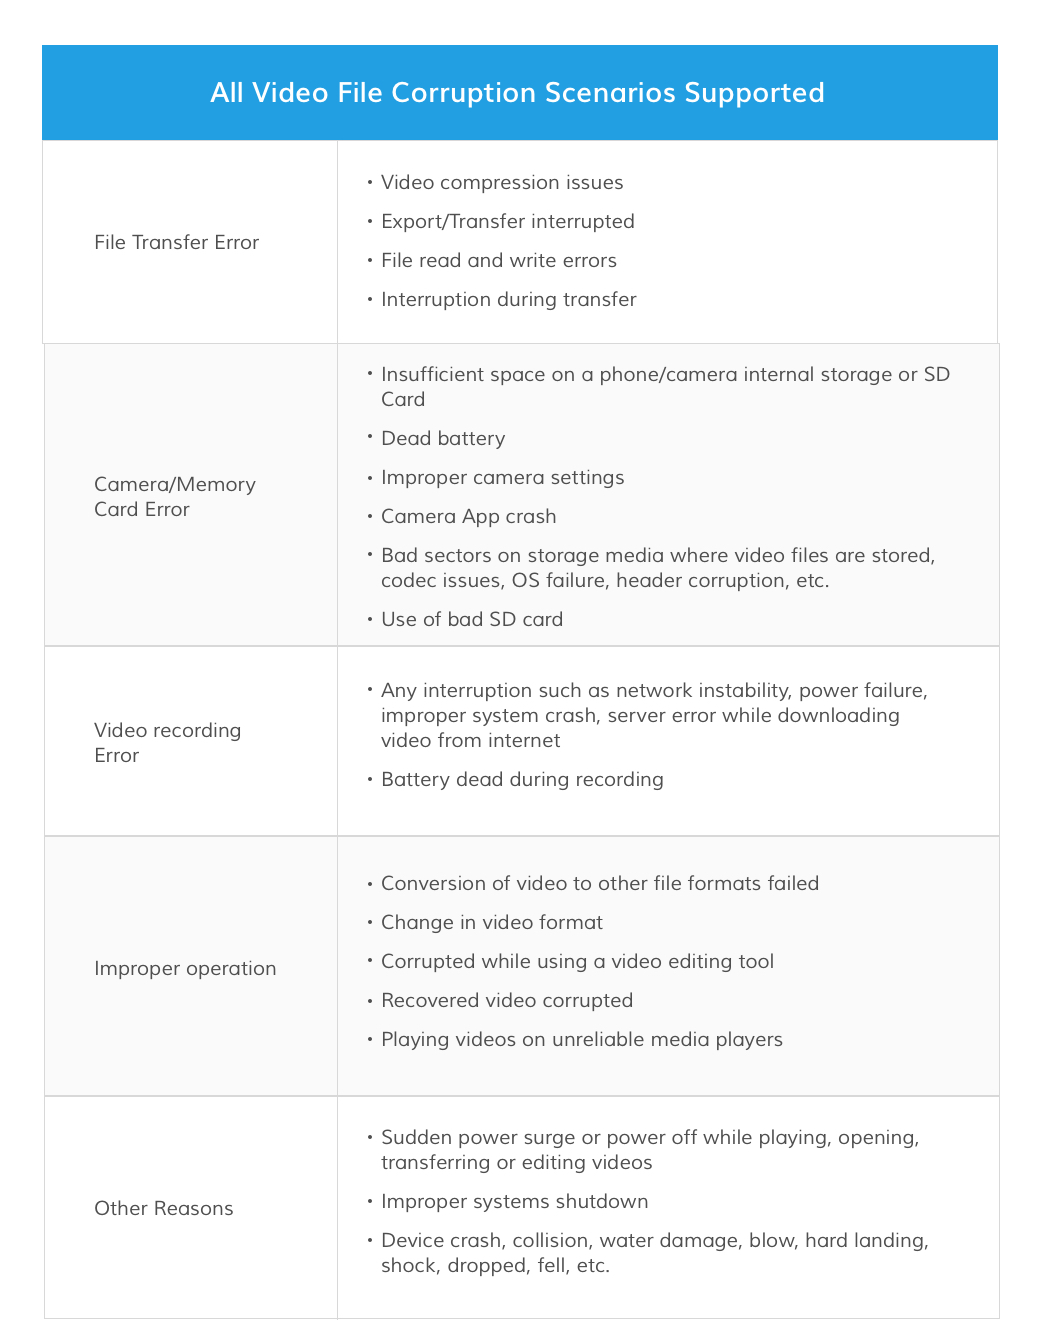
1.5. Supported Scenarios
No matter where and how you lost your important data, Recoverit Data Recovery is powerful enough to help you get them all back without any data damage.
2. Getting Started
2.1. Download and Install
The download and installation of Recoverit Data Recovery are simple and easy. Get the simple steps here.
2.1.1. Basic computer requirements
Before starting to download and install Recoverit, let’s know some basic requirements.
- RAM: 2 GB minimum (4 GB recommended)
- CPU: 1GHz (32bit or 64bit)
- Operating Systems: Windows 10/8.1/8/7/Vista, Windows Server 2016/2012/2008/2003; Mac OS X 10.9 - 10.15
2.1.2. Download Recoverit
Recoverit comes with Windows and Mac version. As per your needs, choose the right version and c lick the below button to get the software downloaded.
2.1.3. Install Recoverit on Windows
- Double-click the “recoverit_setup_full4134.exe” file in your downloaded folder.
-
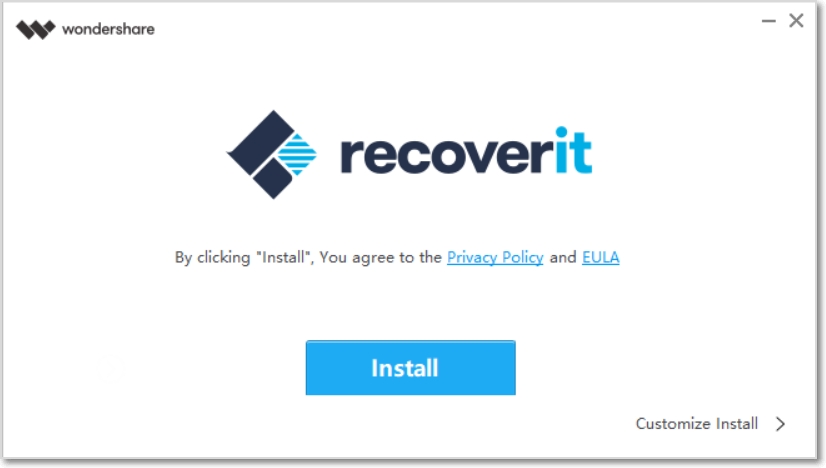
Click “Install”. A dialogue will appear to ask for an installation confirm. You can also click “Customize Install” to select your preferred language and destination.
- Click “Start Now”. Wait for few minutes, and an ending dialog will appear. Start the recovery process using Recoverit in no time.
Note: To launch Recoverit Data Recovery, simply double click the “Wondershare Recoverit” icon on the Desktop.
2.1.4. Install Recoverit on Mac
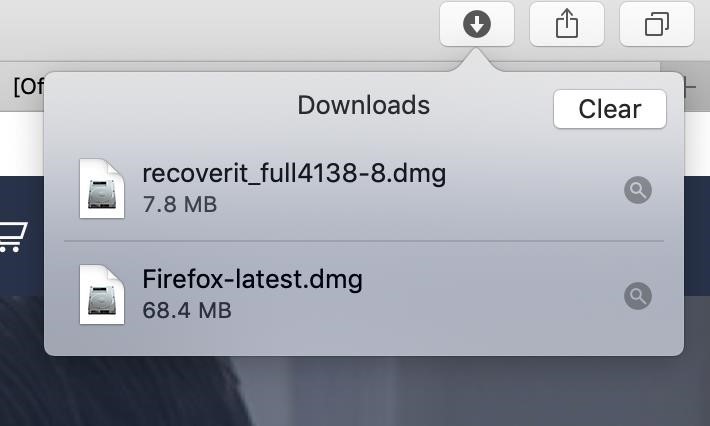
- After downloading Recoverit, click “recoverit_full4138-8.dmg” to get the software installed on your Mac.
-
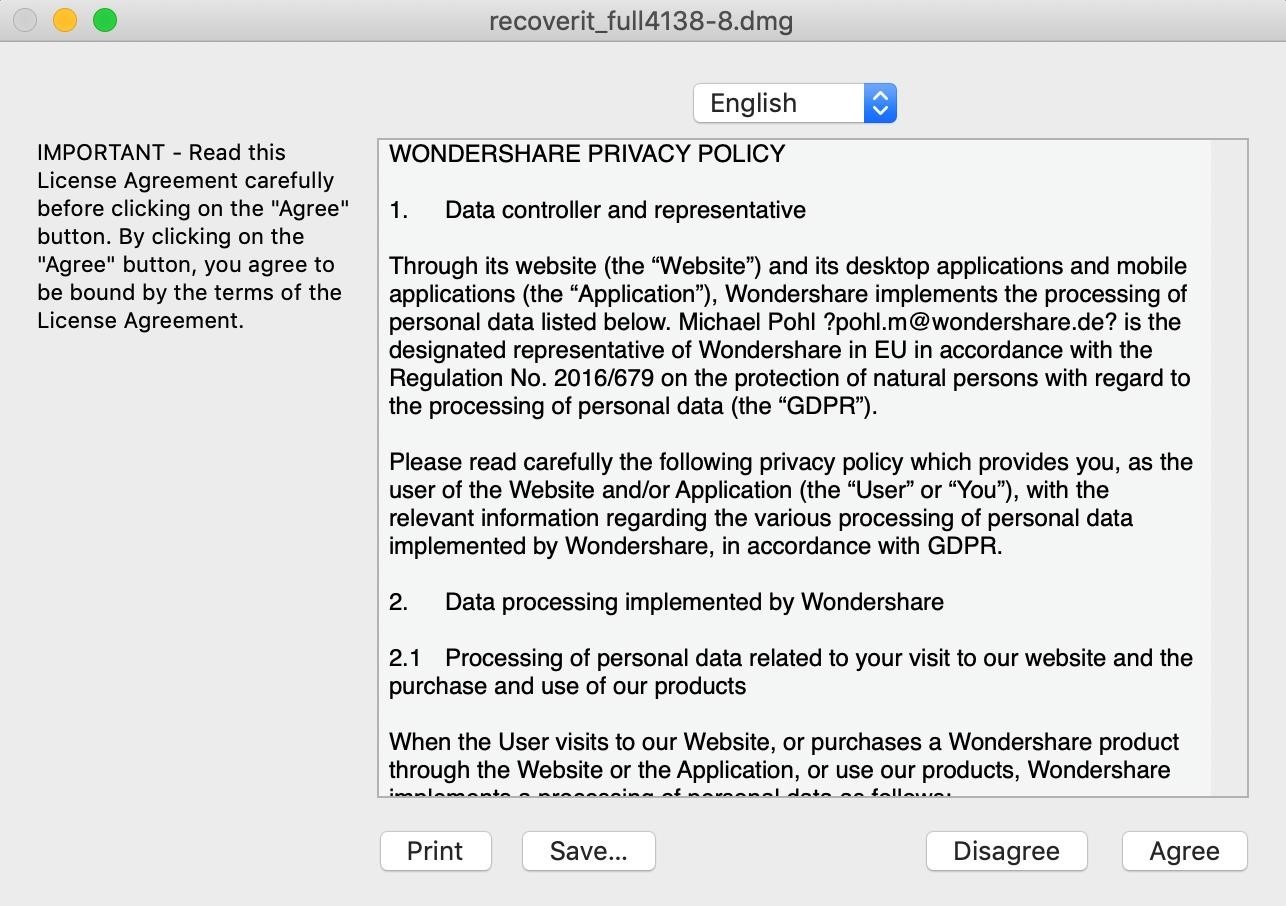
Agree to the privacy policy. Next, you can select the specific language of your choice, and English will be the one by default. Read Wondershare Privacy Policy and click “Agree” to confirm and accept it.
-
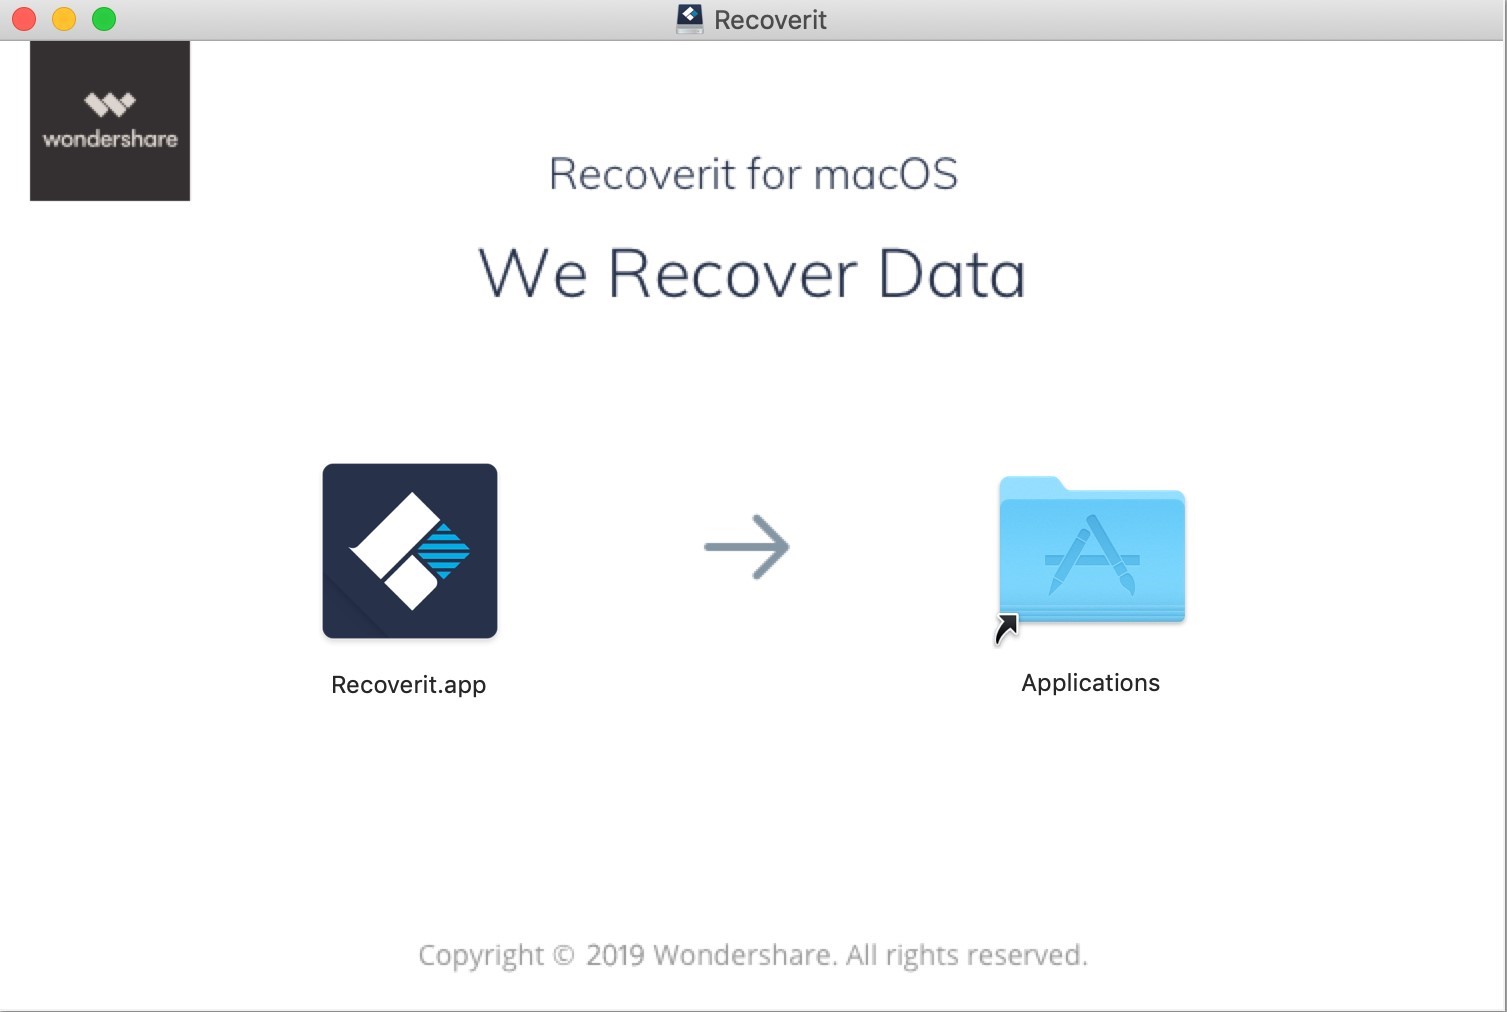
Drag Recoverit.app to the Applications. To make sure keep using Recoverit on your Mac, please move the .exe file to the Applications.
2.1.5. Launch Recoverit on Mac
To launch Recoverit Data Recovery, simply double click the “Recoverit” icon on the Desktop. If it is not there, please go to “Finder” > “Applications” > “Recoverit” and double click the software.
Then a password window will pop up. Please input your Mac password and press “Enter” to open the software.
2.2. Purchase Recoverit
Recoverit Data Recovery has an official online store for each of you: https://recoverit.wondershare.net/buy/store.html. To check more details, check out the page.
For those who have downloaded and installed Recoverit on the computer, please click the  cart button or to get the pricing plans.

2.3. Register with Recoverit
Recoverit Data Recovery allows you to scan and preview data stored on your computer or storage devices for free totally. But if you want to recover and save the lost or deleted files, please register and upgrade it first.
2.3.1. Register with Recoverit
1 Go to the Registering Window
-
Click
 and go to the registering page.
- Click “Register” in the tab.
-
Click “Register” when you recover data without registering or buying the software.

2 Buy or Sign in
-
If you haven’t purchased the software, please go to do it to get Recoverit with full version. Click “Buy Now” and you can get the pricing plan.
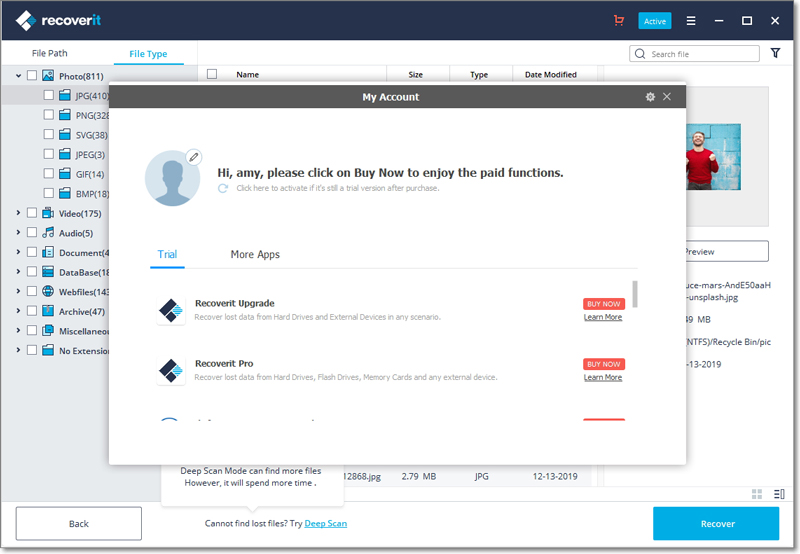
- If you have upgraded it, click the gear icon and switch the account to the one that purchased the software.
2.3.2. Activate Recoverit
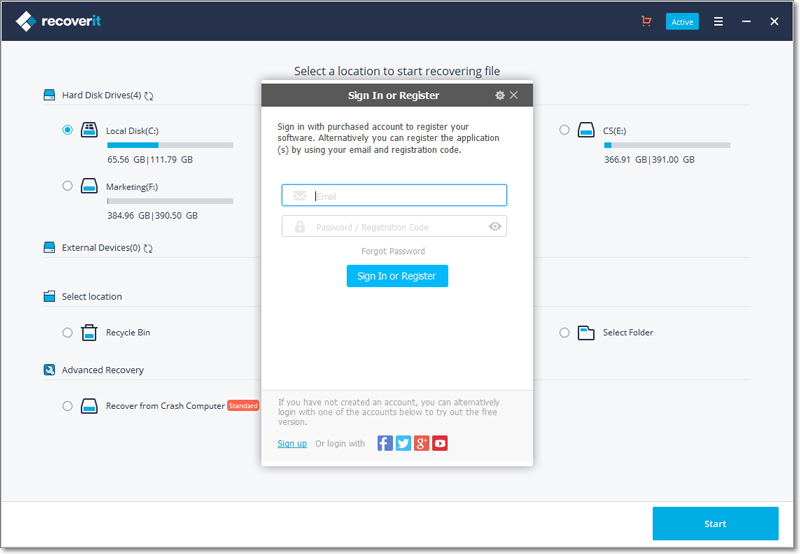
Input your email and password or registration code. Click “Sign In or Register”. After that, you can use the full-version software completely.
2.4. Check Recoverit Updates
For all the users who buy Recoverit Pro or Ultimate, the free lifetime update is provided. With an active Internet connection, Recoverit can be updated automatically. If not, you can also follow the below steps.
- Launch Recoverit Data Reocvery
-
Click the Menu button -

- Choose “Check for updates”
- Confirm the latest updates
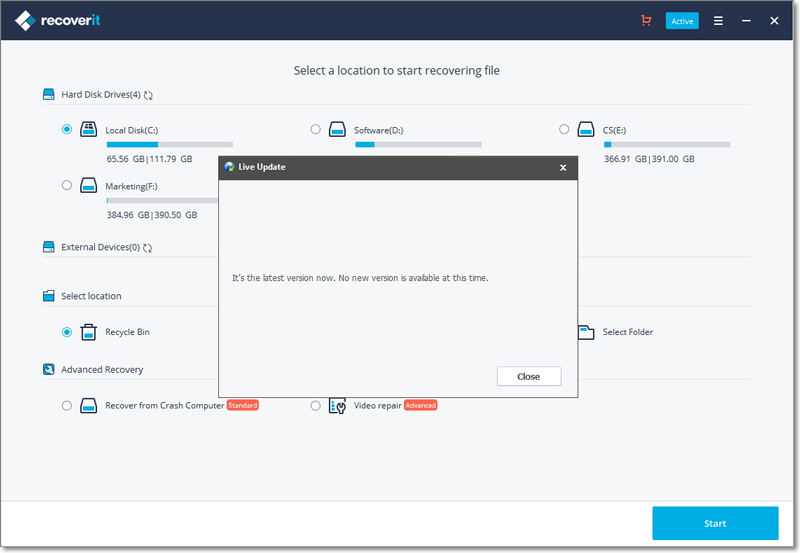
The Live Update window may not appear due to the reasons.
- Fail to connect a safe Internet
- Unable to get configuration files
- Unable to locate the executable file
- Fail to find the files about Recoverit updates
Note: If the software isn’t downloaded from our official website or has made some special personal configurations, the update check and monitor might fail too.
2.5. Get Recoverit Supports
- Online support center: https://recoverit.wondershare.com/support/
- Knowledge base: https://recoverit.wondershare.com/resource/
- Search on Recoverit website: https://recoverit.wondershare.com/search.html
- Chat bot with Recoverit: https://recoverit.wondershare.com/
- Submit a ticket: http://support.wondershare.com/#/guide?id=259
- Recoverit program: go to the Menu button > “Help” or “User Guide”
- Pricing plan help: https://recoverit.wondershare.net/buy/store.html
- How to use Recoverit: https://recoverit.wondershare.net/guide.html
3. How to Use Recoverit
3.1. Interfaces & Buttons
Before starting to recover your lost or deleted files on a computer, let’s know something about its user interface and specific buttons.
3.1.1. Main Interfaces
There are 3 main kinds of interfaces that support you to find your lost data and get them all back.
1 Storage Selection
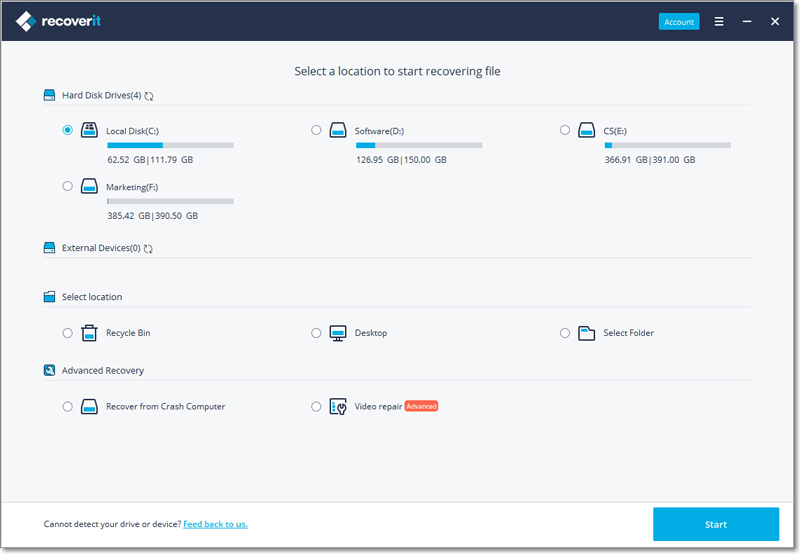
The first interface you see will be the one asking for specific scanning locations. Four tabs are shown, respectively Hard Disk Drives, External Devices, Select location and Enhanced Recovery.

Hard Disk Drives
Under the tab, all your internal hard disk drives will be shown, even including the lost partitions. Yes, as you see, the orange storage bar means that this partition is lost, while the blue color shows the location is working normally.
External Devices
If you have connected one or some removable storage media, all of them display under the tab. The external devices can be an SD card, memory card, USB flash drive, external hard drive, Zip drive, digital camera, camcorder, Drone camera, action camera, cell phone, music player, audio recorder, etc.
And the same is that the external device marked with the orange color lost its partition.
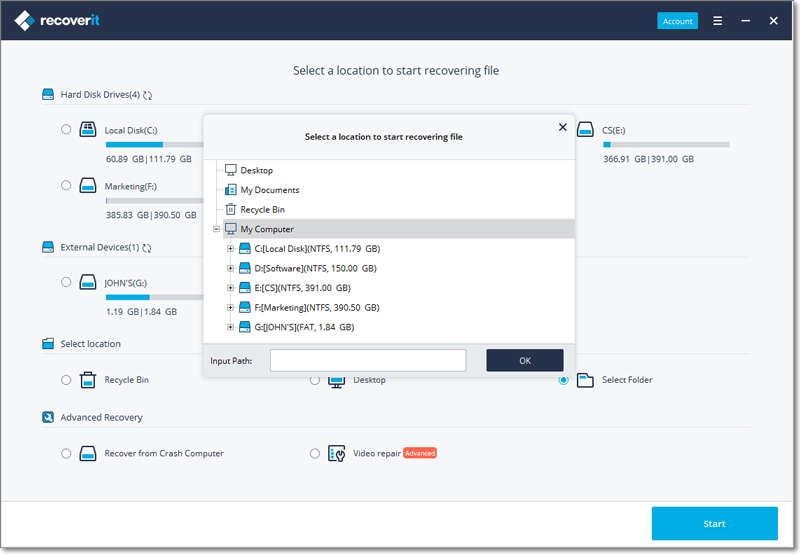
Select location
Under the tab, we list three frequently used locations for you, where data loss can occur much more easily. They are respectively Recycle Bin on Windows computer or Trash on Mac, as well as Desktop.
Besides, if you remember the exact file path where you lost or deleted the files, you can resort to “Select Folder” to start the scanning process.
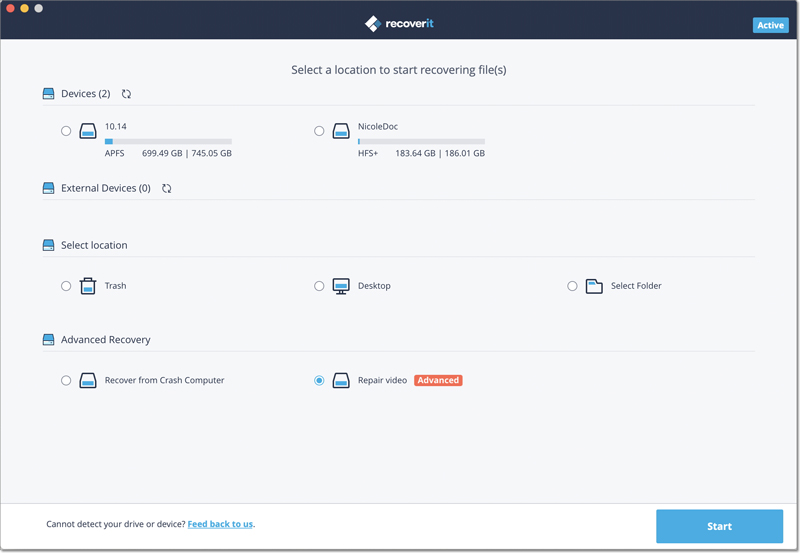
Enhanced Recovery
The final part comes with two options – Recover from Crash Computer and Video Repair.
"Recover from Crash Computer" needs to be opted in when you find your computer is crashed and unbootable. Tick the option and you’ll be guided to create a bootable media first to boot your computer up. Only then can you recover your lost data from the crashed computer with a USB drive or CD.
"Video Repair" is to help you repair the videos that got corrupt during shoot, when performing file transfer, while editing, converting or processing.
Start
In the location interface, the “Start” button is also important. After selecting the location where you want to retrieve your lost data back, please click “Start” to begin the scanning and recovery process.
2 Scanning & Recovery
In the interface, you can do many things, including pinpointing the specific files quickly, previewing files, and most importantly, recovering data. Now, let’s show them one by one.

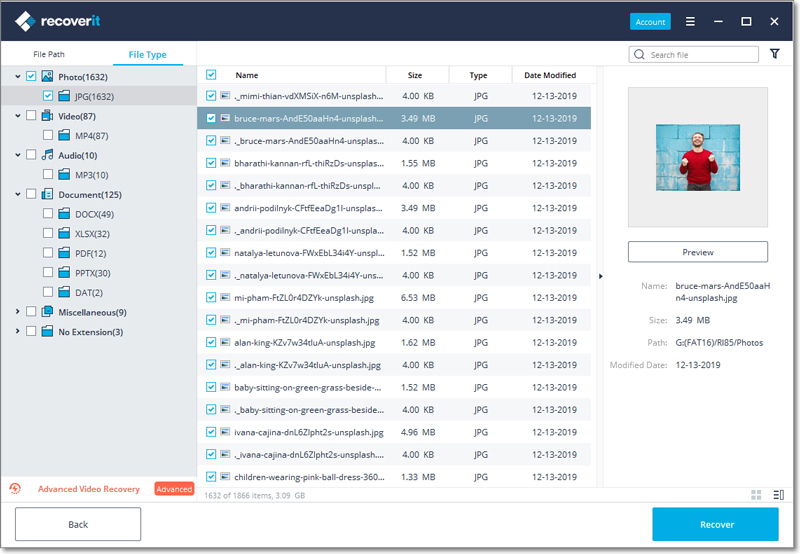
Pinpoint specific files
Recoverit offers multiple filtering and searching options to help you pinpoint some specific files you want to retrieve back, among a mountain of necessary or unnecessary data. It will greatly save your time and effort.
As shown on the below image, there are 4 options in total that can help you filter and precisely find the wanted files more quickly and easily.
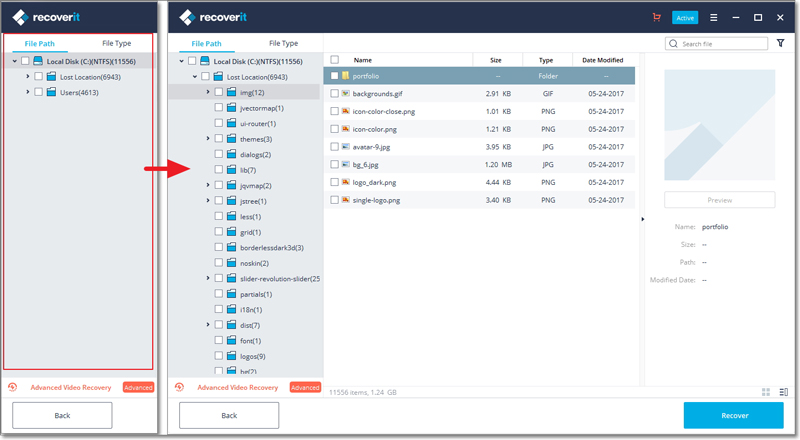
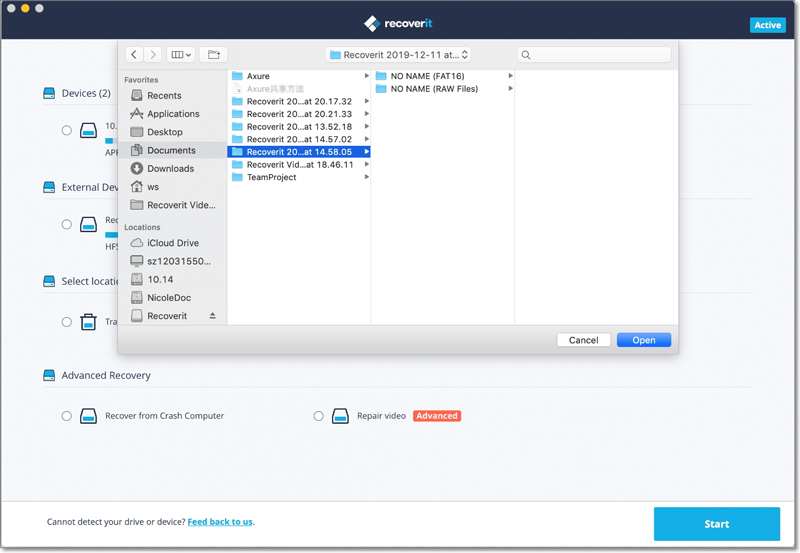
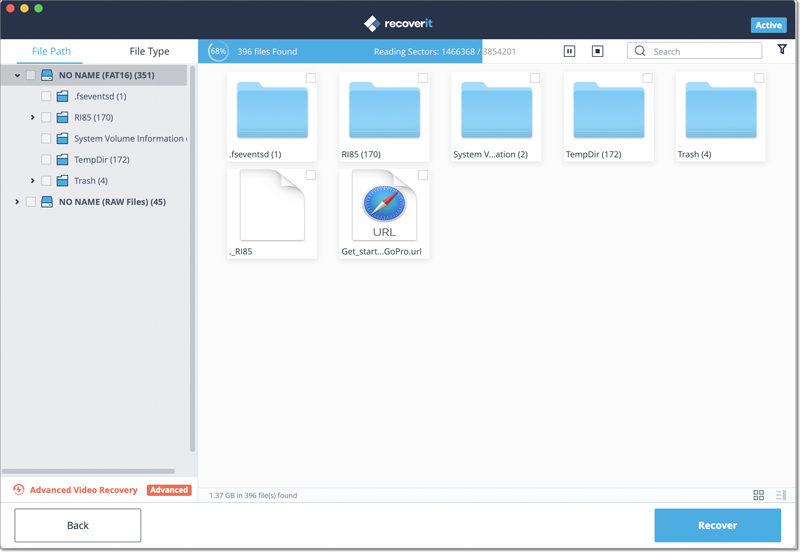
Option 1: File Path
If you know somewhere your data gets lost on the selected hard disk, go to “File Path” to recover data from some specific locations.
Recoverit will show different file systems on the hard disk you select before for scanning, for example, NTFS, FAT32 and Raw Files. You can directly click the systems > “Recover” to get back all the data stored in it.
Also, clicking the “>” button, Recoverit will expand all the concrete files and folders. To restore data, please check the location, select multiple folders, files or even a single file, and then click the “Recover” button.
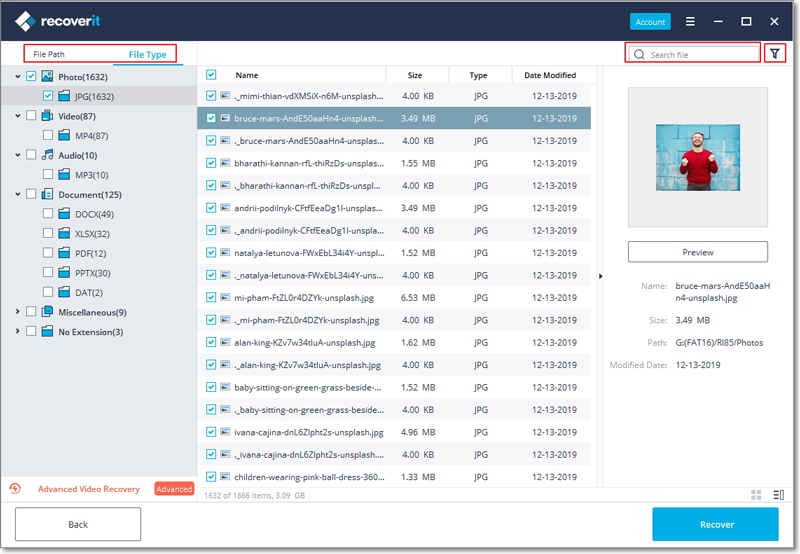
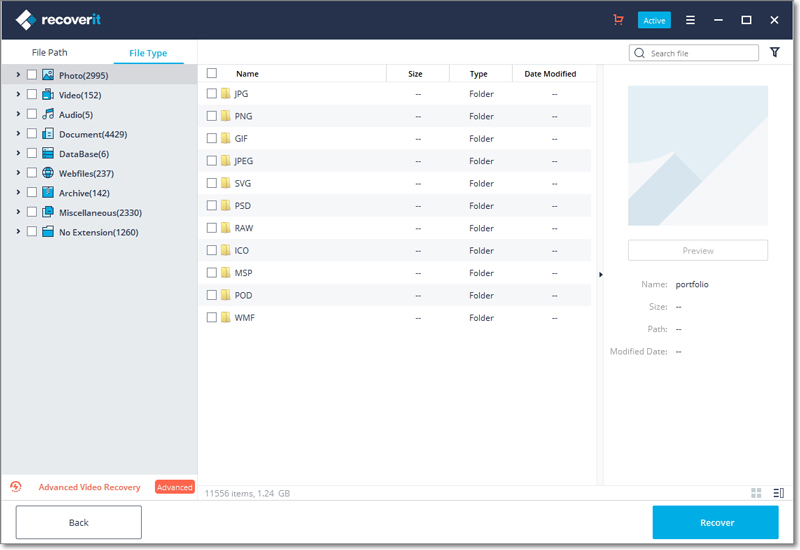
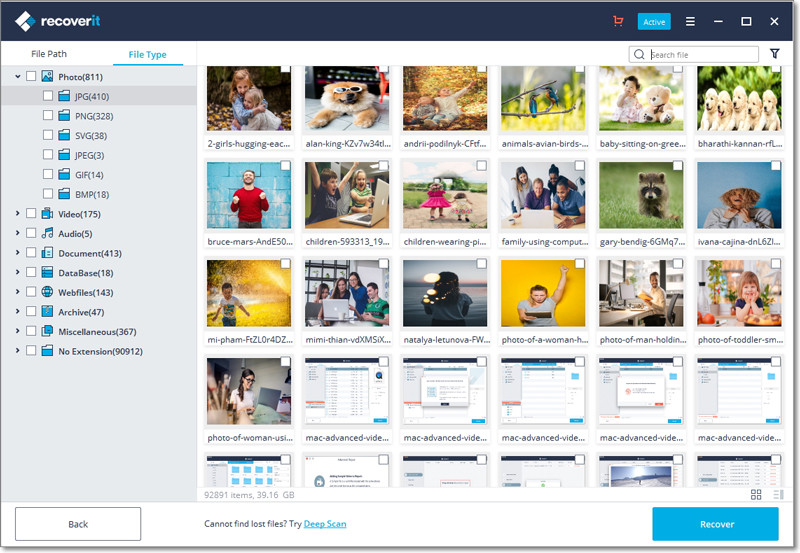
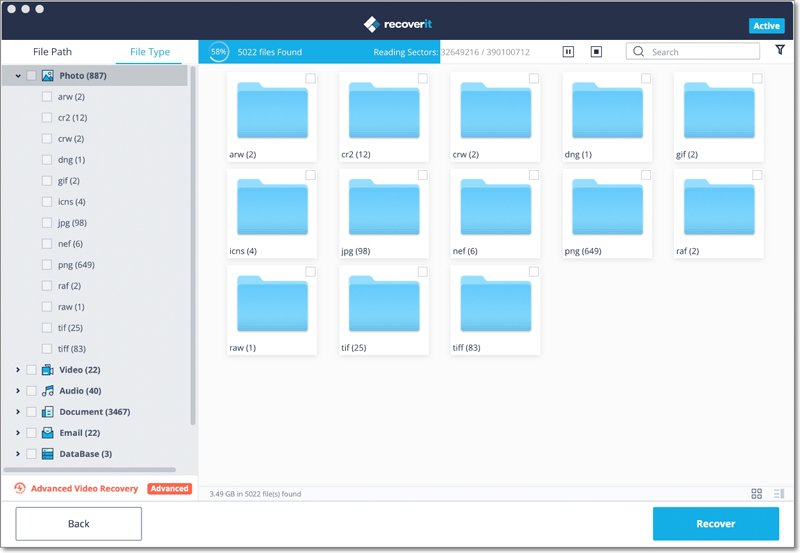
Option 2: File Type
As mentioned before, Recoverit supports to recover 1000+ types and formats of data, including photos, videos, audios, documents, Emails, DataBase, Webfiles, archives, data without extensions, and many more.
Recoverit allows you to recover only one or more types and formats of data. Clicking the “>” button, all formats of data stored on the selected hard disk will be expanded.
And you can even preview different formats of files, even watching a video, or listening to an audio. Amazing, right? Go to try it free right away.
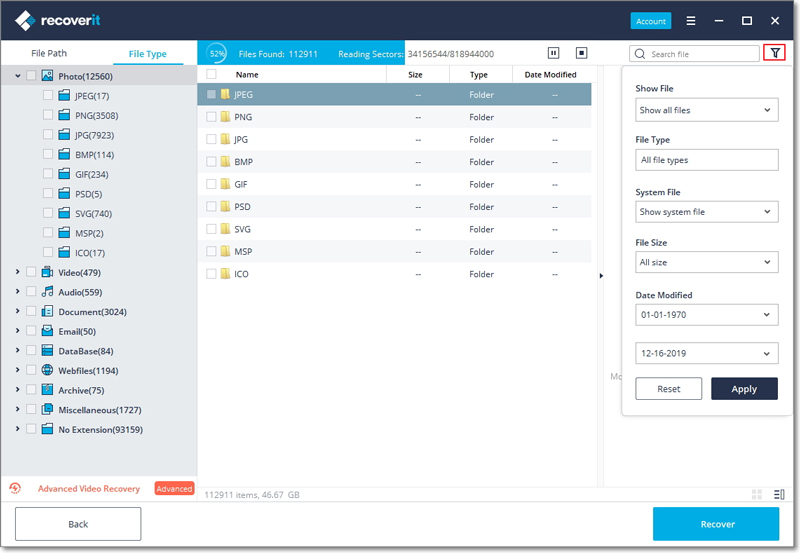
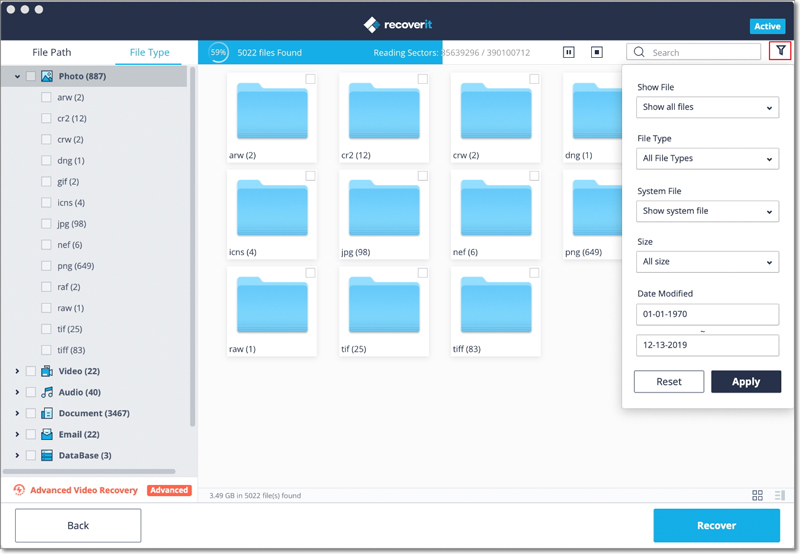
Option 3: File filter
Use the filter on the right, you can filter the extracted files on the basis of their type, file size, modification date, and other features to narrow down the results.
- Show Files: To show all files or just the deleted files
- File Type: Filter results for specific file types, such as photos, multiple file types, or view all file types
- System File: Toggle between the feature to show system files or hide system files
- File Size: To view all files irrespective of their size or files of a specific size (like 100-500 MB)
- Date Modified: This will let you filter files for specific dates on which they were modified
Option 4: Search file name or path
Keep the exact file name in your mind tightly? If yes, congratulations! Much of your time and effort is saved. Directly input the file name or some keywords in the searching box, and you can get the exact ones.
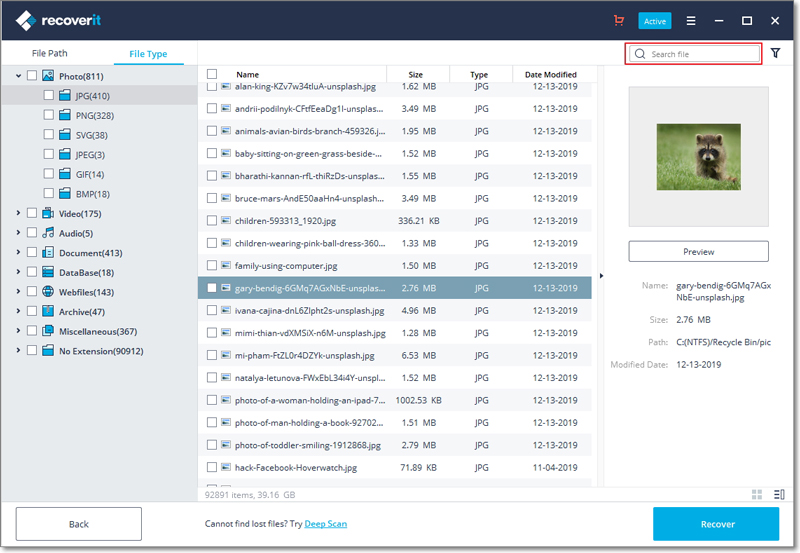
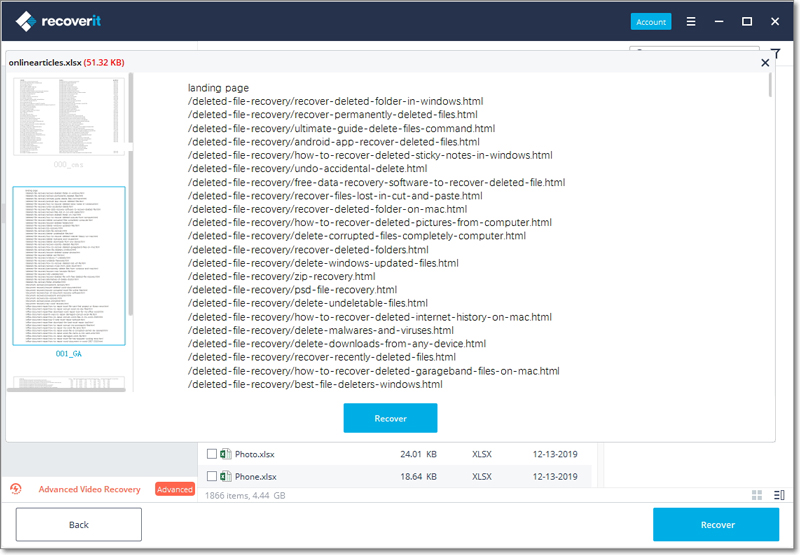
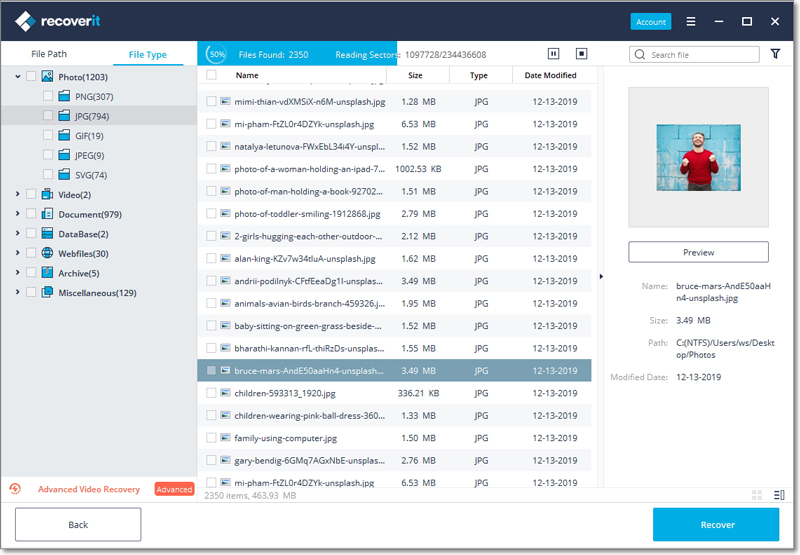
3 Preview files
We support you to have a preview and thumbnail view of data files during and after the scanning.
To do it, there are 3 ways, shown on the below image.
Method 1: Select a file and then click “Preview” on the right panel.
Method 2: Double click the file you want to preview and recover.
Besides, when you select and click a file, some information about it will appear, including its name, size, path and modified date. They can help you confirm if it is what you want.
Method 3: In the right bottom corner, there are two small icons, both of them supporting different types of thumbnails.
3.1.2. Important Buttons
To smooth your data recovery job, the following buttons are of great help for you.
-
 Click the “Start” button to begin the scanning and recovery process.
-
 Click the “Back” button to go to the previous step, usually that will be to select another location.
-
 Click the “Preview” button to preview files before recovery.
-
 Click the “Recover” button to recover and save your lost data.
-
 The 3 buttons appear during the scanning process. If you want to suspend the process, click the first button; to terminate it, the second one; to continue it, the third one.
-
 Change the way to preview data through the two buttons.
-
 Click this right arrow button to expand more information.
-
 Click the downward arrow to show or hide the drop-down menu.
-
 The Menu button includes many helpful options, such as Language, Disk Tools, Log Files, etc.
Language:
We support multiple languages, including English, Japanese, Chinese, French, German, Italian, Portuguese, Spanish, Arabic, Dutch, Korean, etc.
Disk Tools:
When clicking it, you’ll be directed to the Disk Manager, where you can know the hard disk status.
Log Files:
They record the history of scanning and recovery via Recoverit. You can view them to check something wrong with your device or data.
3.2. Recover Data on Windows
Losing data is not a rare matter for most of us. Recoverit Data Recovery for PC can help you recover 1000+ types and formats of data in different storage devices, including your Windows computer hard drive, Desktop, Recycle Bin, external devices and even a crashed computer. It also provides dedicated features like advanced video recovery to get back your lost videos. Also, the application includes a video repair tool that can repair corrupted videos under different scenarios.
For more information, you can turn to the first part – what Recoverit supports.
3.2.1. Launch Recoverit on Windows
To recover files, it is necessary to launch Recoverit on your computer.
- To make Recoverit Data Recovery run on a Windows computer, please double click the “Wondershare Recoverit” icon on the Desktop.
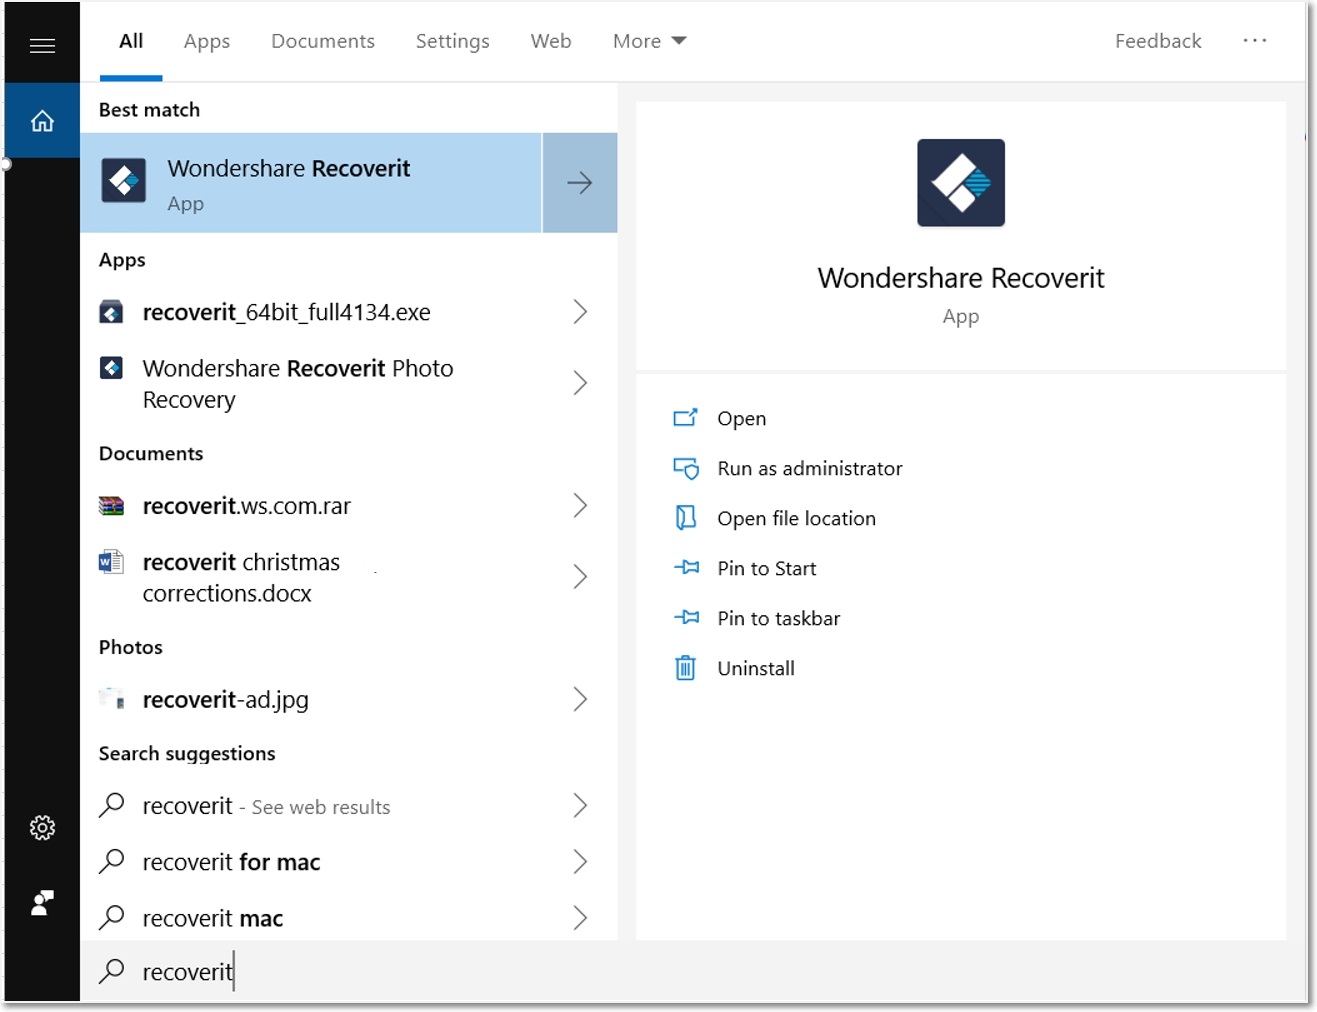
- If Recoverit is not on the Desktop, you can enter "Recoverit" in the search box on your Windows computer. And then click on the App or Choose to "Open" it. The below image is an example on Windows 10.
3.2.2. Recover Files from Windows Computer
To recover data on a computer, please follow the 3 steps.
- Select a location
- Scan the location
- Preview & recover data
Step 1 Select a location
- To recover data on a computer, it is necessary to choose a location where you lost data.
- Here, please select a hard disk under the “Hard Disk Drives” tab, or Desktop under the “Select location” tab.
- Click "Start" to begin the scanning on the selected location.
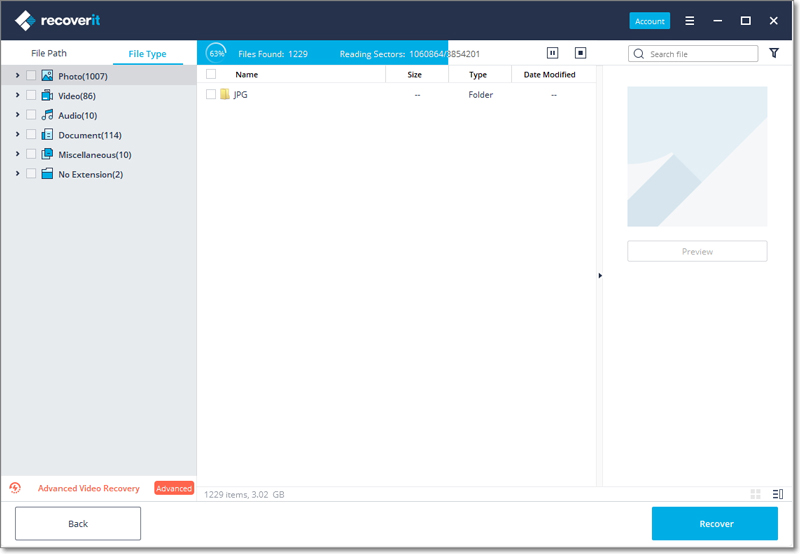
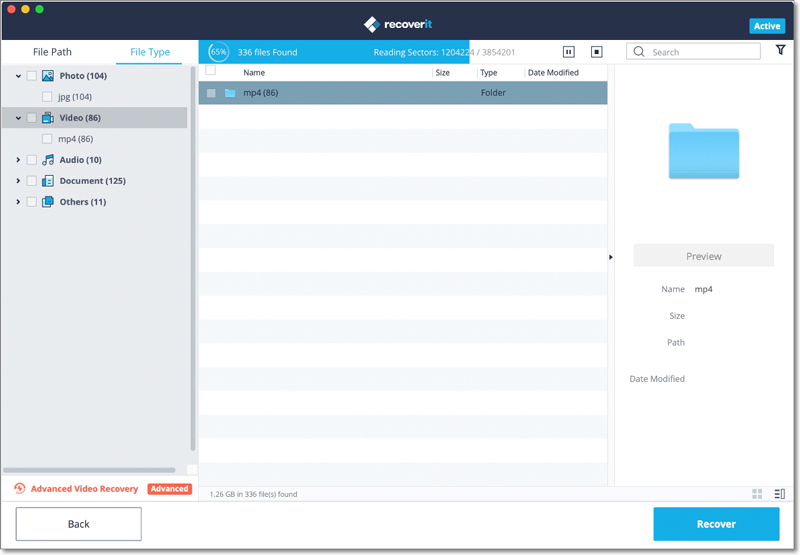
Step 2 Scan the location
Recoverit will start an all-around scan. Usually, it will take a few minutes to finish the scanning. Sometimes, a few hours are required if many large-sized files are present.
During the scanning process, you can also pinpoint files or stop the scanning for your convenience.
If you are looking for lost or deleted videos, then you can click on the “Advanced Video Recovery” option that is located at the bottom-left corner on the interface. Simply click on it to perform a deep scan to look for large-sized videos. You can know more about the Advanced Video Recovery feature later in this tutorial.
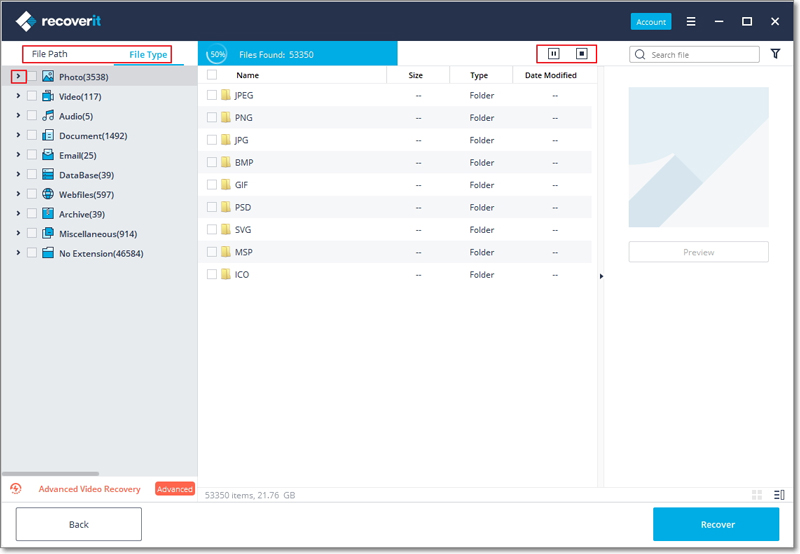
1 Pinpoint files during the scanning
During the scanning, you can toggle between different ways to filter, select and pinpoint the files you want to recover. The ways are respectively "File Path" and "File Type". By the way, to get more details, you can click the rightward arrow.
File Path is the route on the computer to store the data. For example, “C:\Program Files\Wondershare\Wondershare Recoverit Pro\log”.
File Type is the types and formats of data. The file type can be photo, video, audio, document, email, DataBase, Webfiles, archive, miscellaneous and no extensions. The file format, put it simply, is the specific extensions of different types of files, such as JPG, PNG, MP3, MP4, XLSX, DOCX, etc.
If the results are overwhelming and you get a lot of files, then you can use the filters on the right. You can filter the extracted files on the basis of their type, file size, modification date, and other features to narrow down the results.
- Show Files: To show all files or just the deleted files
- File Type: Filter results for specific file types, such as photos, multiple file types, or view all file types
- System File: Toggle between the feature to show system files or hide system files
- File Size: To view all files irrespective of their size or files of a specific size (like 100-500 MB)
- Date Modified: This will let you filter files for specific dates on which they were modified
2 Pause or Stop the scanning
Even if Recoverit starts to scan the selected location for your lost data, you can pause or stop it at any time. You can suspend the scanning temporarily by clicking the pause button - , and continue the process after clicking the play button -
 .
.
If you have found something you want, you can stop the process at any point by clicking on the stop button - .
.
Step 3 Preview and recover files
Recoverit allows users to preview the recoverable files before proceeding to the recovery step. You can select the targeted files and click the "Recover" button to retrieve your files back.

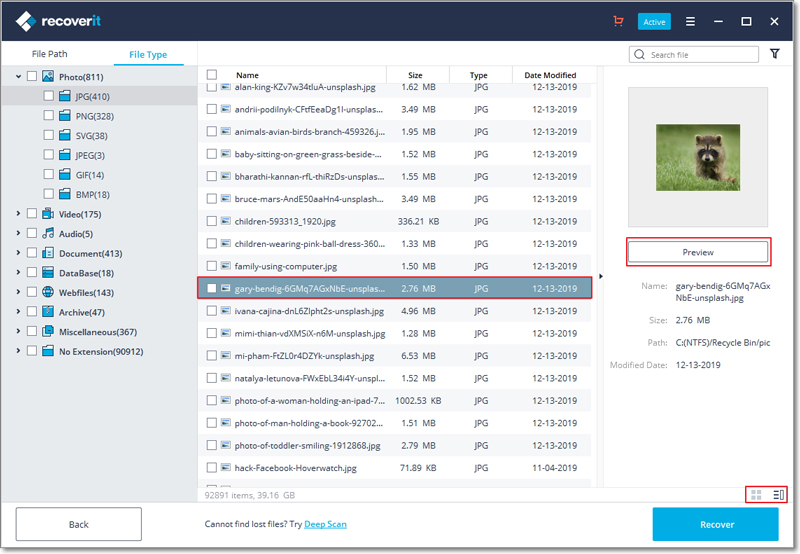
1 Preview files after the scanning
As a Recoverit user, you can preview data by clicking on the file. A thumbnail will show you on the right panel.
Besides, a preview window will pop up after clicking the “Preview” button or double clicking a file.
Moreover, when you click on the file, some information about the file can display, including the file name, file size, file path and the modified date.
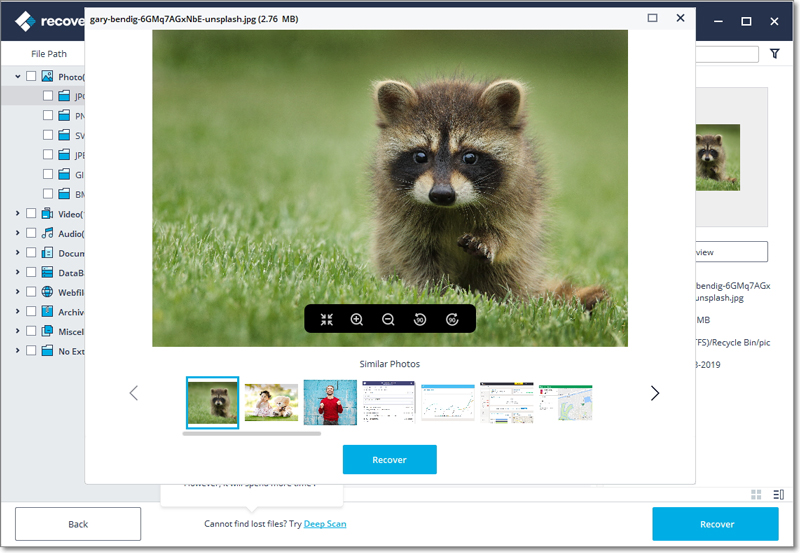
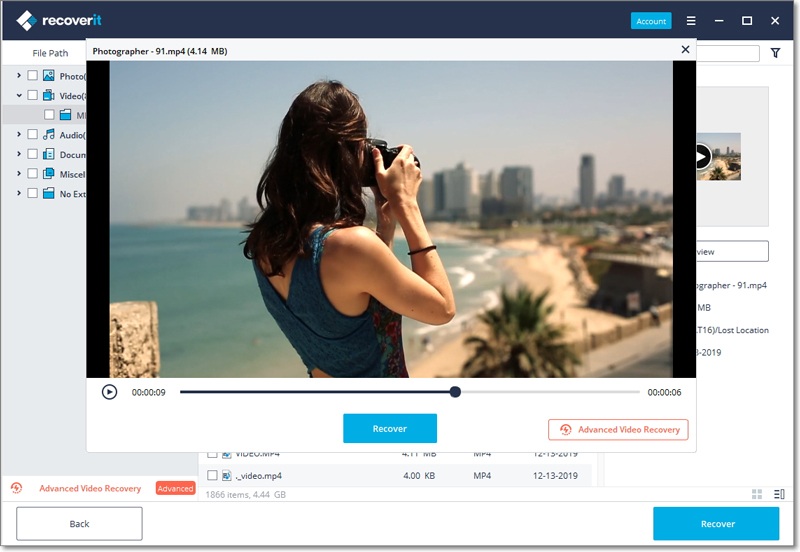
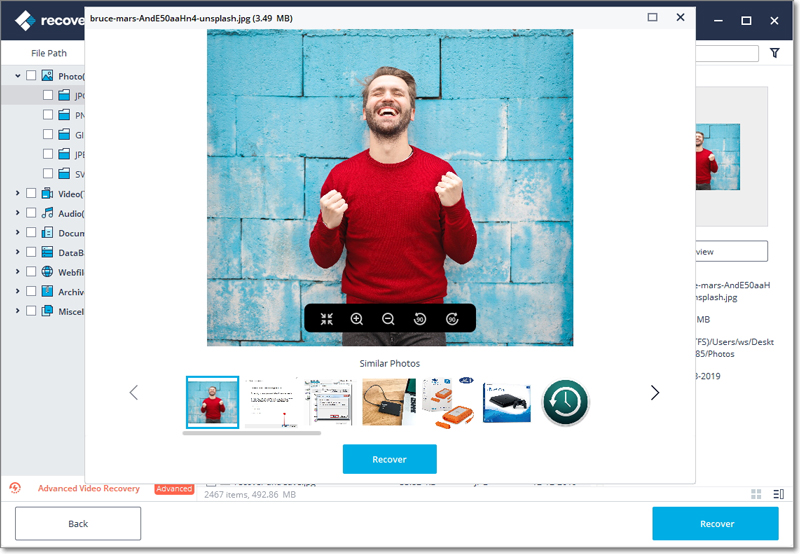
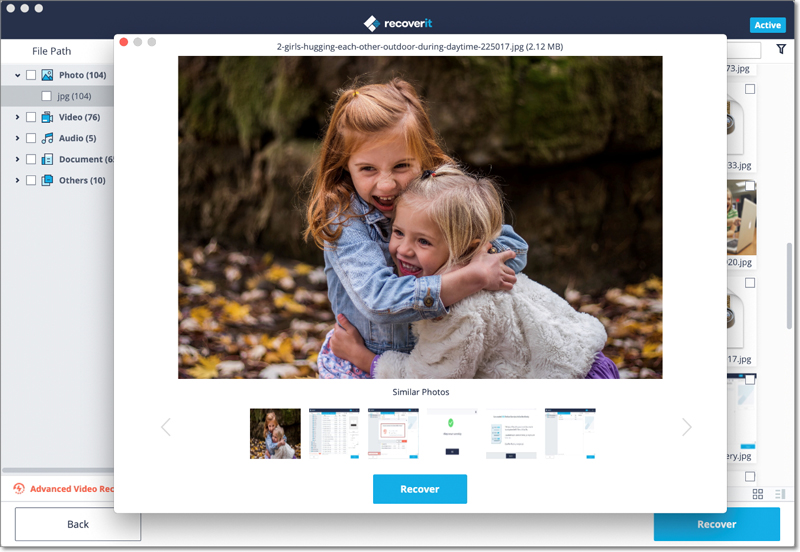
Recoverit provides a wide preview for photos on its interface. The interface also displays other similar photos for our reference at the bottom. Additionally, it also gives us an option to view the photo on full screen, zoom in, zoom out, or rotate it.
Recoverit supports to preview almost all the common types of files, such as images, videos, audios, Outlook emails, documents, and many more.
• Preview a Photo
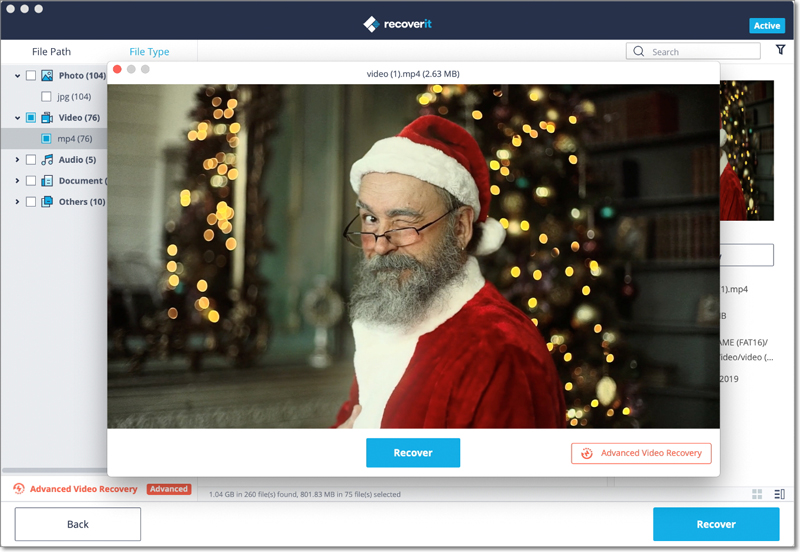
• Preview a Video
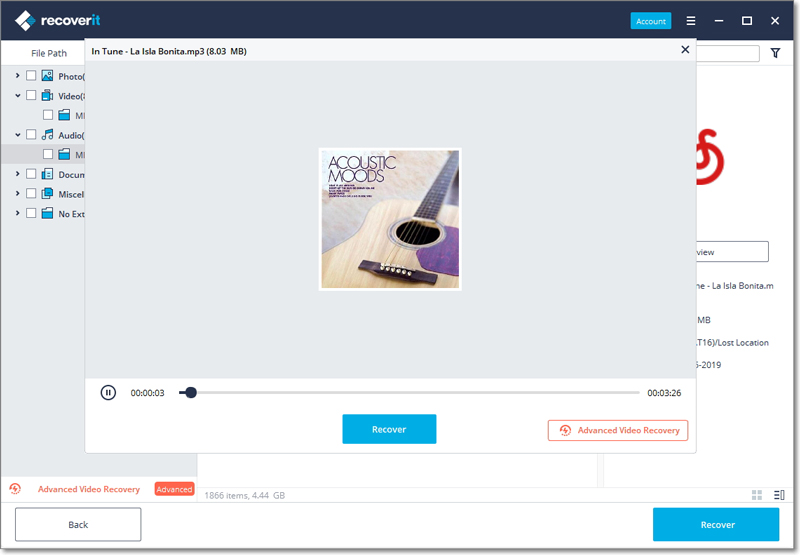
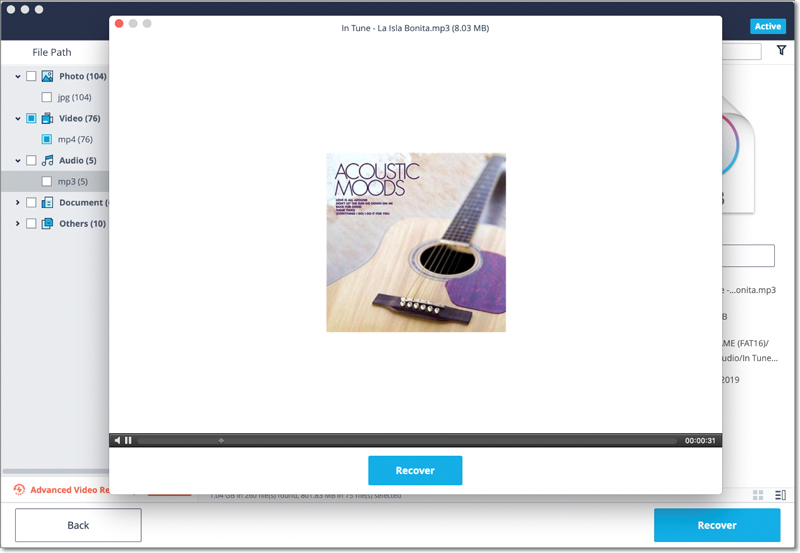
• Preview an Audio File
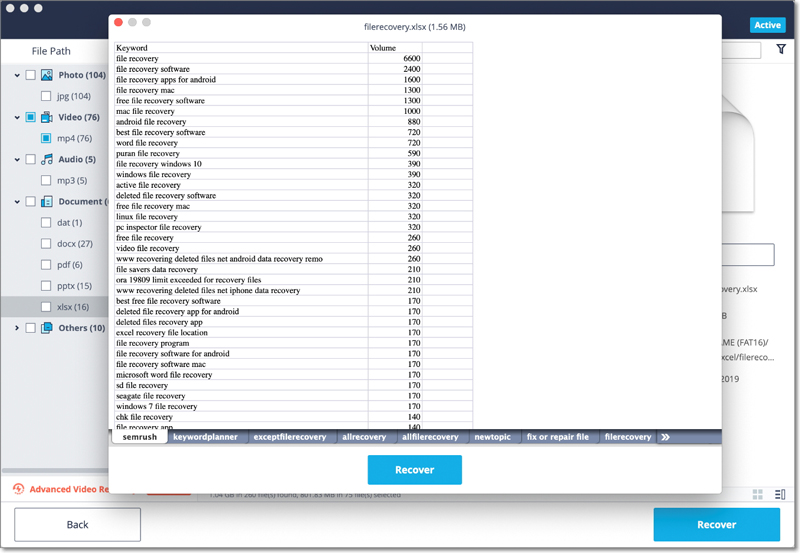
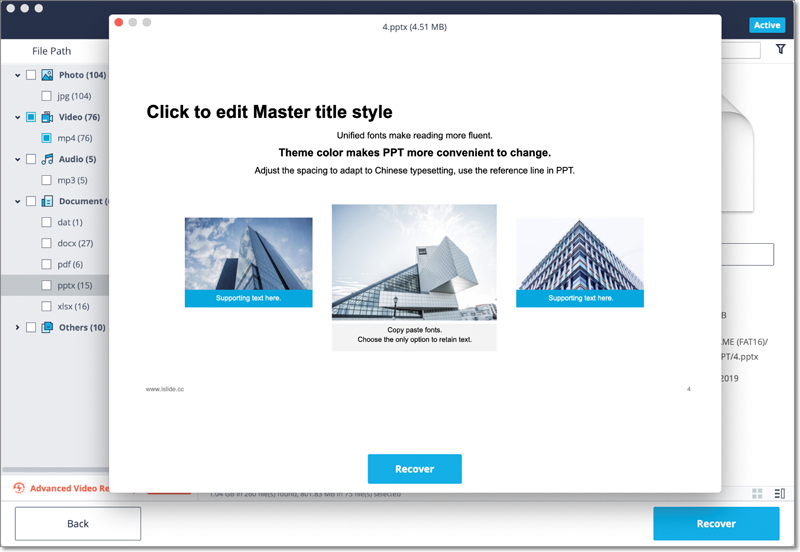
• Preview a PowerPoint File

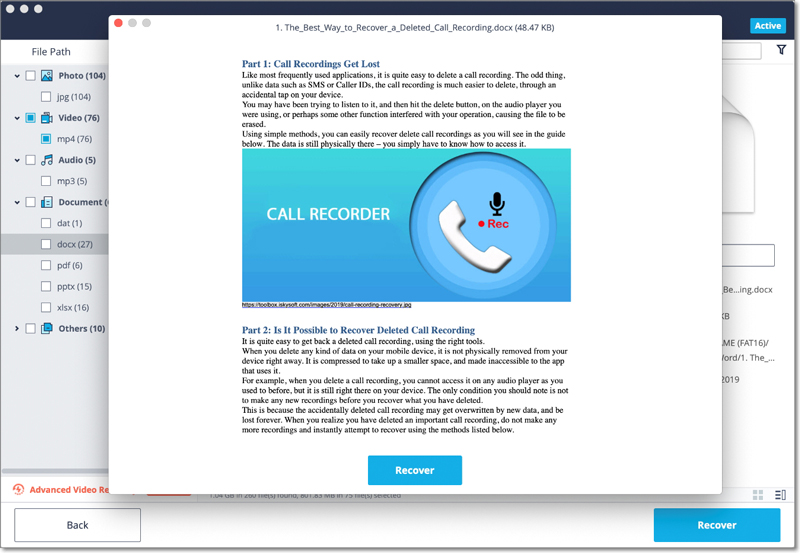
• Preview a Word File
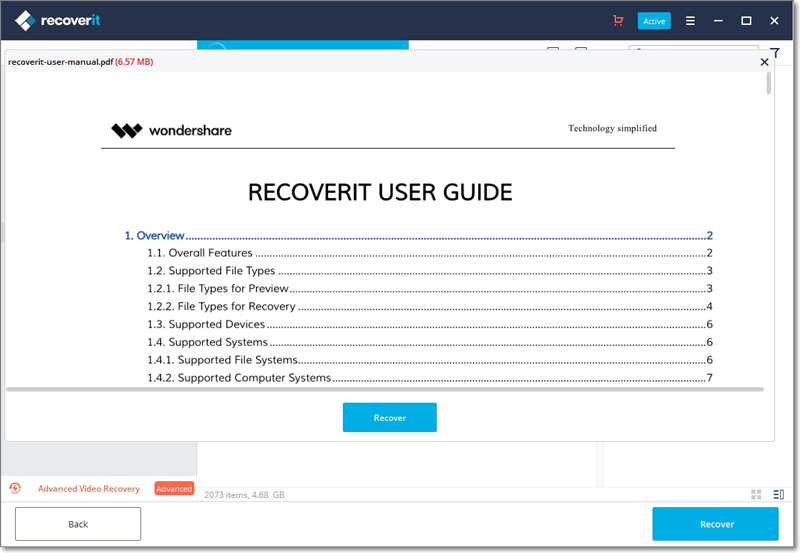
• Preview a PDF Document
• Preview an Excel File
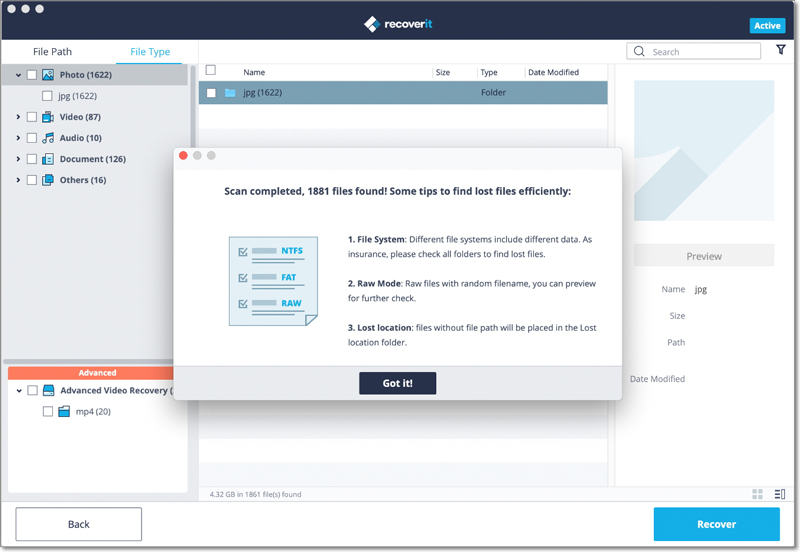
If you are not able to preview the files, we offer some inbuilt tips for you. Follow them and get the problems fixed. You can get the exact details in the page: Preview files with Recoverit
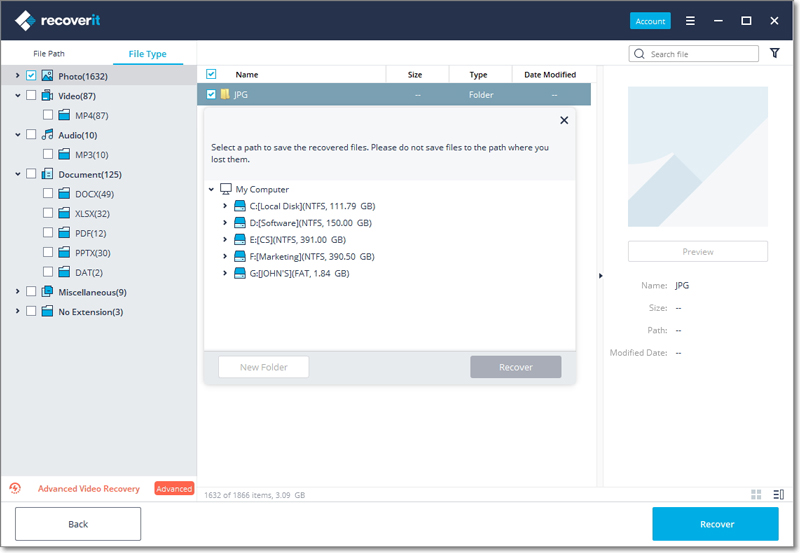
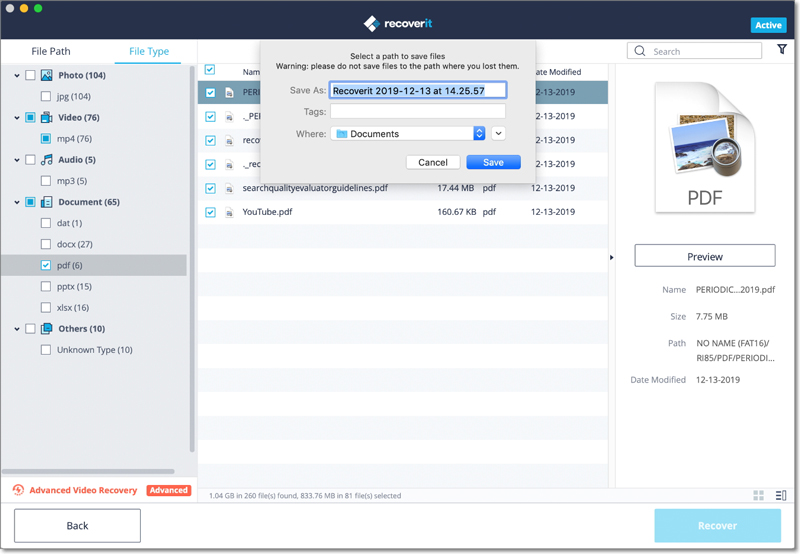
2 Recover Files from Windows Computer
After previewing the files and confirm they are what you want, you now can get them all back using Recoverit.
Directly hit on the “Recover” button to retrieve your lost data back and choose a path to save the recovered files.
Please do not save the files into the hard disk where you deleted or lost the data.
Note: The steps imply for recovering data from a Windows computer's internal hard drive. If you need to get data back from Recycle Bin, external devices or a crashed computer, please read a little further.
3.2.3. Do Advanved Video Recovery
The application also provides a provision to look for large-sized and complex videos with the help of its deep video scanning feature.
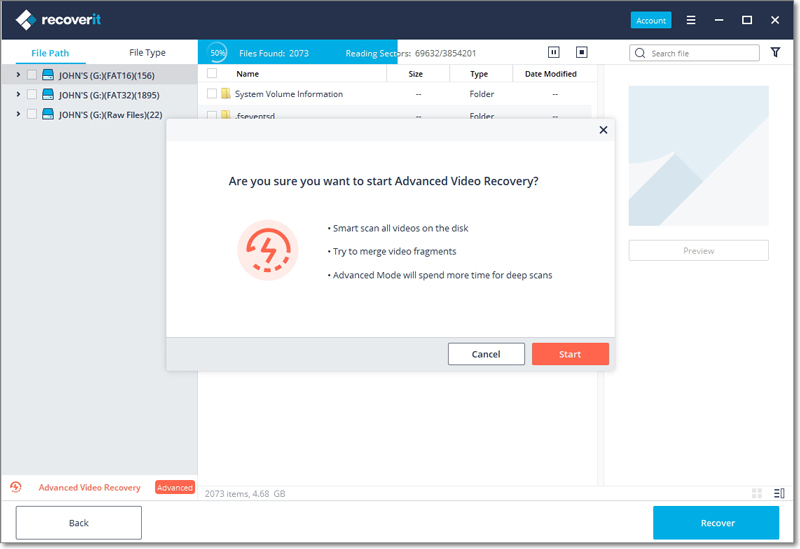
Step 1 Select the “Advanced Video Recovery” option
To start with, you need to select the Advanced Video Recovery option that would be displayed in two different ways.
From the bottom-left corner: During the scanning process, you can view a feature for “Advanced Video Recovery” listed at the bottom-left panel of the interface. You can just click on it to load the feature.
From the video preview window: As you would open the window to preview a video, you can view an “Advanced Video Recovery” feature at the bottom. Just click on it to launch the option.
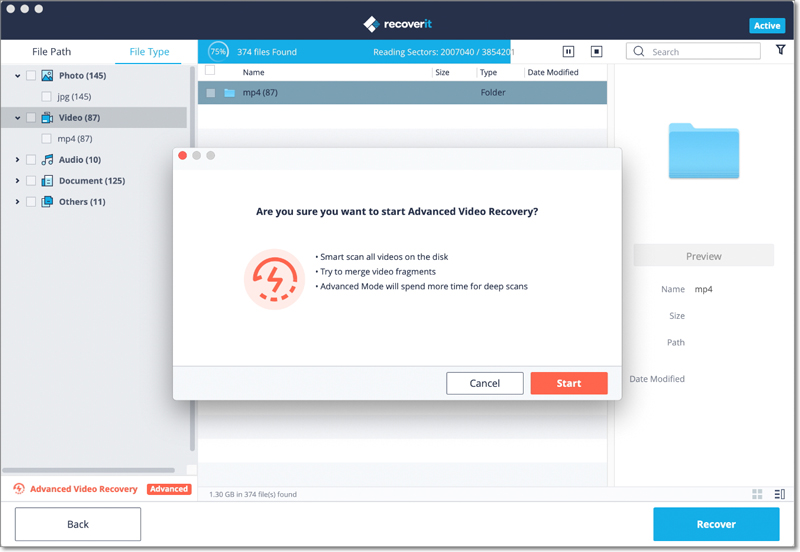
As you would launch the Advanced Video Recovery feature, you will get the following prompt informing you about its operation. It is a smart scan that can merge video fragments and will take more time to complete the scan. Just confirm your choice and click on the “Start” button to proceed.
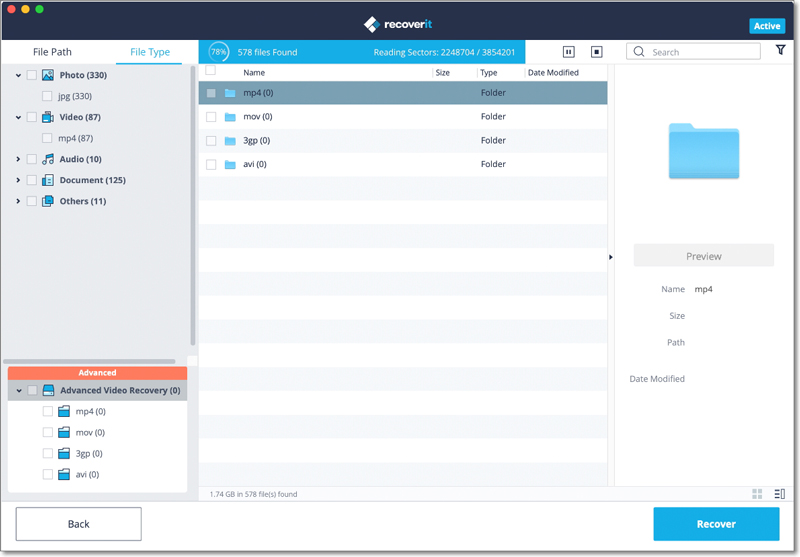
Step 2 Perform Deep Scan for the Videos
Simply wait for a while as the Deep Scan will take more time to merge and splice the video fragments to recover them. You can view the scanning results and pause/stop them whenever you want. You can also pinpoint the results, search for specific files, and use the available filters to narrow down the scan.
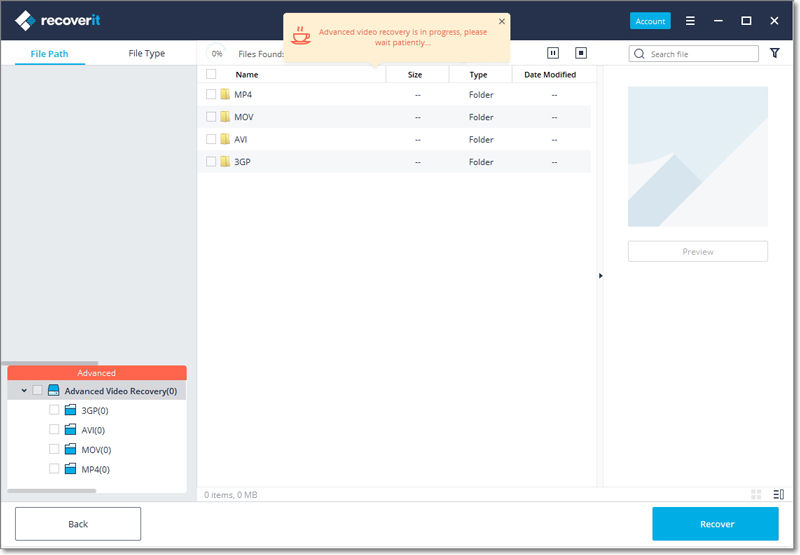
Note: Please wait patiently when the Advanced Video Recovery is in progress. Don't quit the program as it may interrupt the scanning and recovery.
Step 3 Preview and Recover
The application will display the results of the Advanced Video Recovery and will let you preview them. You can look for specific videos and view them on the interface of Recoverit. Select the videos that you wish to save and click on the “Recover” button. This will open a browse window so that you can select a location to save the video files. It is recommended to save them to another secure location and not where you lost them originally.
3.2.4. Restore Files from Emptied Recycle Bin
Each time the files are deleted from your computer by choosing the "Delete" option, they go to the Recycle Bin. The lost files can come from different sources of your computer, including the internal hard drive, partitions, sectors, and even external devices.
To recover the permanently deleted or emptied data from the Recycle Bin, scanning the whole computer is unreasonable. It will result in a very long scanning time.
To save the scanning time, there are two scan modes for Recycle Bin recovery, namely all-around scan and deep scan. Once you find nothing through the all-around scan, you can turn to the deep scan mode. The deep scan will deeply search for your lost data.
Step 1 Select the Recycle Bin
To restore recycle bin, recover emptied recycle bin or retrieve permanently deleted files on a computer, you should select the recycle bin as the target location.

Step 2 Scan the recycle bin
As mentioned before, there are 2 scan modes to scan and recover files from the Recycle Bin.
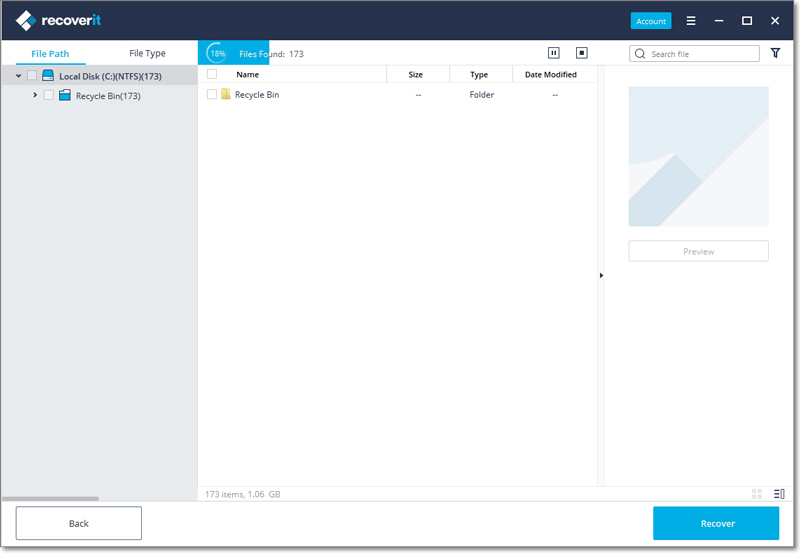
1 All-Around Scan
It will automatically start an all-around scan to search for files from recycle bin. Usually, the scan can meet your needs of lost data.
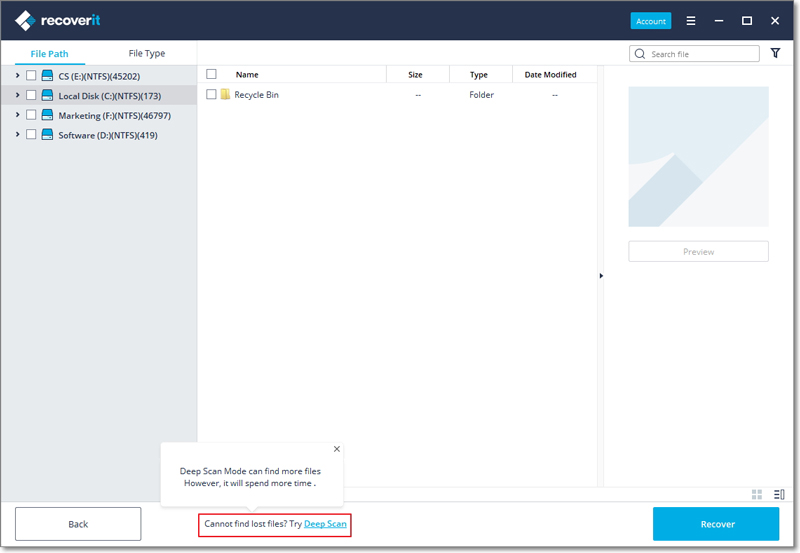
2 Deep Scan
After the all-around scan, if you still find nothing desired, you can resort to the deep scan mode to deep dig out more lost data from Recycle Bin.
During the scanning, you can filter the files from the file type categories on the left bar. The same, you can choose to pause or stop the scanning process at any time.
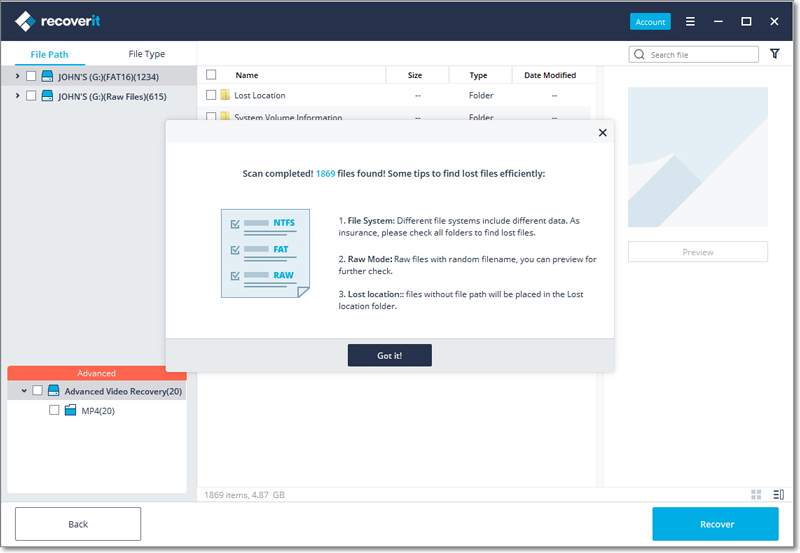
Simply let the application scan the files and don’t close it in between to get better results. Once the scan is completed, you can preview your files.
Step 3 Preview and recover your data
1 Select a file or files
Once the scan is completed, Recoverit will list all the files by classifying the file types on the left. You can filter and locate data through the options:
- Show Files: Show all files or just the deleted files
- File Type: Get results for specific file types (like photos), multiple file types, or all types
- System File: View all system files or hide system files
- File Size: Filter results to view all files (irrespective of their size) or files of specific sizes
- Date Modified: Specify the dates on which the files were modified the last time
2 Preview data
Before recovery, it would be better if you take advantage of the preview feature to confirm if the files are what you want.
- Thumbnails
- Double click the file
- Click on the “Preview” button
-
Toggle the 2 preview methods:
3 Recover and save files
Finally, you can select the targeted files and click “Recover” button to retrieve your data back from recycle bin.
Please do not save the recovered data on the same location to avoid data overwriting.
3.2.5. Recover Data from External Devices
If your data gets lost from an external device on Windows computer, Recoverit can also help you recover them. The external device can be an external hard drive, memory card, SD card, digital camera, Drone camera, USB flash drive, music player, sound recorder and so on.
Step 1 Connect the external device
Before getting Recoverit started, you need to connect the external device to your computer. Make sure that it can be recognized or detected.
Step 2 Select the external device
To recover lost or deleted files from the removable storage media, please select the device as the target location. And then hit on the “Start” button to move forward.
Even though the partition on the device has got lost, you can still use Recoverit to bring the lost data back.
Step 3 Scan the external device
An all-around scan will be launched on the external storage media. Wait a few minutes to finish the scanning. During the process, you can locate the targeted files, as well as pause or stop it.
Step 4 Preview and recover files
Once the scanning ends, you can preview the files from the scanning result. To get the files back, click “Recover” and save them into another safe location.
3.2.6. Recover Data from Crashed Computer
If your system is crashed or stops working in an ideal way, then you can get Recoverit to retrieve back your lost or inaccessible data. Download and install Recoverit on a working computer, prepare a blank USB drive or CD/DVD and connect it to the computer.
Step 1 Preparations for Crash Recovery
- Another working computer
- A blank USB drive or CD/DVD
- Connect the device to the computer
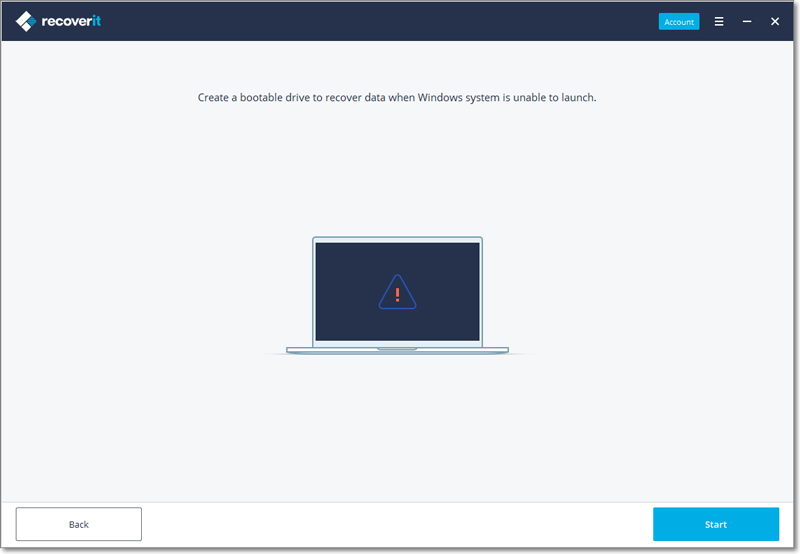
Step 2 Create a bootable media
To recover data from an unbootable computer, you need to create a bootable media to start it up first. Now, let’s have a look at how to create a bootable drive.
1 Start computer crash recovery
The first step is to launch the data recovery software on a working computer and choose "Recover from Crash Computer" under the last tab. Click "Start" to go on.
If you are unable to launch your Windows computer, you can use Recoverit to create a bootable media and recover data.
Make sure a blank USB drive or CD/DVD is connected to the working computer and can be recognized. If yes, click “Start” to go on.
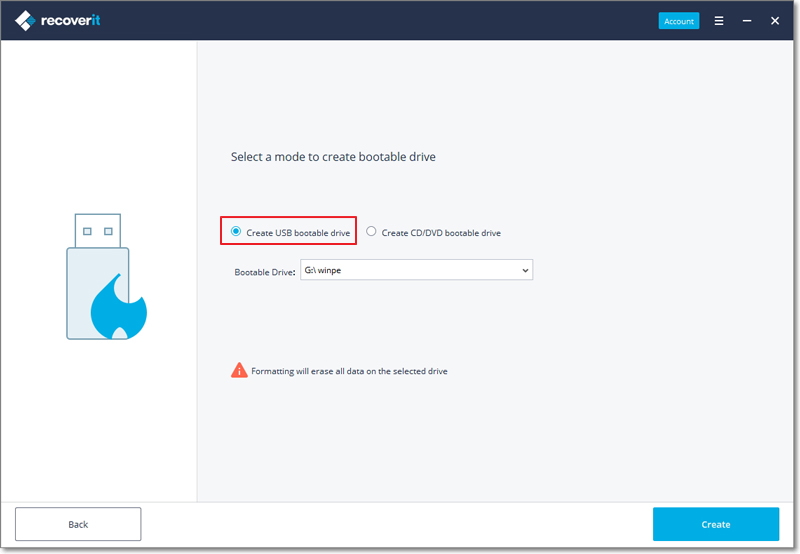
2 Select the type of your bootable drive
Then, select a mode to create a bootable drive. You can select USB bootable drive or CD/DVD bootable drive. If the bootable media is connected, it will show on the Bootable Drive. Click the "Create" button to start.
3 Backup and format data
Once you choose to create USB bootable drive or create CD/DVD bootable drive, an alert message about formatting USB flash drive will pop up.
Make sure you have backed up your important data before formatting the media. Click "Format " button to confirm.

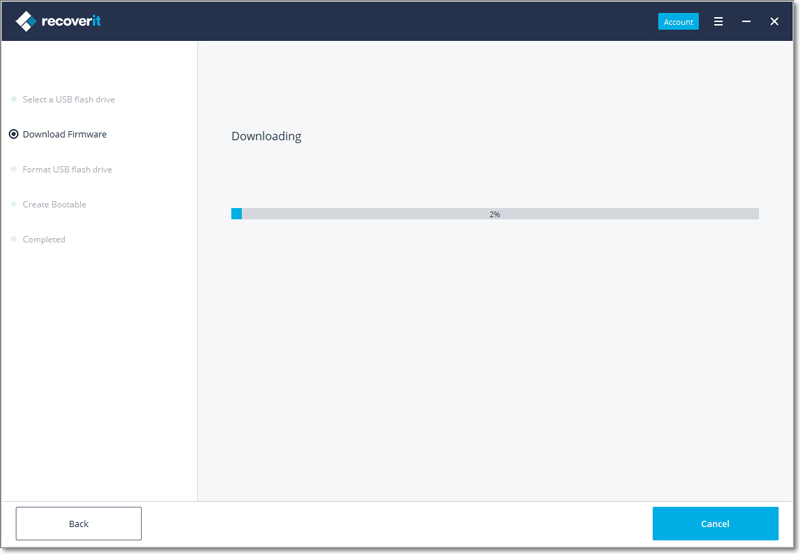
4 Downloading Firmware
On clicking the “Format” button, you can see an interface showing that the firmware is downloading. Firmware is a specific class of computer software embedded in some hardware devices. To create a bootable drive, the specific firmware is indispensable.
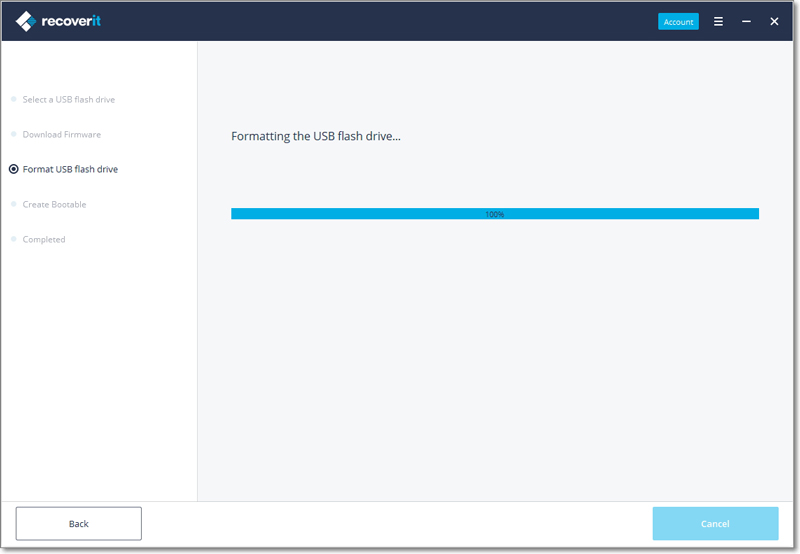
5 Formatting the bootable drive
Once Recoverit downloads the firmware successfully, it will start to format your bootable drive, like the USB flash drive. Formatting a device will erase all the data stored on it. So keep the data backup in mind.
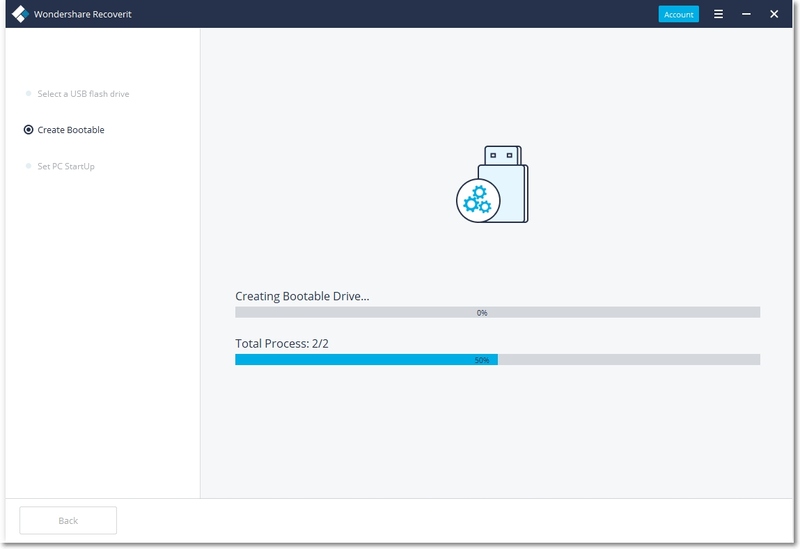
6 Creating the bootable media
It will just take a few minutes to finish the process of creating a bootable drive. During the process, please do not eject the USB flash drive or pull out the CD/DVD drive.
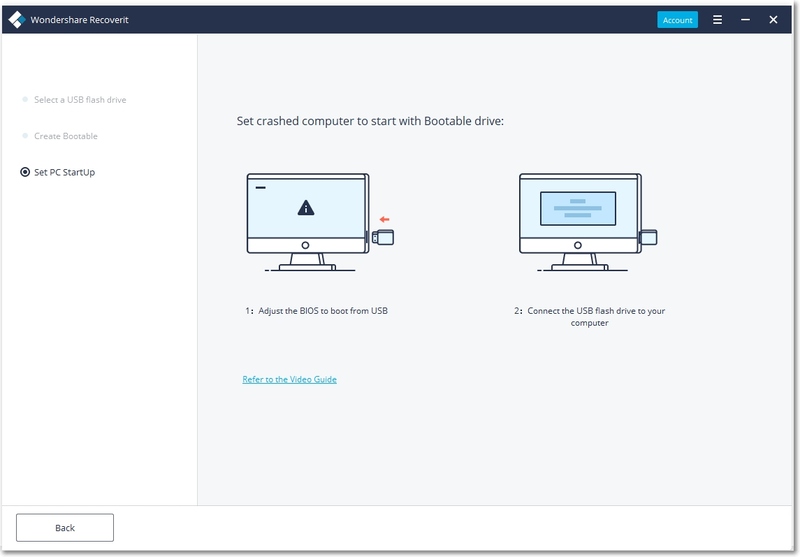
7 Finish creating the bootable media
Now, the bootable drive used to boot your crashed computer up is created. What you need to do next is to follow the below steps.
- Adjust the BIOS to boot from USB/CD/DVD drive: restart your crashed computer and press the BIOS entry key when the first screen displayed.
- Connect the USB flash drive or insert CD/DVD drive to your computer.
- Restart your computer and start to recover data from the crashed system.
Step 3 Recover data from crashed computer
After following the above steps, you’ll find that the crashed computer becomes bootable now. Restart the computer and recover lost data in 3 steps.
1 Select a location
To save the scanning and recovery time, please select a hard disk where you lost data. Click “Start” to go on.
2 Scan the location
Please wait for a while until the scanning is over. Usually it lasts for a few minutes.
3 Preview and recover data
Finally, you can preview the files, select the wanted ones and click “Recover” to get them all back.
Notes: You can make the preview of different types and formats of data, such as photos, videos, audios, documents and many more.
After recovering data, please save them to another safe location, like an external hard drive or removable device.
3.3. Recover Data on Mac
Recoverit Data Recovery can recover 1000+ types and formats of data from all storage devices in a variety of data loss situations. The main file types can be photos, videos, audios, documents, archives, emails and many more. The storage devices include Windows or Mac hard drive, external hard drive, USB flash drive, SSD, digital camera, Drone camera, SD card, CF card, etc. It can also repair corrupted video files via its inbuilt video repairing tool as well. For more information, you can turn to the first part – what Recoverit supports.
3.3.1. Launch Recoverit on Mac
The same is that we need to launch Recoverit before recovering data on Mac.
To launch Recoverit Data Recovery on Mac, double click the “Recoverit” icon on the Mac Desktop.
Not there? Please go to “Finder” > “Applications” > “Recoverit” and double click the software. For those who set a password, please input the password and press “Enter” or “Return” to enable Recoverit.
3.3.2. Recover Files on Mac
Generally, the steps on recovering data are very similar no matter which kind of computer you own, Windows or Mac.
To recover data on a Mac computer, please follow the 3 steps.
- Select a location
- Scan the location
- Preview and recover data
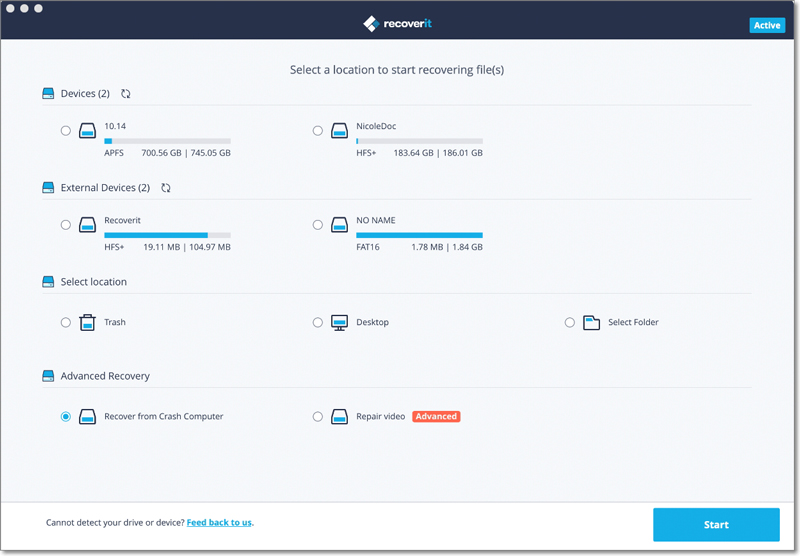
Step 1 Select a device
Launch Recoverit Data Recovery on your computer
To recover data from Mac computer, please select a drive under the "Devices" tab or "Desktop" under the "Select location" tab. Click on the "Start" button to move forward.

If you know the exact file path of your lost data, you can also choose "Select Folder" under the "Select location" tab. Afterward, click on the "Start" button to proceed.
Step 2 Scan the location
Recoverit will start an all-around scan. With the advanced scanning and searching algorithm, all your lost, deleted or formatted data can be found.
You can pause or stop the scanning process if you find your data at any time.
If you wish to recover large-sized or complex videos, then you can also click on the “Advanced Video Recovery” feature on the bottom-left corner of the screen. This will perform a deep scan, particularly to recover lost videos. You can read further to know about this feature in detail.
1 Pinpoint files during the scanning
In case the results would yield an overwhelming amount of data, then you can filter the results. There is a panel on the right that can help you filter the results on the basis of various parameters.
- Show Files: You can either view all files or just the files that were deleted
- File Type: This can filter results for specific file types (like photos), various file types, or all file types
- System File: To filter either all system files or hide system files
- File Size: You can view files of all sizes or a specific size (like 100-500 MB)
- Date Modified: To filter the files for the specific dates on which they were last modified
2 Pause or Stop the scanning
As the application would recover your data, you can pause or stop the process anytime you want. To simply halt the process, click on the pause button -  . You can later continue the process, by clicking on the resume button -
  .
If you are satisfied with the results and found what you were looking for, then you can suspend the process by clicking on the stop button -
.
If you are satisfied with the results and found what you were looking for, then you can suspend the process by clicking on the stop button -  .
.
Step 3 Preview and recover files
Recoverit allows users to preview the recoverable files before proceeding with the recovery step. You can select the targeted files and click the "Recover" button to retrieve your files back.
1 Preview files on Mac
Recoverit offers four options of previewing accessible data on Mac
- Thumbnails
- Click the “Preview” button on the right panel
- Double click a single file from the result menu
-
Toggle between the two preview angles -

As long as the file can be viewed on Mac and it is smaller than 15 MB, Recoverit can help you preview the files on Mac.
Recoverit also provides a bigger and better way to preview photos. It will display similar photos at the bottom panel to make it easier for you to recover your photos.
Preview an image
Preview a video
Preview an audio file
Preview a Word document
Preview an Excel file
Preview a PDF document

Preview a Powerpoint document
2 Recover and save Mac files
Once you preview your data and have got what you were looking for, click on the "Recover" button to restore your files. Select a different location to save the recovered files.
Please do not save the files on the hard disk where you deleted or lost the data before to prevent the overwriting of data.
Note: The steps are applicable for recovering data from Mac’ internal hard drive. If you need to get data back from Mac’s Trash, external devices or a crashed Mac, please read a little further.
3.3.3. Do Advanced Video Recovery
If you have lost your videos and can’t find them with the standard recovery method, then you can try the Advanced Video Recovery feature of Recoverit. It will perform a deep scan on the system and will let you get back heavy or complex videos with its advanced splicing algorithm.
Step 1 Select the “Advanced Video Recovery” mode
There are two different ways to launch the Advanced Video Recovery module of Recoverit.
During the scanning process, you can click on the “Advanced Video Recovery” option at the bottom-left corner of the screen.
Besides that, you can also access the Advanced Video Recovery feature from the video preview screen at the bottom of the interface.
Once you launch the Advanced Video Recovery option, the application will display the following prompt informing about its smart scan features. Simply confirm your choice by clicking on the “Start” button.
Step 2 Complete the Deep Scan operation
Wait for a while as the application would look for the needed video fragments and would recover your videos with its splicing technique. If you want, you can pause and resume the scanning or just stop the process whenever you want. There are also additional filters to narrow down the results.
Step 3 Preview and Recover
In the end, you can just preview the recovered videos on the native interface of Recoverit. Simply select the videos you wish to get back and click on the “Recover” button. This will open a browser window, letting you locate the folder where you wish to save the videos. It is recommended to save them to another location instead of its original location to avoid the overwriting of data.
3.3.4. Recover Files from Emptied Trash
Every time you delete a file temporarily, it is moved to Mac’ Trash. You can usually go to the Mac Trash to restore it afterward. However, if you delete files permanently or empty the Trash, Recoverit becomes an indispensable tool for you to get them back.
The data present on the Mac Trash can come from different sectors, partitions, hard drives or even external devices connected on Mac. Thus, scanning the Mac Trash for all data types will require a lot of time and bring some burden on your Mac.
To fix the problem, Recoverit offers 2 kinds of recovery modes, namely quick recovery and all-around recovery. The quick recovery mode is to scan some frequently used files on the Trash, while the all-around recovery mode can do the deep scan and even dig out the system files.
Step 1 Select the Trash
To restore Trash and retrieve deleted files from emptied Trash, select "Trash" under the "Select location" tab. Click "Start" to commence the scan.

Step 2 Scan the Trash
When it comes to Mac Trash recovery, there are two kinds of recovery modes. The quick scan will be initiated first. It will take you a few minutes to finish it.
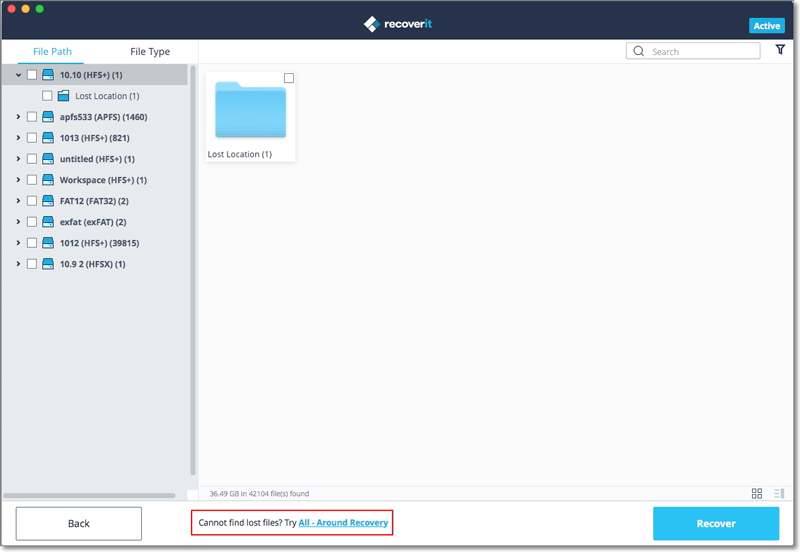
Can't find files on Mac Trash? Try All-Around Recovery.
If you cannot find the deleted or lost files, then you can try the "All-Around Recovery" option from the bottom of the interface. It will scan and search for more files from emptied Trash deeply, although more time is needed.
Sit back and wait as the application would scan your Mac and recover the data deleted from its Trash folder. You can preview your files and even halt the scanning process as per your requirements.
Step 3 Preview and recover your data
After the scanning, you can locate, preview and select files before recovery. Finally, click "Recover" to retrieve the files back.
1 Locate Files
Once the scan is completed, you can utilize the below features to locate some specific data more quickly.
- Show Files: To filter all files or just the deleted content
- File Type: Filter results for specific file types (like photos), multiple file types, or all view files of all types
- System File: To view system files or hide system files
- File Size: Filter results for specific file sizes or files of all sizes
- Date Modified: Enter a specific date when the files were modified the last time
2 Preview files with Recoverit
Recoverit supports to preview different types and formats of data, falling back on different options.
- Thumbnails
- The "Preview" button
- Double click a file
- Toggle between different preview modes
3 Recover and save files from Mac Trash
Then, you can select the targeted files and click on the "Recover" button to retrieve your data back from Trash.
After recovering files, please do not save them to the same location. A different location like external hard drive or any other source is recommended.
3.3.5. Recover Data from External Devices
Once you find the data stored on an external device gets lost, don’t worry! Recoverit can help you recover lost data from an external media on Windows or Mac computer. Regardless of the type and model of the external device, you stand a good chance of getting them back using Recoverit. For example, external hard disks, memory cards, cameras, music players, pen drive, etc.
Step 1 Select the external media
To recover lost or deleted files from an external media, you should choose it as the target location for data scanning and searching.

Step 2 Scan the removable media
An all-around scan starts once you make the choice. It usually takes a few minutes.
During the process, you can filter and locate files of your choice.
Step 3 Preview and recover files
After it, Recoverit provides the preview function for you before recovery. A variety of files can be previewed, such as pictures, videos, movies, audios, music, documents, and so forth.
Then, select one or more files you want to restore and click "Recover" to get all of them back.
3.3.6. Recover Data from Crashed Mac
Mac computer is less vulnerable to system crash compared to Windows computer. However, it does not mean the Mac crash will never happen. To recover data from a crashed or unbootable Mac, you need to boot it up at first.
Step 1 Preparations for Mac Crash Recovery
- A blank USB flash drive or CD/DVD
- A new computer that is working normally
- Connect the bootable media to the new computer
Step 2 Create a bootable media
To recover lost data on a crashed Mac, you have to use Recoverit to create a bootable drive for starting the Mac up. The below steps can help you do that.
1 Select Mac Crash Recovery
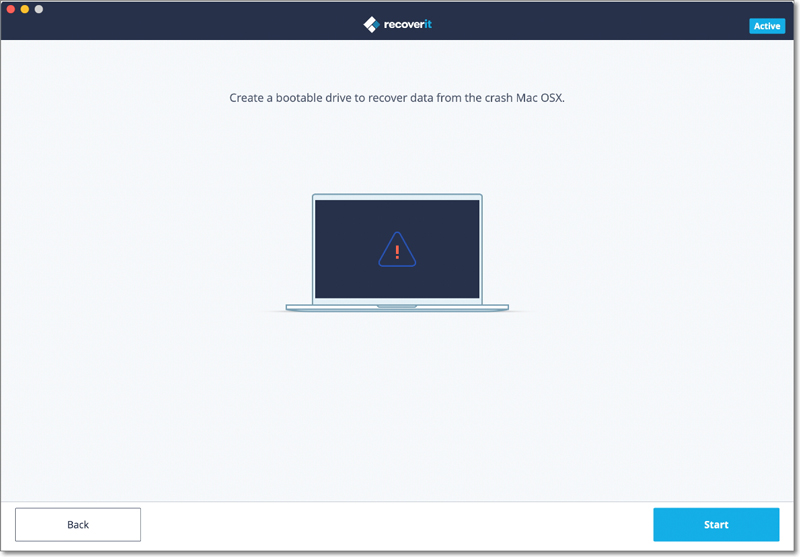
The first step is to launch the data recovery software on the new computer and choose "Recover from Crash Computer" under the last tab. Click "Start" to go on.
2 Start creating a bootable drive
Recoverit can be used to create a bootable media to help you extract data from a crashed system. Create a bootable drive to recover data when Mac system is unable to launch. Click the "Start" button to get started.
3 Select a USB drive
Please insert a USB drive to create a bootable media drive. Once you connect it to your working computer, it will show beside the “Bootable Media Drive” tab. Insert more than one external drives? Click the arrow to view the drop-down menu and choose a blank one. Click “Start” to go on.
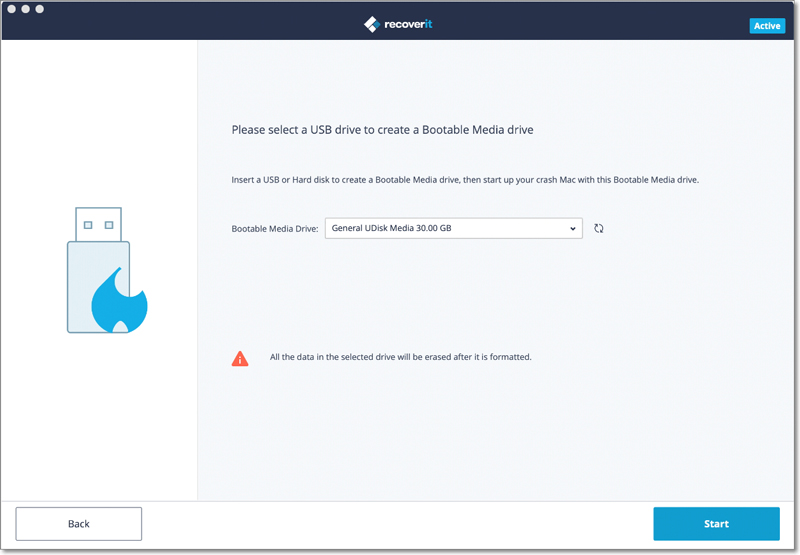
4 Backup and format data
To ensure the enough space on the USB drive, it will be formatted, and thus, all the data present on it will be wiped. So back up important files in advance.
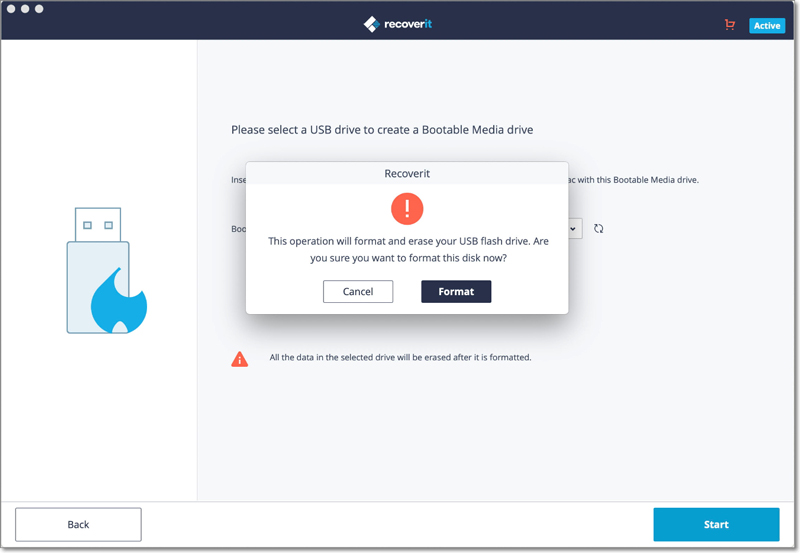
Click “Format” and the next interface will show you the procedure of formatting the USB drive.
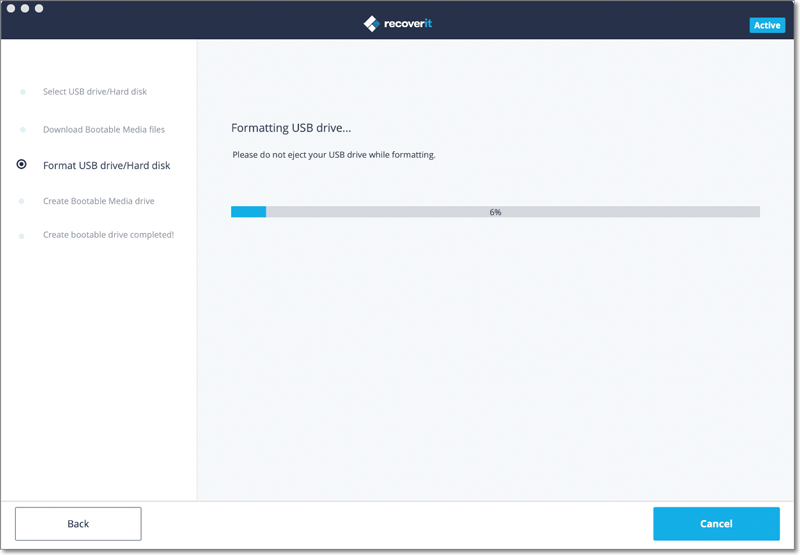
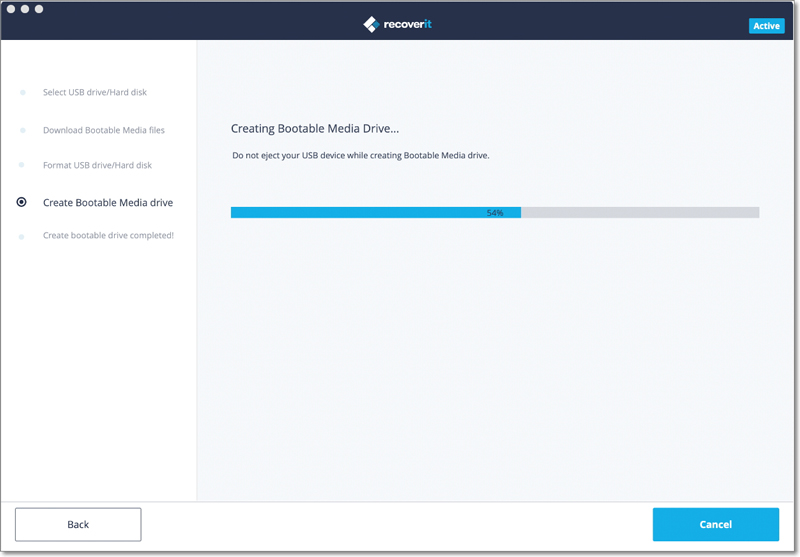
5 Creating the bootable media
After the drive formatting, Recoverit starts creating the bootable media drive on Mac. During the process, do not remove the USB flash drive out of your Mac computer.
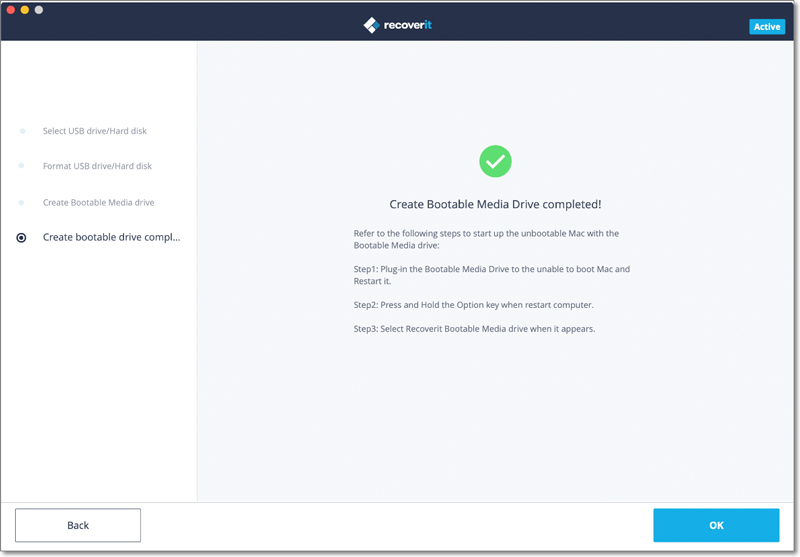
6 Finish creating the bootable media
Usually a few minutes later, the bootable USB flash drive will be created. And you can receive a guide to retrieving your data back.
- Plug in the bootable media drive to the unbootable Mac and restart it
- Press and hold the Option key when restarting the computer.
- Select Recoverit Bootable Media Drive when it appears.
Step 3 Recover lost data from crashed Mac
Now, you have created a bootable USB drive to start the crashed Mac up. You can follow the next 3 steps to begin data recovery.
1 Select a hard disk
You need to select a hard disk or device as the location for scanning and searching. Usually, to extract lost data from a crashed Mac, you can select the hard disk under the "Devices" tab.
If you just want to recover lost data from a specific folder, you can tick "Select Folder" under the "Select location" tab and input the concrete file path. Then, click "Start" to move on.
2 Scan the hard disk
A quick but all-around scan will be initiated immediately. It will last for a few minutes.
But for a Mac based on HFS+ file system, you can also turn to the deep scan to more thoroughly dig into the device for lost files.
3 Preview and recover data
After the scan, you can preview the files in different formats and types. Then, select the data you want and click "Recover" to get all of them back. Please do not save them in the same location to avoid data overwriting.
3.4. Repair Corrupted Videos
It is a terrible thing to face video crashes in the middle of the task. To fix a corrupted video file, Recoverit offers an additional video repairing feature for Windows and Mac. It has advantages as repairing plenty of corrupt video files, repairing videos with different formats at the same time, no limitation upon the size of video files to be repaired, user-friendly interface and such.
3.4.1. Repair Corrupted Videos on Windows
The tool can fix almost any video file, irrespective of its file size and its issue. Simply open the user-friendly application, select the “Video Repair” option, and click on the “Start” button from its home to launch the module.

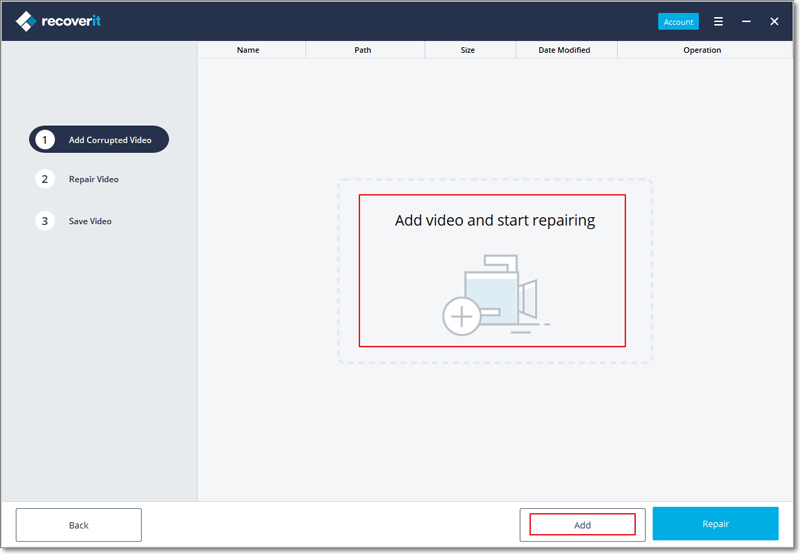
Step 1 Add any Corrupted Video
Firstly, you can just add the corrupted video files to the application. For this, you can click on the add button that would launch a browser window. You can just browse to the location where the corrupted videos are stored and load them to the application. Additionally, you can just drag and drop the corrupted video files to the interface.
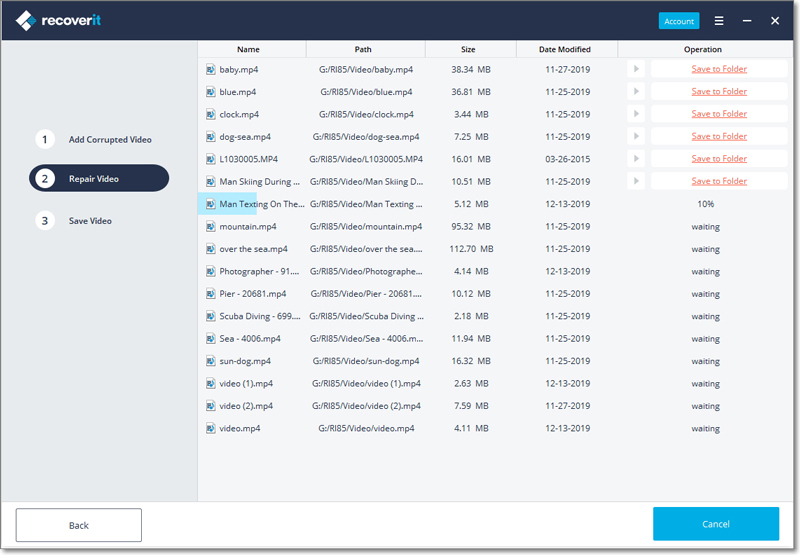
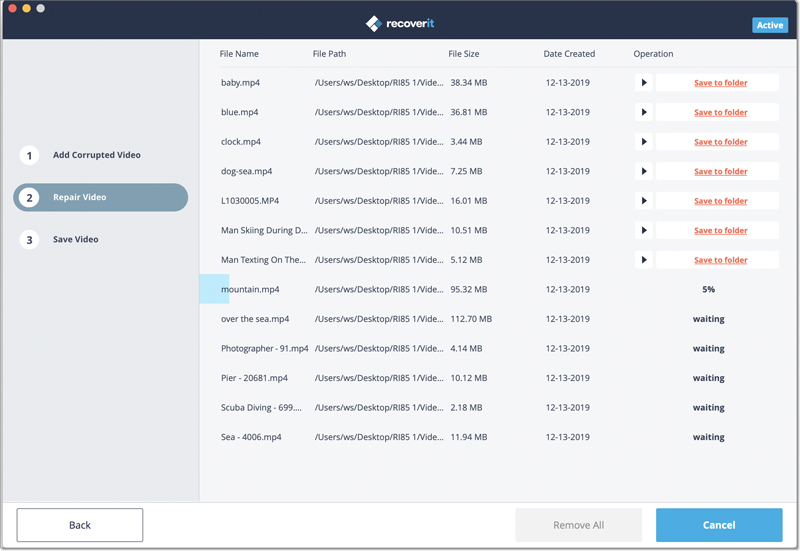
Step 2 Repair Corrupted Videos
Wait for a while as Recoverit Video Repair would fix the loaded videos. You can view the progress from an on-screen indicator and simply wait for the process to be completed.
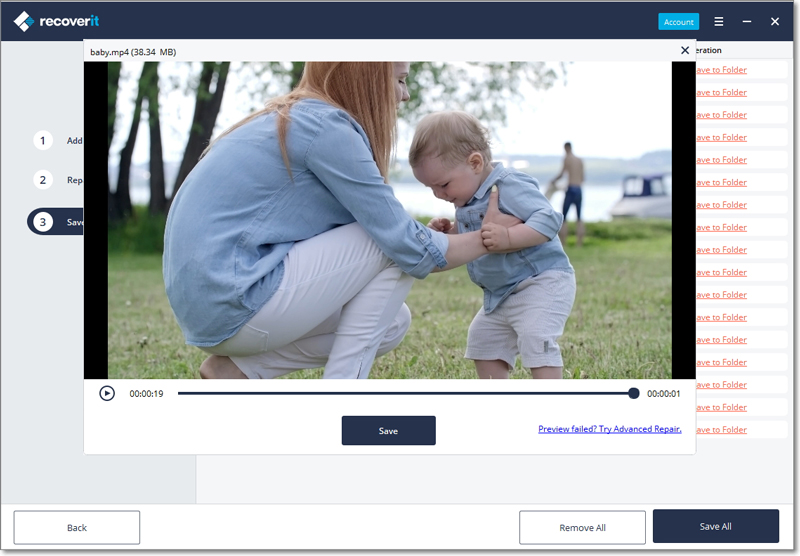
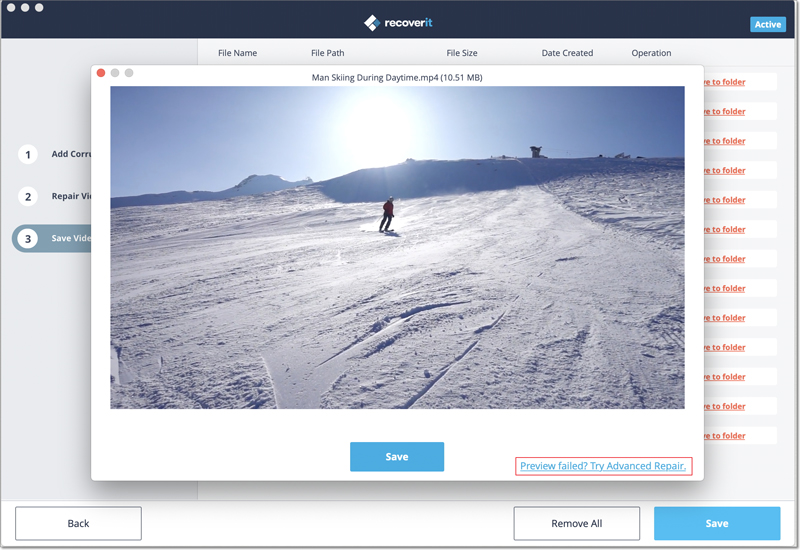
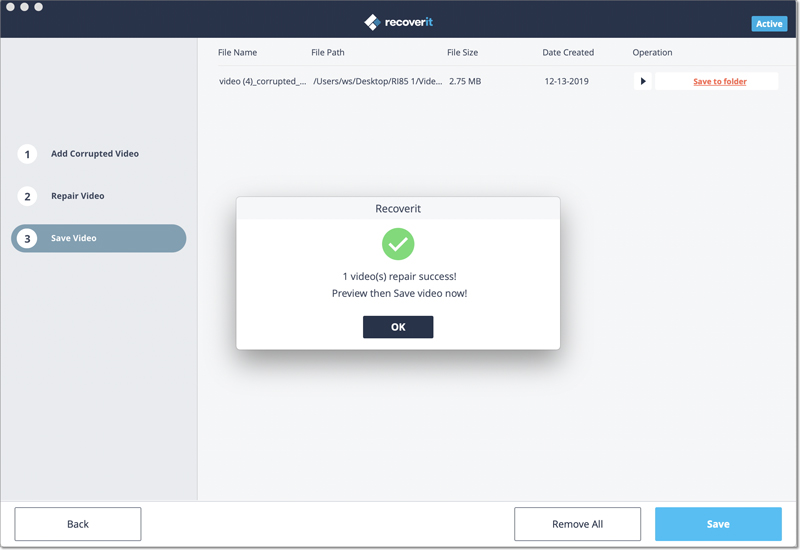
1 Preview the repaired video
After when the repairing process is completed, the application will let you preview the repaired videos on its interface.
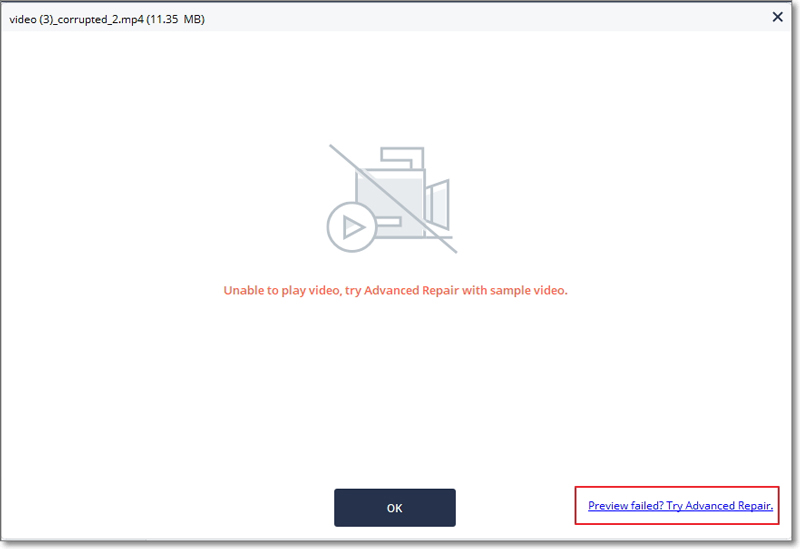
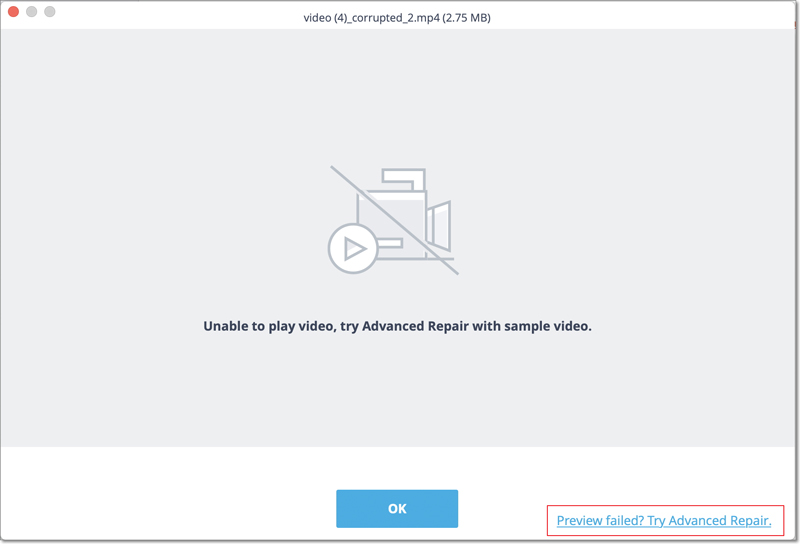
2 Advanced Repair- Add a sample video
If the video has been severely damaged or the standard scan is not able to yield the expected results, then you can just click on the “Advanced Repair” option instead.
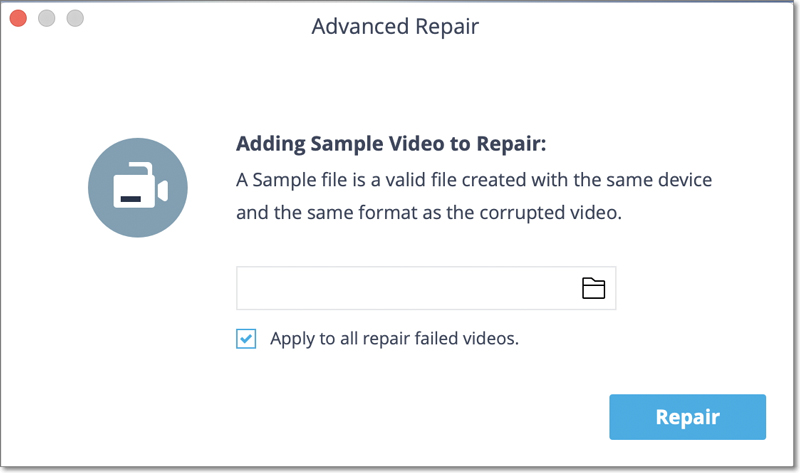
1. Add a sample video
The Advanced Repair will need you to add a sample video. Ideally, a sample video is a valid video file that should be of the same format as the corrupted video file and must be shot on the same device as well.
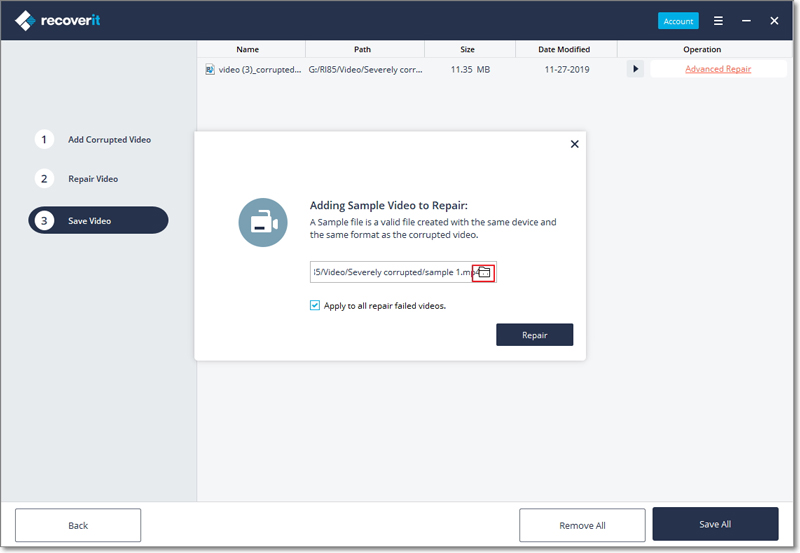
2. Repair
Once the sample video has been added, just click on the “Repair” button to start the video repairing process.
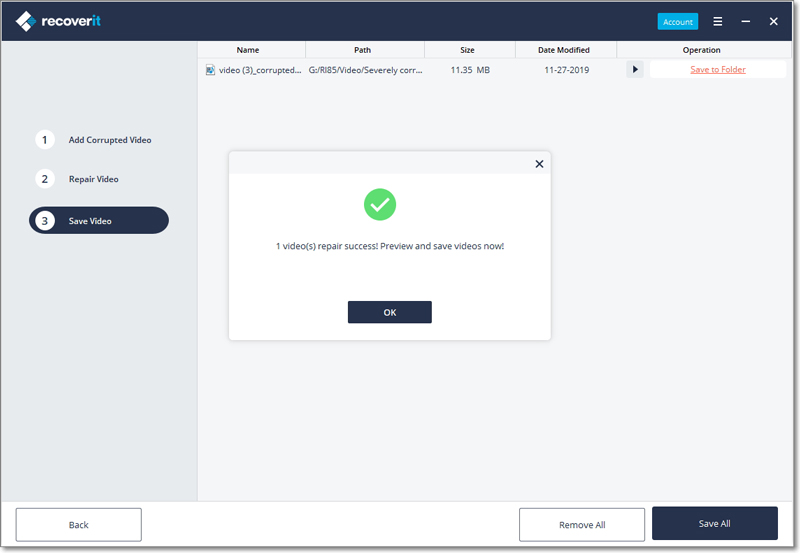
Step 3 Save the Repaired Videos
When the repairing process is completed, you can just save the repaired videos on the location of your choice. A browser window will open, letting you go to the specific location to save the videos (or add a new folder).
3.4.2. Repair Corrupted Videos on Mac
The Mac version of Recoverit also has a dedicated feature for Video Repair that you can access from its home. Just select the “Video Repair” option from the welcome screen and click on the “Start” button. The application has two different video repairing modes – Quick and Advanced that you can run according to your needs.
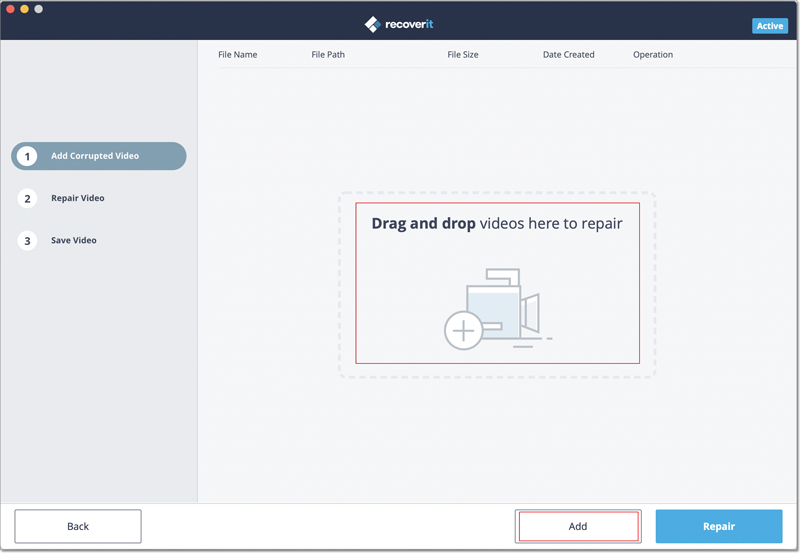
Step 1 Add any Corrupted Video
As the Video Repair application would be launched, you can simply add the corrupted videos on it. There is no restriction on the size of the video that you can add. Just drag and drop the videos from any location to Recoverit. You can also click on the add button to launch a browser window to locate the videos you want to repair.
Step 2 Repair Corrupted Videos
As Recoverit would start the repairing process, you can simply wait for it to be completed. There is an indicator to let you know the progress of the repairing operation.
1 Preview the repaired video
One the repairing process is completed, you can preview the results on the interface. Just click the Play button to prevew it.
2 Advanced repair (add a sample video)
If the quick scan is not able to yield the expected results, then it means your video is severely damaged. To fix this, just click on the “Advanced Repair” feature.
1. Add a sample video
To perform the advanced video repair, you need to first add a sample video to the application. The sample video should be of the same format as the corrupted video file and shot on the same device as well. The application will let you browse your Mac’s directory to add the sample video.
2. Repair
Once the sample video is added, just start the video repair process and wait for a while as the advanced repair might take longer to repair your video file.
Step 3 Save the repaired videos
In the end, you can just preview the video repairing results on the interface and save it on the location of your choice. A browser window will be launched, letting you save the repaired videos to a secure location on your Mac or any other source.
3.5. Recoverit Pop-Up Tips
To help users proceed data recovery more effectively and conveniently, Recoverit comes with many tips showing as small pop-up windows.
3.5.1. Tips for Previewing Data
Recoverit offers some considerate tips and analyses for you if you find the files unable to preview or corrupted. The solutions will also be provided, which will make for your smooth data recovery using Recoverit. There are mainly 3 tips here.
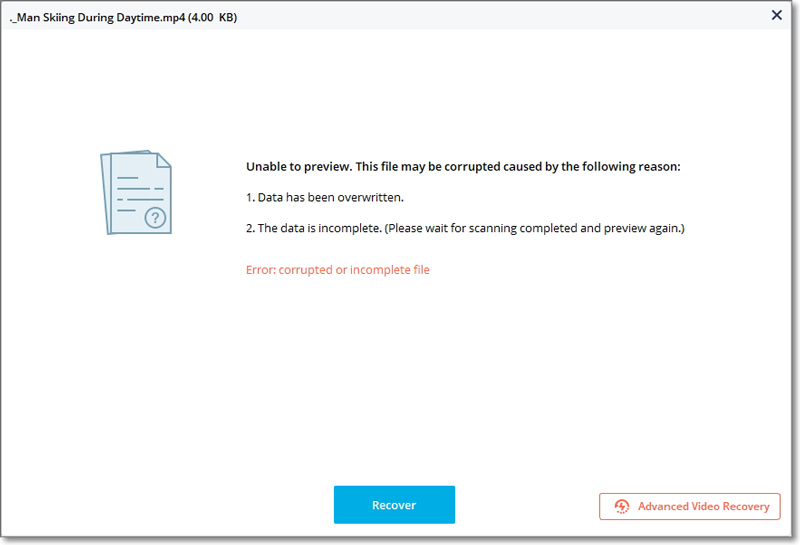
Tip 1. Unable to preview because of the file corruption
The first possible reason for the file corruption is that the file is incomplete. You can wait for the complete scanning process and then preview it again. Besides, if the file itself is corrupted, it is hardly possible to preview and recover it. And if the data has been overwritten, the recovery is also very difficult.
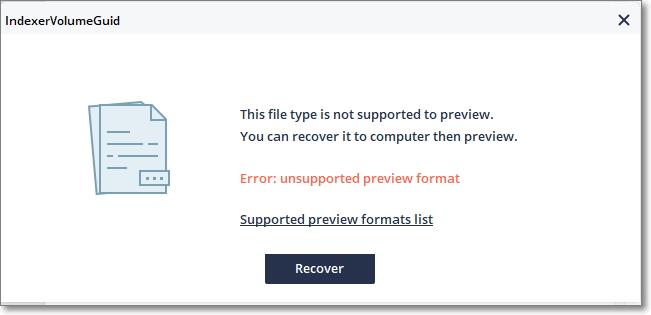
Tip 2. This file type is not supported to preview
Recoverit 8.0 does not support to preview all formats of files to help you reduce the capacity it takes on a computer. You can recover the files directly. Normally, they are healthy and original.
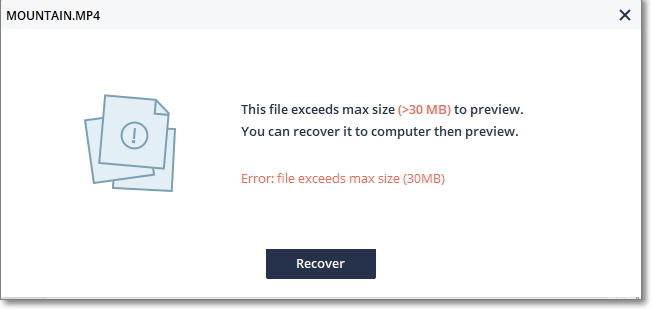
Tip 3. This file exceeds max size to preview
Recoverit 8.0 supports the preview of files with less than 30 MB size, in order to make sure that the software can keep working normally without crash or freezing. Besides, like other software in the market, the preview of much larger files can influence the installation speed and require larger capacity.
3.5.2. Tips for Using Recoverit
Recoverit also provides some tips about how to use Recoverit more conveniently and avoid data overwriting or damage.
Tip 1. Cancel the scanning
Once you find your data or decide not to recover data, you can click on the stop button to end the scanning process. In case that you click the button by mistake, the below alert message will pop up.

Tip 2. Exit Recoverit during the scanning
The same, in order to avoid the careless operations by users, Recoverit will offer a special message to remind them.

Tip 3. Select a file to recover
To recover lost files, you need to select one or more files so that Recoverit can recognize and recover the specific ones.
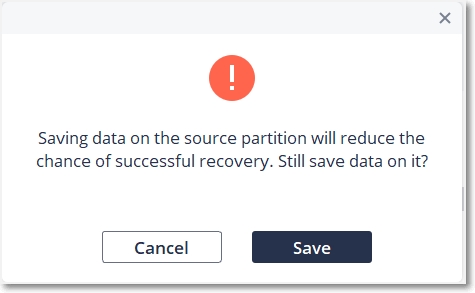
Tip 4. Save data on another location
Saving data on the same location or the source partition will cause the data overwriting. To avoid the data getting lost forever, please save them on a different device or partition.