How to Use Recoverit
1. نظرة عامة
1.1 الميزات العامة
Recoverit Data Recovery معترف به جيدًا بين أكثر من 5،000،000 مستخدم في جميع أنحاء العالم. دعونا نحصل على لقطة للبرنامج ونتعرف على سبب التعرف عليه باعتباره برنامج استعادة البيانات رقم 1.
- استرجع أكثر من 1000 نوع وتنسيقات للبيانات والملفات
- دعم لاستعادة ملف واحد أو عدة ملفات
- يصلح جميع أنواع مقاطع الفيديو التالفة أو المكسورة أو التالفة التي يتعذر الوصول إليها
- واجهة سهلة الاستخدام وعملية استرداد مباشرة
- مسح عميق وذكي وسريع لجميع البيانات المفقودة
- المعاينة والصور المصغرة المتاحة قبل الاسترداد
- معاينة المستندات والصور ومقاطع الفيديو والتسجيلات الصوتية وما إلى ذلك.
- استعادة البيانات في المواقف المختلفة من جميع الأجهزة
- خيارات متعددة لمواقع مختلفة لتوفير الوقت
- مسار ملف محدد مخصص متاح للمسح الضوئي
- خيارات بحث وتصفية ممتازة لتحديد البيانات المفقودة
- دعم شاشة الكمبيوتر بدقة مختلفة (100٪ ، 125٪ ، 150٪)
- صمم شريط تقدم المسح لمعرفة الوقت المتبقي للمسح ، وكمية الملفات التي تم العثور عليها وقطاعات محرك الأقراص الثابتة التي تم فحصها.
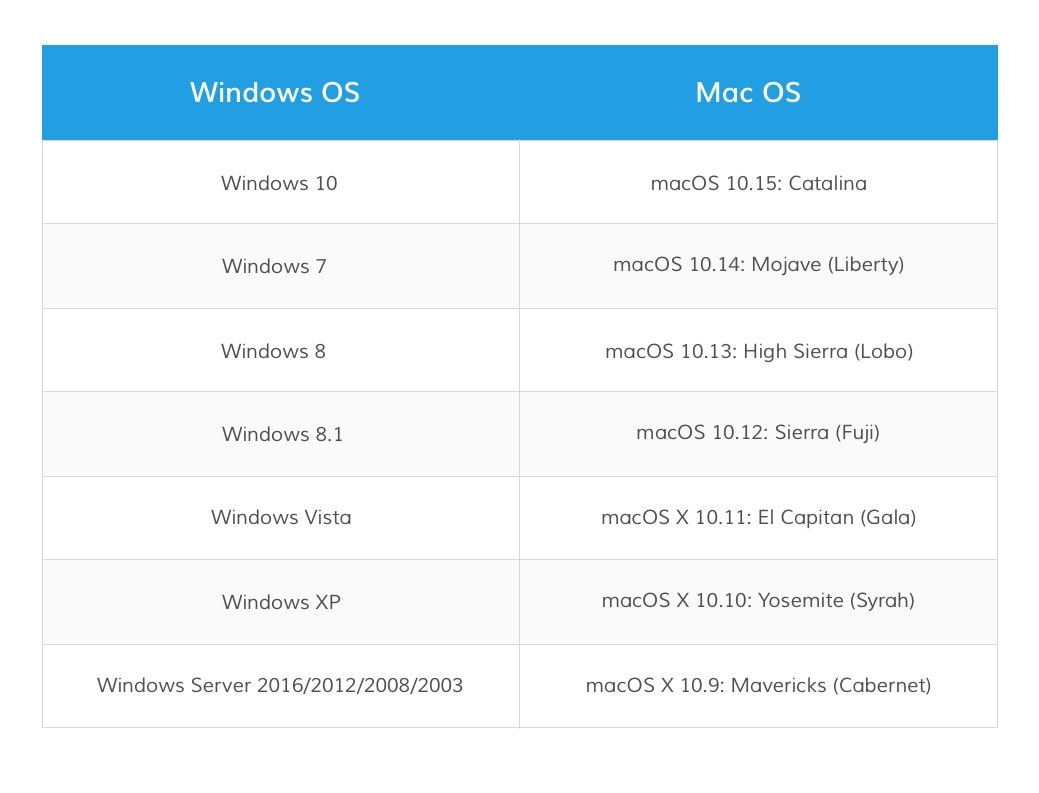
- العمل على أنظمة تشغيل Windows 10 / 8.1 / 8/7 / Vista / XP و Windows Server 2016/2012/2008/2003 و MacOS X 10.15 - 10.9
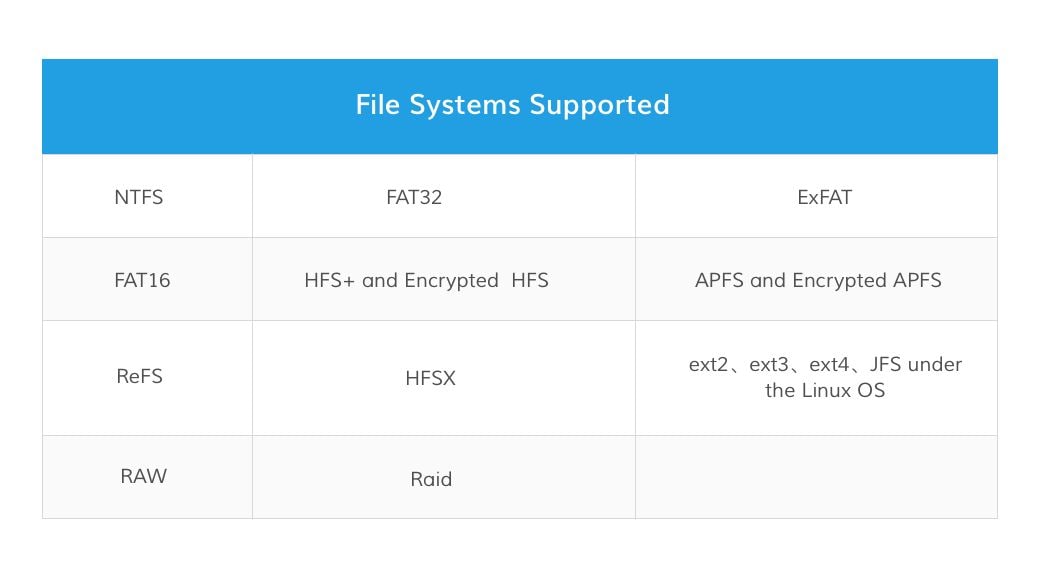
- متوافق مع جميع أنظمة الملفات تقريبًا مثل NTFS و FAT32 و FAT16 و exFAT و APFS و APFS المشفر و HFS + و HFS و HFSX و RAW و RAID وما إلى ذلك.
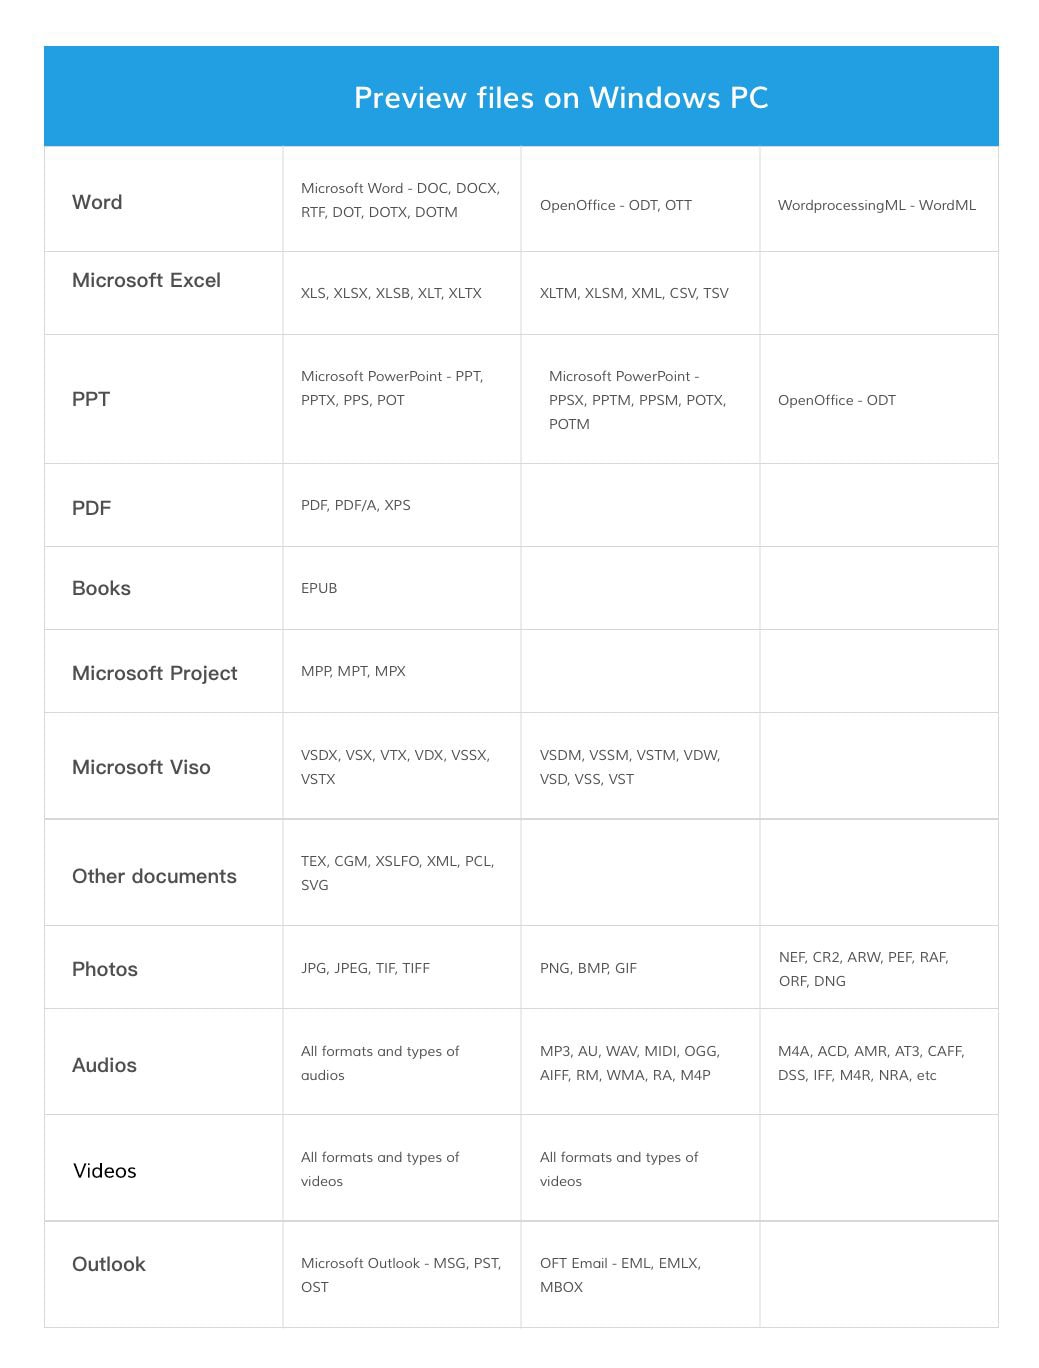
1.2 أنواع الملفات المدعومة
يمكن لبرنامج Recoverit استرداد أكثر من 1000 نوع وتنسيقات من الملفات. كما أنه يجعل معاينة أنواع وتنسيقات البيانات المختلفة متاحة.
1.2.1. أنواع الملفات المراد معاينتها
ما هي وظيفة المعاينة لبرنامج استعادة البيانات؟ حسنًا ، إنها الميزة التي يمكن أن تساعدك في عرض معلومات الملف قبل تحديد الملفات واستعادتها. تتضمن المعلومات حجم الملف واسم الملف ومسار الملف وحتى المحتوى الملموس بداخله.
يمكن لبرنامج Recoverit معاينة الملفات المخزنة أو المعروضة على جهاز كمبيوتر يعمل بنظام Windows أو Mac. ولكن من أجل الحفاظ على عمل برنامجك على الكمبيوتر دون أي تلف في البيانات ، هناك بعض القيود.
Mac معاينة البيانات أقل من 15 ميغابايت على Mac
بشكل عام ، طالما أنه يمكن عرض الملفات على جهاز كمبيوتر Mac الخاص بك ، يمكن معاينتها عبر Recoverit Data Recovery for Mac Wizard.
- جميع تنسيقات وأنواع البيانات على جهاز Mac الخاص بك
- يجب أن يكون حجم الملف أقل من 15 ميغا بايت
- إذا كان الملف نفسه تالفًا ، فإنه يفشل
Windows معاينة البيانات أقل من 30 ميجابايت على Windows
يمكن معاينة جميع أنواع وتنسيقات البيانات والملفات التالية ، طالما أن حجم الملف أصغر من 30 ميغابايت والبيانات سليمة. الحد الأقصى لحجم الملف هو التأكد من أن البرنامج يمكنه الاستمرار في العمل بشكل صحي وطبيعي على جهاز الكمبيوتر الخاص بك ، في حالة تعطل البرنامج أو بطئه.
1.2.1. أنواع الملفات المراد استردادها
يدعم Recoverit Data Recovery أكثر من 1000 تنسيق وأنواع الملفات المراد استعادتها. تلك المحددة هي على النحو التالي.

1.3 أجهزة التخزين المدعومة
مع تقدم التكنولوجيا ، يمكن لـ Recoverit العمل مع المزيد والمزيد من الأجهزة ، مثل كاميرا GoPro وكاميرا الطائرة بدون طيار ومحرك RAW. الآن ، تتوفر الآن جميع الأجهزة تقريبًا لاستعادة البيانات.
- Hard drive, USB drive, Pen drive, floppy disk, Solid State Drive, Zip drive
- مع تقدم التكنولوجيا ، يمكن لـ Recoverit العمل مع المزيد والمزيد من الأجهزة ، مثل كاميرا GoPro وكاميرا الطائرة بدون طيار ومحرك RAW. الآن ، تتوفر الآن جميع الأجهزة تقريبًا لاستعادة البيانات.
- الكاميرا الرقمية وكاميرا الدرون مثل DJI Drone وكاميرا الحركة مثل GoPro
- كاميرا فيديو ، مسجل صوت ، مشغل موسيقى ، iPod (Nano ، Classic & Shuffle)
- قرص صلب خارجي ، قرص صلب (HDD) ووسائط تخزين أخرى
1.4. الأنظمة المدعومة
لتلبية الاحتياجات المختلفة للمستخدمين الرقميين ، يتم إنتاج عدد متزايد من أنظمة الكمبيوتر والملفات. Recoverit Data Recovery يواكب دائمًا التكنولوجيا الشائعة. ومن ثم ، فهو بلا شك متوافق مع أحدث الأنظمة لمساعدة المستخدمين على استعادة بياناتهم المهمة.
1.4.1. أنظمة الملفات المدعومة
يدعم Recoverit Data Recovery تقريبًا جميع أنظمة الملفات في هذا المجال ، ناهيك عن الأنظمة الأكثر شيوعًا ، على سبيل المثال:
1.4.2. أنظمة الكمبيوتر المدعومة
يأتي Recoverit Data Recovery مع إصدارات Windows و Mac.
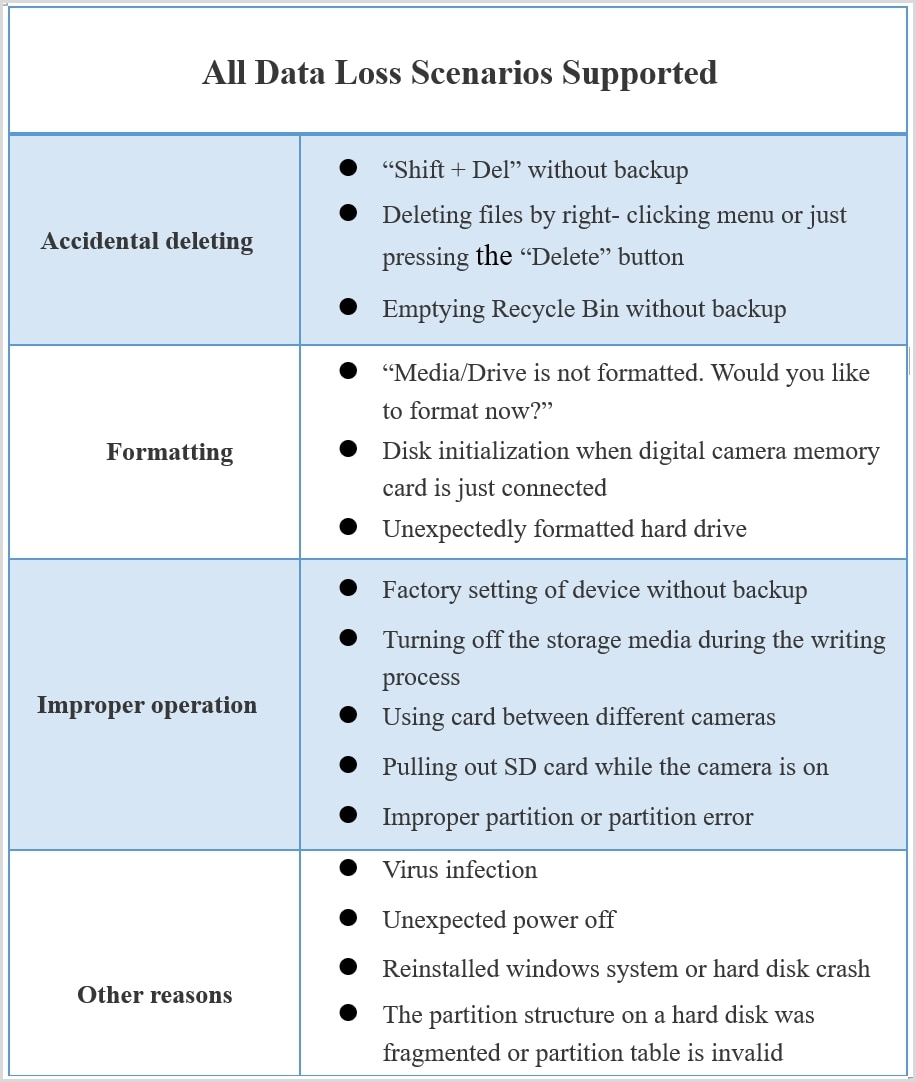
1.5 السيناريوهات المدعومة
بغض النظر عن مكان وكيفية فقد بياناتك المهمة ، فإن Recoverit Data Recovery قوي بما يكفي لمساعدتك في استعادتها جميعًا دون أي تلف للبيانات.
2. البدء
2.1. التنزيل والتثبيت
تنزيل وتثبيت Recoverit Data Recovery بسيط وسهل. احصل على الخطوات البسيطة هنا.
2.1.1. متطلبات الكمبيوتر الأساسية
قبل البدء في تنزيل وتثبيت Recoverit ، دعنا نعرف بعض المتطلبات الأساسية.
- ذاكرة الوصول العشوائي: 2 غيغابايت كحد أدنى (4 غيغابايت مستحسن)
- CPU: 1GHz (32bit or 64bit)
- أنظمة التشغيل: Windows 10 / 8.1 / 8/7 / Vista / XP ، Windows Server 2016/2012/2008/2003 ؛ نظام التشغيل Mac OS X 10.9 - 10.15
2.1.2. تنزيل Recoverit
Recoverit يأتي مع إصدار Windows و Mac. وفقًا لاحتياجاتك ، اختر الإصدار الصحيح ثم انقر فوق الزر أدناه لتنزيل البرنامج.
2.1.3. قم بتثبيت Recoverit على Windows
- انقر نقرًا مزدوجًا فوق ملف "recoverit_setup_full4210.exe" في المجلد الذي تم تنزيله.
-
انقر فوق "تثبيت". سيظهر حوار لطلب تأكيد التثبيت. يمكنك أيضًا النقر فوق "تخصيص التثبيت" لتحديد اللغة والوجهة المفضلة لديك.
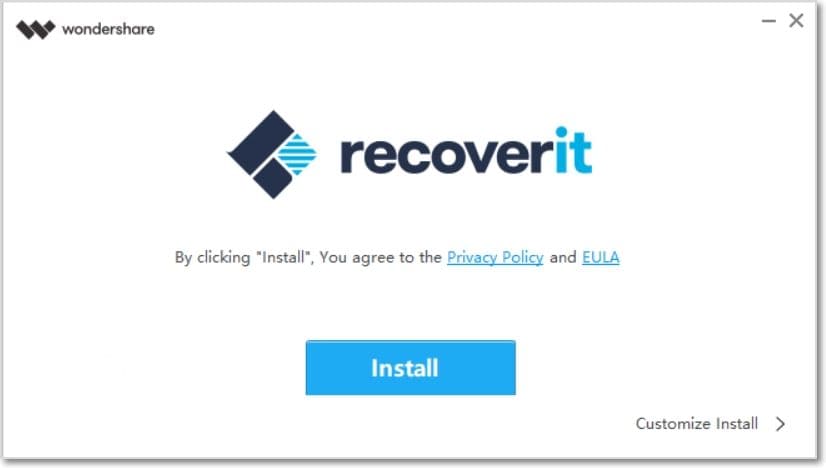
- انقر فوق "ابدأ الآن". انتظر بضع دقائق ، وسيظهر مربع حوار ختامي. ابدأ عملية الاسترداد باستخدام Recoverit في أي وقت من الأوقات.
ملاحظة: لتشغيل Recoverit Data Recovery ، ما عليك سوى النقر نقرًا مزدوجًا فوق رمز "Wondershare Recoverit" على سطح المكتب.
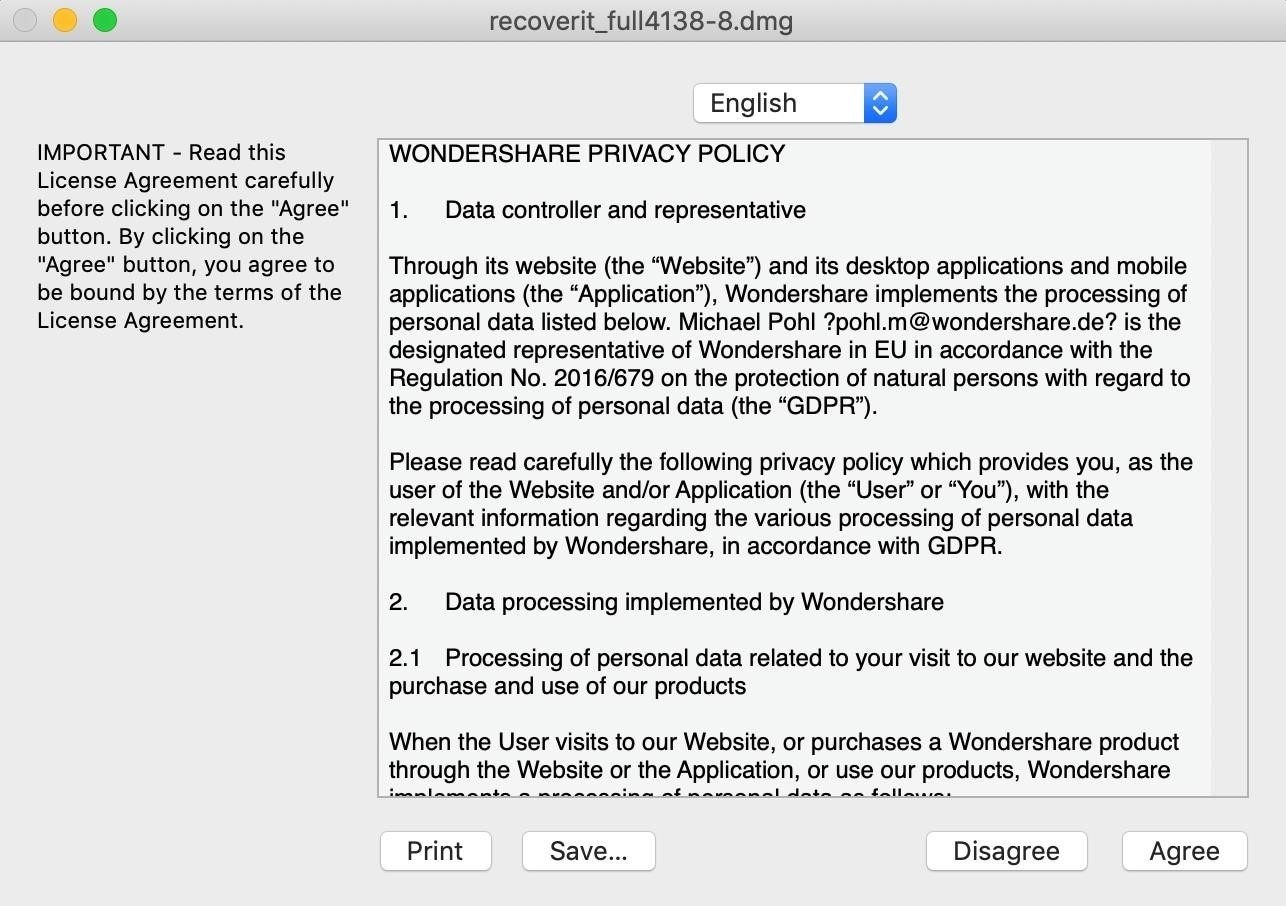
2.1.4. قم بتثبيت Recoverit على نظام Mac
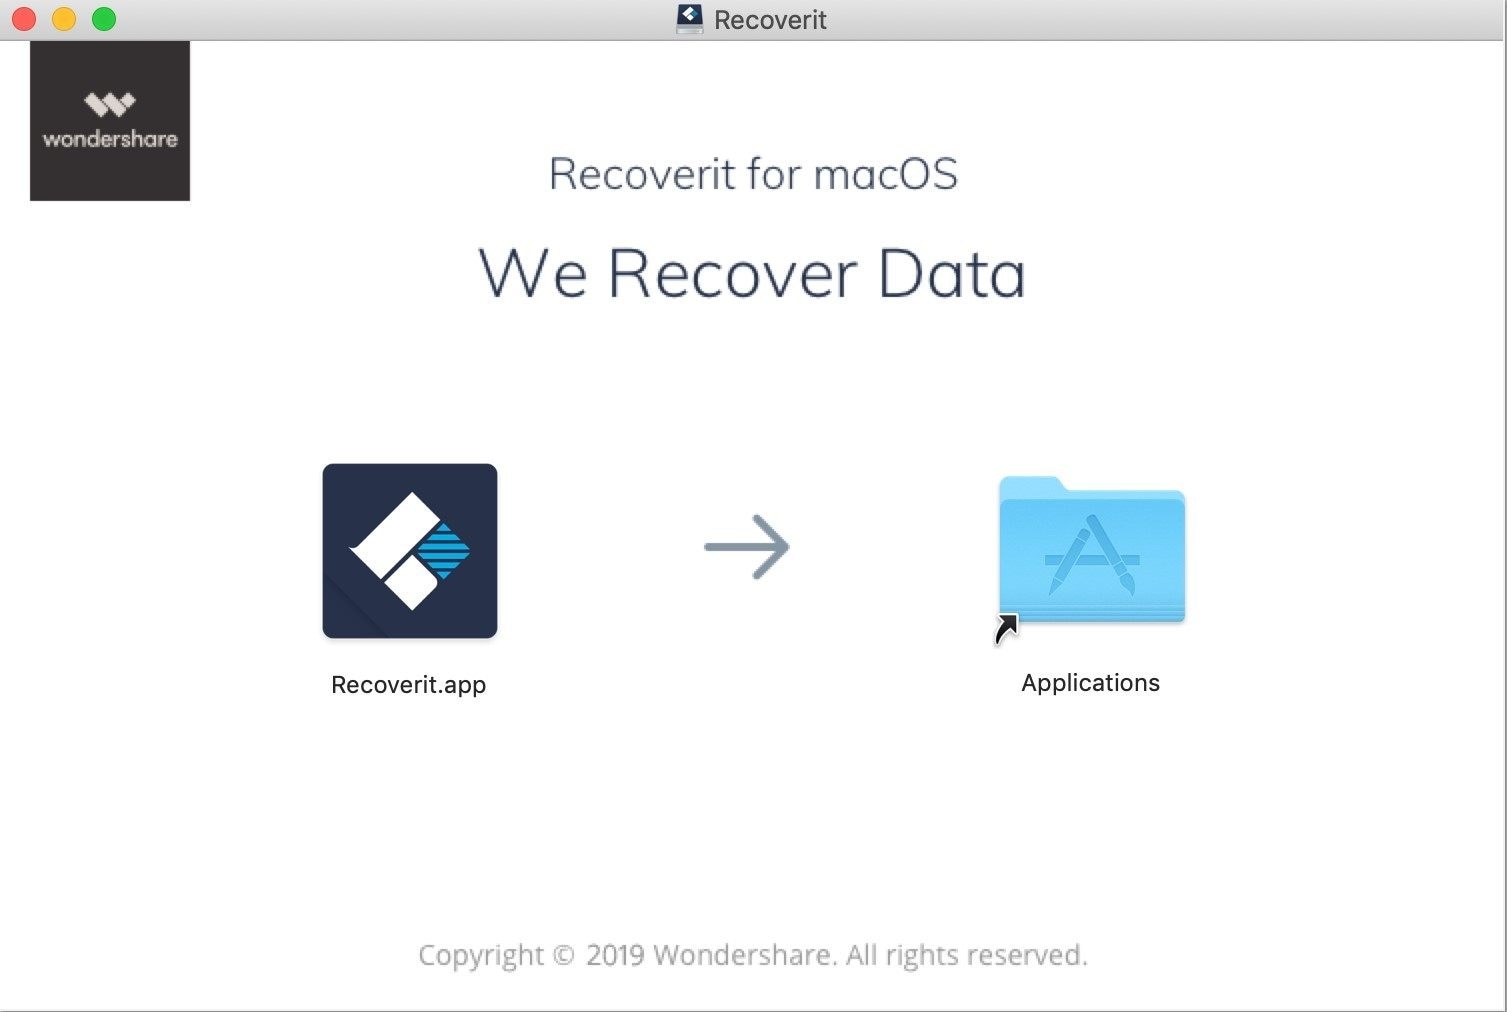
- بعد تنزيل Recoverit ، انقر فوق "recoverit_full4213.zip" لتثبيت البرنامج على جهاز Mac.
-
توافق على سياسة الخصوصية. بعد ذلك ، يمكنك تحديد اللغة المحددة التي تختارها ، وستكون اللغة الإنجليزية هي اللغة الافتراضية. اقرأ سياسة الخصوصية Wondershare وانقر فوق "موافق" لتأكيدها وقبولها.
-
اسحب Recoverit.app إلى التطبيقات. للتأكد من الاستمرار في استخدام Recoverit على جهاز Mac ، يرجى نقل ملف exe. إلى التطبيقات.
2.1.5. قم بتشغيل Recoverit على Mac
لبدء Recoverit Data Recovery ، ما عليك سوى النقر نقرًا مزدوجًا فوق رمز "Recoverit" على سطح المكتب. إذا لم يكن موجودًا ، فيرجى الانتقال إلى "Finder" > “Applications” > “Recoverit” وانقر نقرًا مزدوجًا فوق البرنامج.
ثم ستظهر نافذة كلمة المرور. الرجاء إدخال كلمة مرور Mac والضغط على "Enter" لفتح البرنامج.
2.2. شراء Recoverit
Recoverit Data Recovery لديه متجر إلكتروني رسمي لكل واحد منكم:https://recoverit.wondershare.com/buy/store.html. للتحقق من مزيد من التفاصيل ، تحقق من الصفحة.
بالنسبة لأولئك الذين قاموا بتنزيل Recoverit وتثبيته على الكمبيوتر ، يرجى النقر فوق زر عربة التسوق أو للحصول على خطط التسعير.
2.3 سجل مع Recoverit
يتيح لك Recoverit Data Recovery مسح ومعاينة البيانات المخزنة على جهاز الكمبيوتر الخاص بك أو أجهزة التخزين مجانًا تمامًا. ولكن إذا كنت ترغب في استعادة الملفات المفقودة أو المحذوفة وحفظها ، فيرجى التسجيل والترقية أولاً.
2.3.1. سجل مع Recoverit
1انتقل إلى نافذة التسجيل
-
انقر
 وانتقل إلى صفحة التسجيل.
- انقر فوق "تسجيل" في علامة التبويب.
-
انقر فوق "تسجيل" عند استعادة البيانات دون تسجيل أو شراء البرنامج.

2 شراء أو تسجيل الدخول
-
إذا لم تكن قد اشتريت البرنامج ، فالرجاء الانتقال إلى القيام بذلك للحصول على Recoverit مع الإصدار الكامل. انقر فوق "شراء الآن" ويمكنك الحصول على خطة الأسعار.
- إذا قمت بترقيته ، فانقر فوق رمز الترس وقم بتبديل الحساب إلى الحساب الذي اشترى البرنامج.
2.3.2. تنشيط Recoverit
أدخل بريدك الإلكتروني وكلمة المرور أو رمز التسجيل. انقر فوق "تسجيل الدخول أو التسجيل". بعد ذلك ، يمكنك استخدام الإصدار الكامل من البرنامج بالكامل.

2.4 تحقق من تحديثات Recoverit
لجميع المستخدمين الذين يشترون Recoverit Pro أو Ultimate ، يتم توفير تحديث مجاني مدى الحياة. مع اتصال إنترنت نشط ، يمكن تحديث Recoverit تلقائيًا. إذا لم يكن كذلك ، يمكنك أيضًا اتباع الخطوات التالية.
- قم بتشغيل Recoverit Data Recovery
-
انقر فوق زر القائمة -

- اختر "التحقق من وجود تحديثات"
- قم بتأكيد آخر التحديثات

قد لا تظهر نافذة Live Update بسبب الأسباب.
- فشل الاتصال بإنترنت آمن
- تعذر الحصول على ملفات التكوين
- تعذر تحديد موقع الملف القابل للتنفيذ
- فشل في العثور على الملفات الخاصة بتحديثات Recoverit
ملاحظة: إذا لم يتم تنزيل البرنامج من موقعنا الرسمي على الويب أو أجرى بعض التكوينات الشخصية الخاصة ، فقد يفشل فحص التحديث والمراقبة أيضًا.
2.5 احصل على دعم Recoverit
- مركز الدعم عبر الإنترنت:https://recoverit.wondershare.com/support/
- قاعدة المعرفة:https://recoverit.wondershare.com/resource/
- البحث في موقع Recoverit:https://recoverit.wondershare.com/search.html
- بوت الدردشة مع Recoverit:https://recoverit.wondershare.com/
- تسجيل التذكرة: https://support.wondershare.com/#/guide?id=259
- برنامج Recoverit: اذهب إلى زر القائمة > "مساعدة" أو "دليل المستخدم"
- مساعدة خطة التسعير: https://recoverit.wondershare.com/buy/store.html
- كيفية استخدام Recoverit:https://recoverit.wondershare.com/guide.html
3. كيفية استخدام Recoverit
3.1. واجهات& أزرار
قبل البدء في استعادة الملفات المفقودة أو المحذوفة على جهاز الكمبيوتر ، دعنا نعرف شيئًا عن واجهة المستخدم والأزرار المحددة.
3.1.1. الواجهات الرئيسية
هناك 3 أنواع رئيسية من الواجهات التي تدعمك للعثور على بياناتك المفقودة واستعادتها جميعًا.
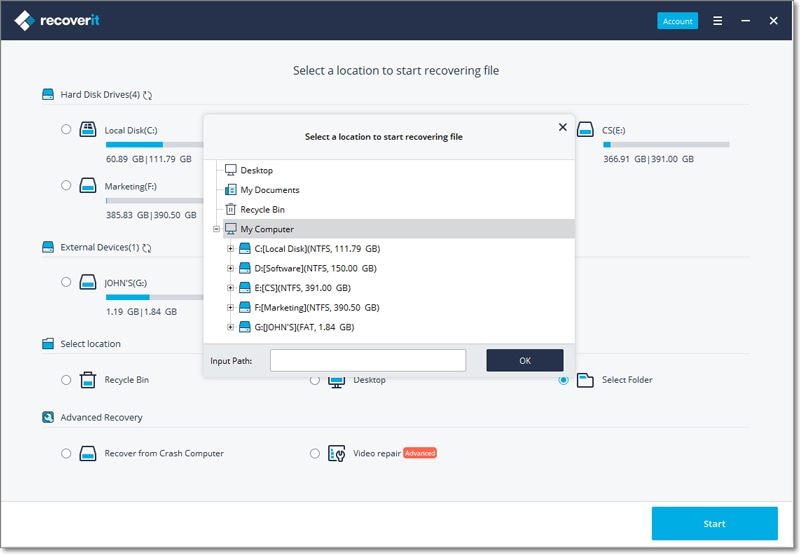
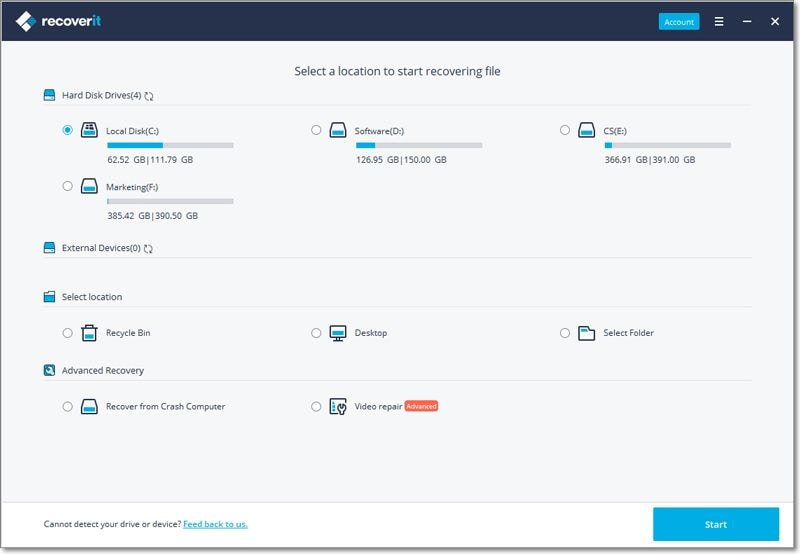
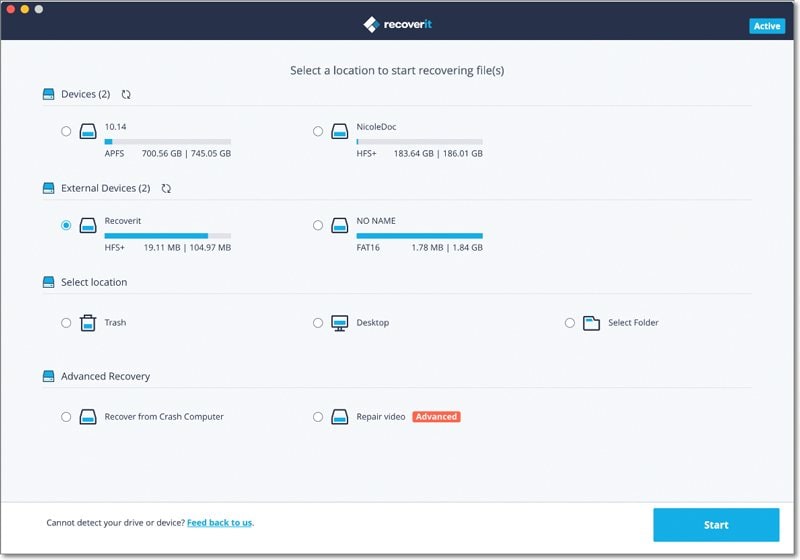
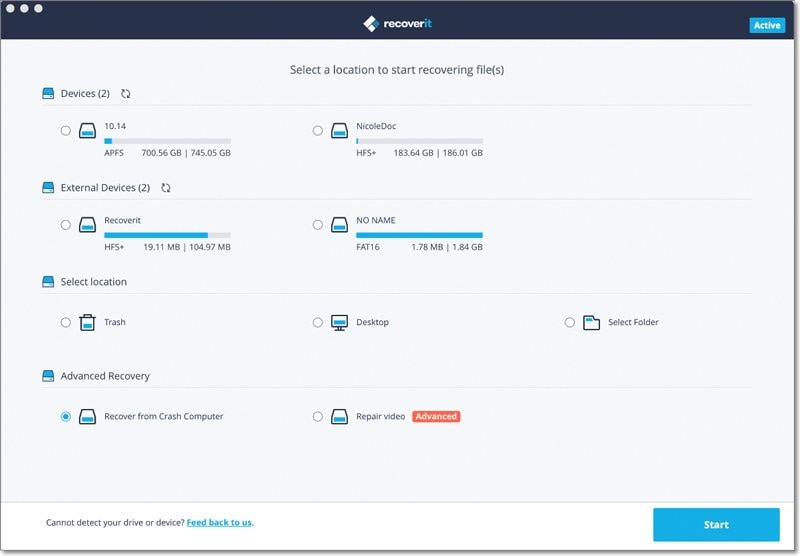
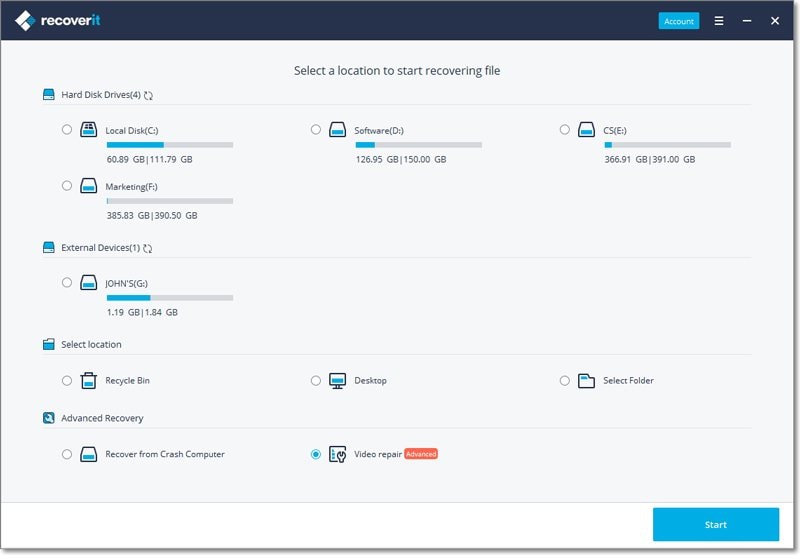
1 اختيار التخزين
ستكون الواجهة الأولى التي تراها هي التي تطلب مواقع فحص محددة. تظهر أربع علامات تبويب ، على التوالي محركات الأقراص الثابتة والأجهزة الخارجية وتحديد الموقع والاسترداد المتقدم.

محركات الأقراص الصلبة
تحت علامة التبويب ، سيتم عرض جميع محركات الأقراص الثابتة الداخلية ، بما في ذلك الأقسام المفقودة. نعم ، كما ترى ، يشير شريط التخزين البرتقالي إلى فقد هذا القسم ، بينما يوضح اللون الأزرق أن الموقع يعمل بشكل طبيعي.
الأجهزة الخارجية
إذا قمت بتوصيل واحدة أو بعض وسائط التخزين القابلة للإزالة ، فسيتم عرضها جميعًا ضمن علامة التبويب. يمكن أن تكون الأجهزة الخارجية بطاقة SD ، وبطاقة ذاكرة ، ومحرك أقراص USB محمول ، ومحرك أقراص ثابت خارجي ، ومحرك Zip ، وكاميرا رقمية ، وكاميرا فيديو ، وكاميرا بدون طيار ، وكاميرا حركة ، وهاتف خلوي ، ومشغل موسيقى ، ومسجل صوت ، وما إلى ذلك.
ونفس الشيء أن الجهاز الخارجي المميز باللون البرتقالي فقد قسمه.
اختر موقعا
ضمن علامة التبويب ، نقوم بإدراج ثلاثة مواقع مستخدمة بشكل متكرر ، حيث يمكن أن يحدث فقدان البيانات بسهولة أكبر. هم على التوالي سلة المحذوفات على كمبيوتر يعمل بنظام Windows أو Trash على Mac ، وكذلك سطح المكتب.
بالإضافة إلى ذلك ، إذا كنت تتذكر مسار الملف الدقيق حيث فقدت الملفات أو حذفتها ، فيمكنك اللجوء إلى "تحديد مجلد" لبدء عملية المسح.
الانتعاش المتقدم
يأتي الجزء الأخير مع خيارين - الاسترداد من Crash Computer and Video Repair.
يجب تفعيل "الاسترداد من Crash Computer" عندما تجد جهاز الكمبيوتر الخاص بك معطلاً وغير قابل للتمهيد. حدد الخيار وسيتم إرشادك لإنشاء وسائط قابلة للتمهيد أولاً لتشغيل جهاز الكمبيوتر الخاص بك. عندها فقط يمكنك استرداد البيانات المفقودة من الكمبيوتر المعطل باستخدام محرك أقراص USB أو قرص مضغوط.
"إصلاح الفيديو" هو مساعدتك في إصلاح مقاطع الفيديو التي تعرضت للتلف أثناء التصوير ، أو عند نقل الملفات ، أو أثناء التحرير أو التحويل أو المعالجة.
ابدأ
في واجهة الموقع ، يعد الزر "ابدأ" مهمًا أيضًا. بعد تحديد الموقع الذي تريد استرداد بياناتك المفقودة إليه ، يرجى النقر فوق "ابدأ" لبدء عملية المسح والاسترداد.
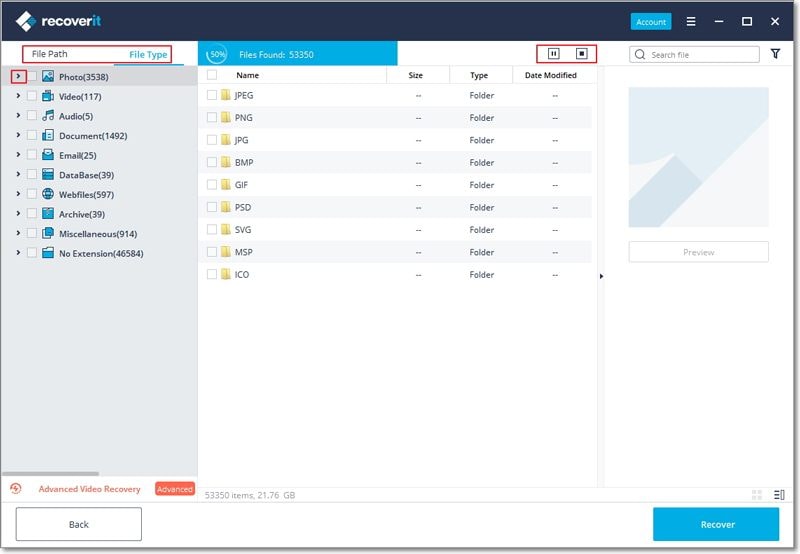
2 المسح & استعادة
في الواجهة ، يمكنك القيام بالعديد من الأشياء ، بما في ذلك تحديد الملفات المحددة بسرعة ، ومعاينة الملفات ، والأهم من ذلك ، استعادة البيانات. الآن ، دعنا نريهم واحدًا تلو الآخر.
تحديد ملفات محددة
يوفر Recoverit خيارات تصفية وبحث متعددة لمساعدتك على تحديد بعض الملفات المحددة التي تريد استردادها مرة أخرى ، من بين مجموعة كبيرة من البيانات الضرورية أو غير الضرورية. سيوفر بشكل كبير وقتك وجهدك.
كما هو موضح في الصورة أدناه ، هناك 4 خيارات في المجموع يمكن أن تساعدك على تصفية الملفات المطلوبة والعثور عليها بدقة بسرعة وسهولة أكبر.
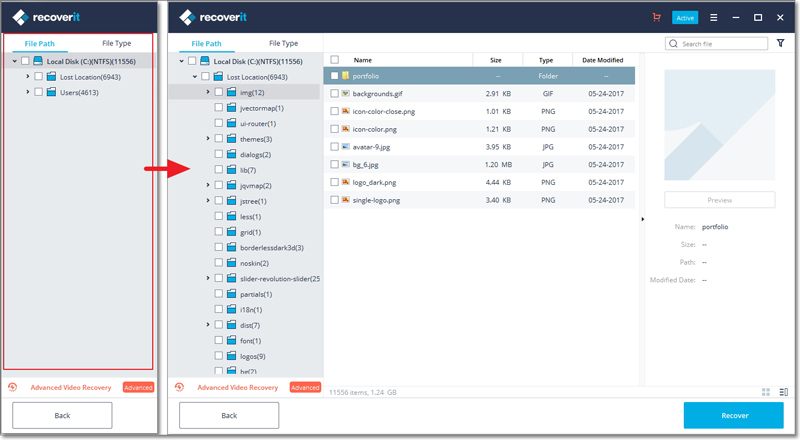
الخيار 1: مسار الملف
إذا كنت تعرف مكانًا ما تُفقد فيه بياناتك على القرص الثابت المحدد ، فانتقل إلى "مسار الملف" لاستعادة البيانات من بعض المواقع المحددة.
سيعرض Recoverit أنظمة ملفات مختلفة على القرص الصلب الذي حددته من قبل للمسح ، على سبيل المثال ، NTFS و FAT32 و Raw Files. يمكنك النقر فوق الأنظمة مباشرة>"استرداد" لاستعادة جميع البيانات المخزنة فيه.
أيضا ، النقر فوق “>”الزر ، سيقوم Recoverit بتوسيع جميع الملفات والمجلدات الملموسة. لاستعادة البيانات ، يرجى التحقق من الموقع وتحديد عدة مجلدات أو ملفات أو حتى ملف واحد ، ثم انقر فوق الزر "استرداد".
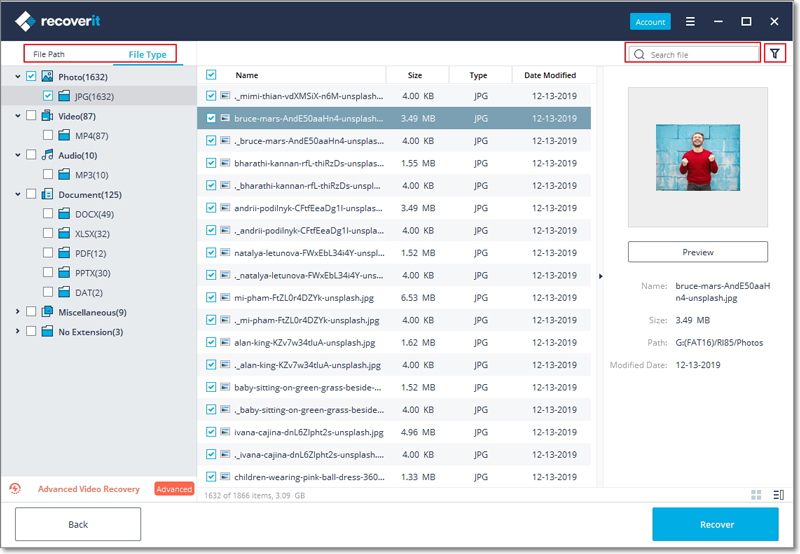
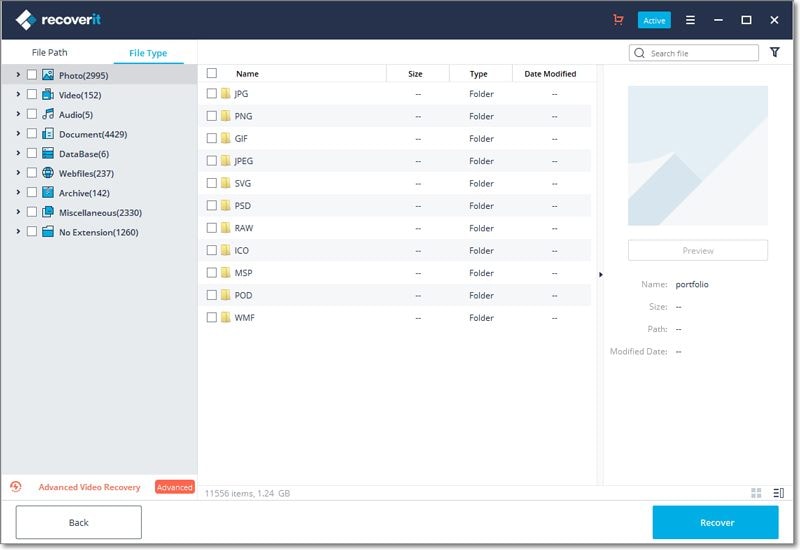
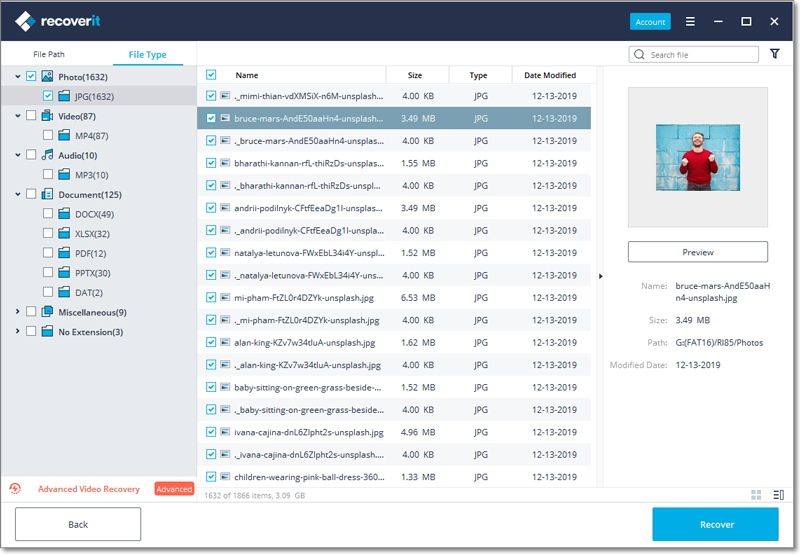
الخيار 2: نوع الملف
كما ذكرنا سابقًا ، يدعم Recoverit استرداد أكثر من 1000 نوع وتنسيقات من البيانات ، بما في ذلك الصور ومقاطع الفيديو والتسجيلات الصوتية والمستندات ورسائل البريد الإلكتروني وقاعدة البيانات وملفات الويب والمحفوظات والبيانات بدون ملحقات وغير ذلك الكثير.
Recoverit allows you to recover only one or more types and formats of data. Clicking the “>” button, all formats of data stored on the selected hard disk will be expanded.
And you can even preview different formats of files, even watching a video, or listening to an audio. Amazing, right? Go to try it free right away.
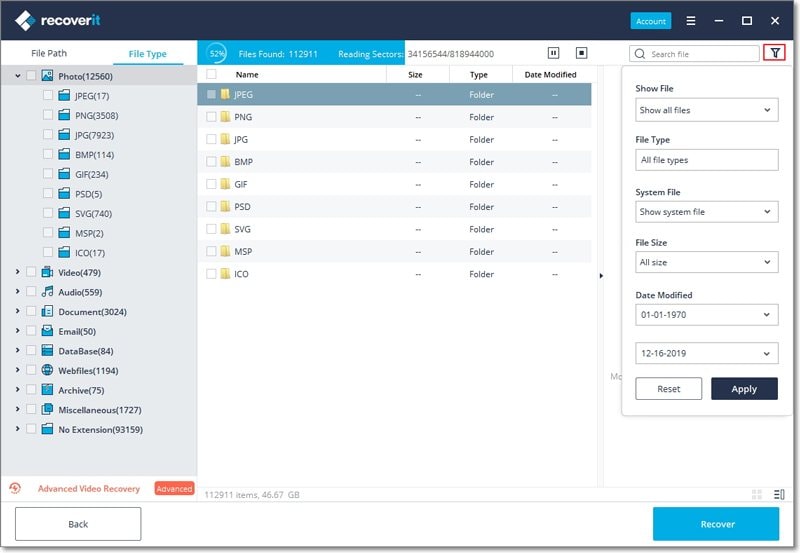
Option 3: File filter
Use the filter on the right, you can filter the extracted files on the basis of their type, file size, modification date, and other features to narrow down the results.
- Show Files: To show all files or just the deleted files
- File Type: Filter results for specific file types, such as photos, multiple file types, or view all file types
- System File: Toggle between the feature to show system files or hide system files
- File Size: To view all files irrespective of their size or files of a specific size (like 100-500 MB)
- Date Modified: This will let you filter files for specific dates on which they were modified
Option 4: Search file name or path
Keep the exact file name in your mind tightly? If yes, congratulations! Much of your time and effort is saved. Directly input the file name or some keywords in the searching box, and you can get the exact ones.
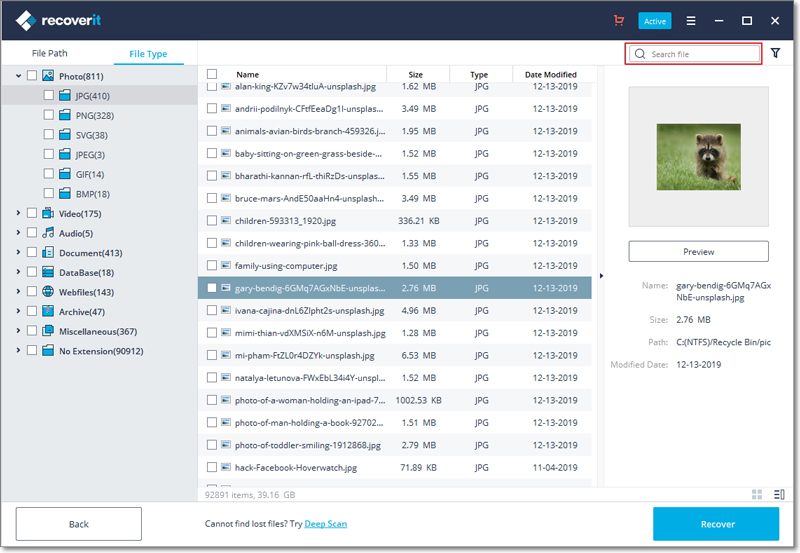
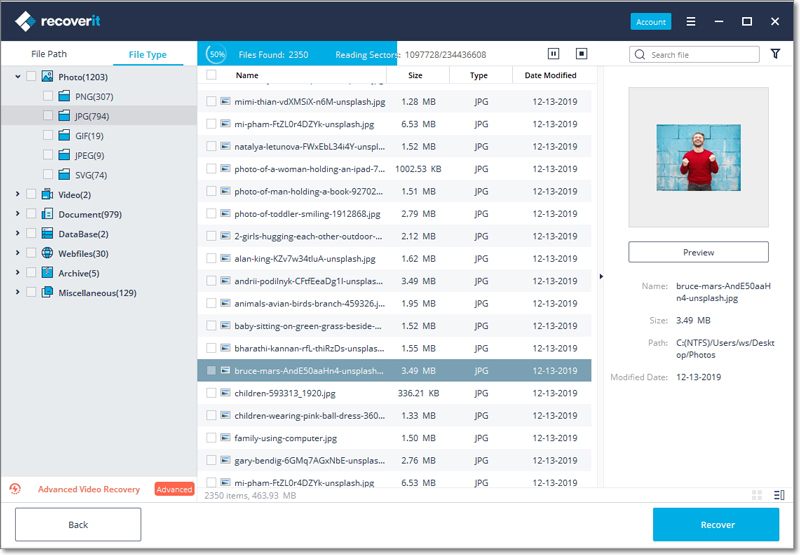
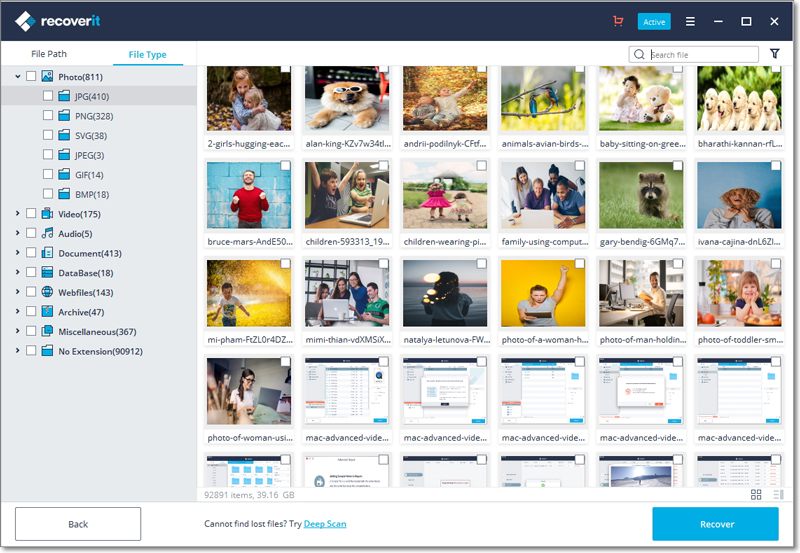
3 Preview files
We support you to have a preview and thumbnail view of data files during and after the scanning.
To do it, there are 3 ways, shown on the below image.
Method 1: Select a file and then click “Preview” on the right panel.
Method 2: Double click the file you want to preview and recover.
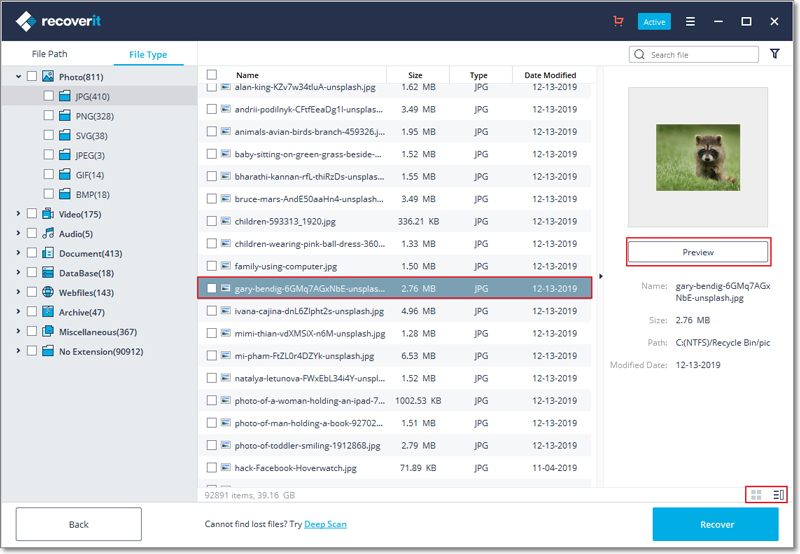
Besides, when you select and click a file, some information about it will appear, including its name, size, path and modified date. They can help you confirm if it is what you want.
Method 3: In the right bottom corner, there are two small icons, both of them supporting different types of thumbnails.
3.1.2. Important Buttons
To smooth your data recovery job, the following buttons are of great help for you.
-
 Click the “Start” button to begin the scanning and recovery process.
-
 Click the “Back” button to go to the previous step, usually that will be to select another location.
-
 Click the “Preview” button to preview files before recovery.
-
 Click the “Recover” button to recover and save your lost data.
-
 The 3 buttons appear during the scanning process. If you want to suspend the process, click the first button; to terminate it, the second one; to continue it, the third one.
-
 Change the way to preview data through the two buttons.
-
 Click this right arrow button to expand more information.
-
 Click the downward arrow to show or hide the drop-down menu.
-
 The Menu button includes many helpful options, such as Language, Disk Tools, Log Files, etc.
Language:
We support multiple languages, including English, Japanese, Chinese, French, German, Italian, Portuguese, Spanish, Arabic, Dutch, Korean, etc.
Disk Tools:
When clicking it, you’ll be directed to the Disk Manager, where you can know the hard disk status.
Log Files:
They record the history of scanning and recovery via Recoverit. You can view them to check something wrong with your device or data.
3.2. Recover Data on Windows
Losing data is not a rare matter for most of us. Recoverit Data Recovery for PC can help you recover 1000+ types and formats of data in different storage devices, including your Windows computer hard drive, Desktop, Recycle Bin, external devices and even a crashed computer. It also provides dedicated features like advanced video recovery to get back your lost videos. Also, the application includes a video repair tool that can repair corrupted videos under different scenarios.
For more information, you can turn to the first part – what Recoverit supports.
3.2.1. Launch Recoverit on Windows
To recover files, it is necessary to launch Recoverit on your computer.
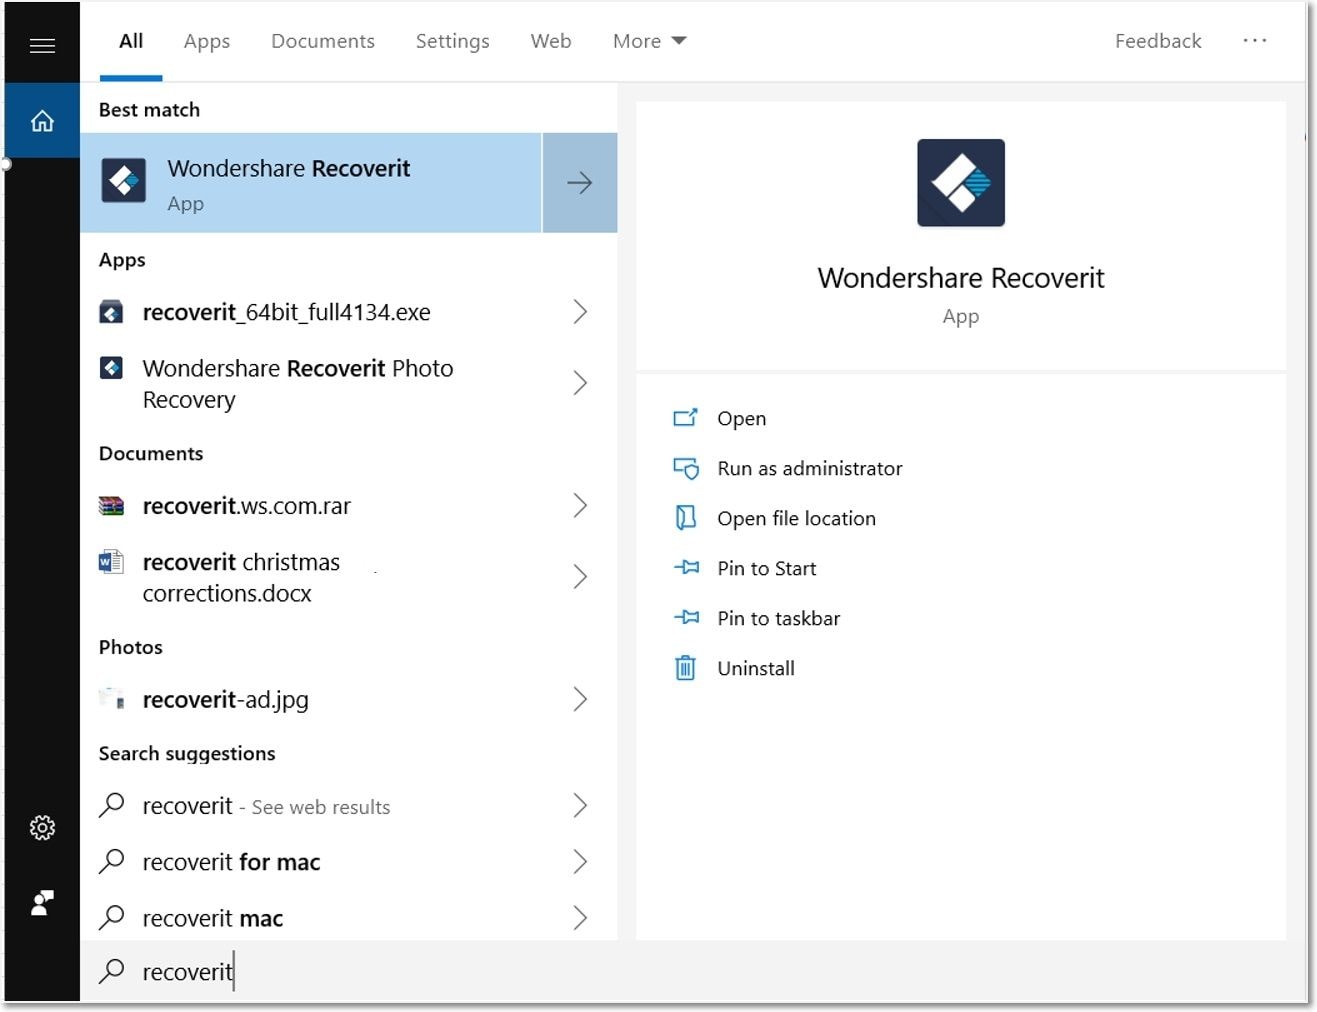
- To make Recoverit Data Recovery run on a Windows computer, please double click the “Wondershare Recoverit” icon on the Desktop.
- If Recoverit is not on the Desktop, you can enter "Recoverit" in the search box on your Windows computer. And then click on the App or Choose to "Open" it. The below image is an example on Windows 10.
3.2.2. Recover Files from Windows Computer
To recover data on a computer, please follow the 3 steps.
- Select a location
- Scan the location
- Preview & recover data
Step 1 Select a location
- To recover data on a computer, it is necessary to choose a location where you lost data.
- Here, please select a hard disk under the “Hard Disk Drives” tab, or Desktop under the “Select location” tab.
- Click "Start" to begin the scanning on the selected location.
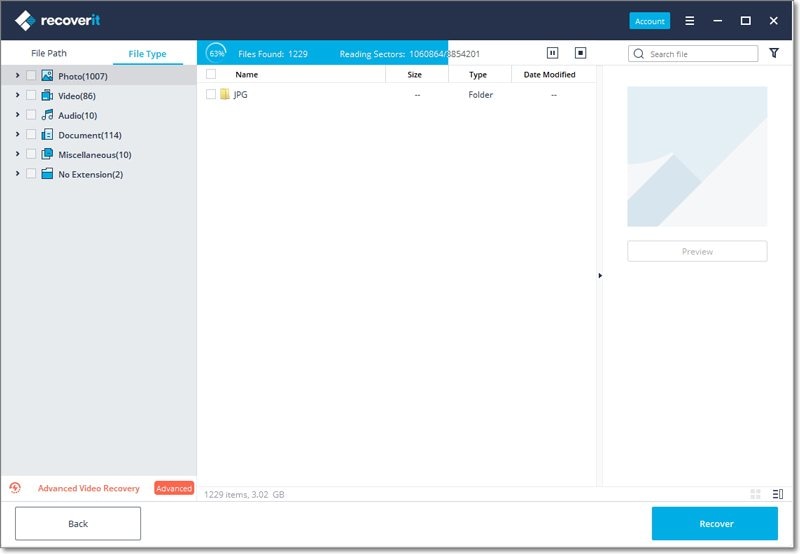
Step 2 Scan the location
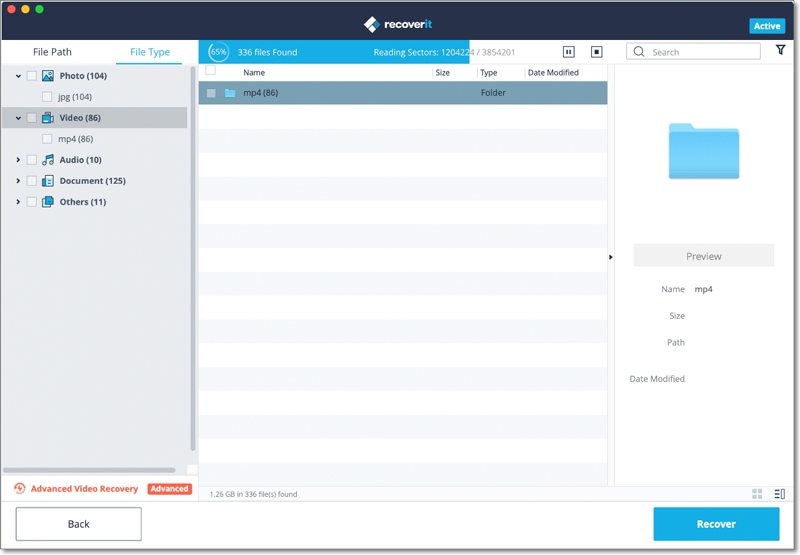
Recoverit will start an all-around scan. Usually, it will take a few minutes to finish the scanning. Sometimes, a few hours are required if many large-sized files are present.
During the scanning process, you can also pinpoint files or stop the scanning for your convenience.
If you are looking for lost or deleted videos, then you can click on the “Advanced Video Recovery” option that is located at the bottom-left corner on the interface. Simply click on it to perform a deep scan to look for large-sized videos. You can know more about the Advanced Video Recovery feature later in this tutorial.
1 Pinpoint files during the scanning
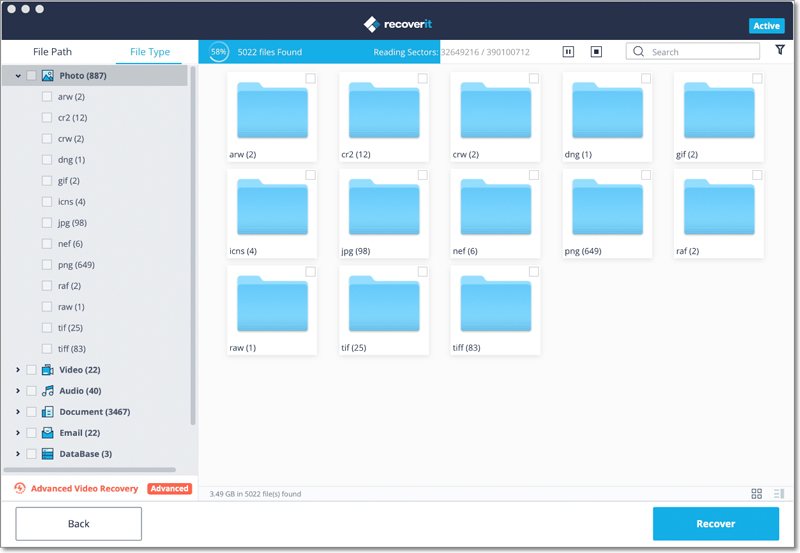
During the scanning, you can toggle between different ways to filter, select and pinpoint the files you want to recover. The ways are respectively "File Path" and "File Type". By the way, to get more details, you can click the rightward arrow.
File Path is the route on the computer to store the data. For example, “C:\Program Files\Wondershare\Wondershare Recoverit Pro\log”.
File Type is the types and formats of data. The file type can be photo, video, audio, document, email, DataBase, Webfiles, archive, miscellaneous and no extensions. The file format, put it simply, is the specific extensions of different types of files, such as JPG, PNG, MP3, MP4, XLSX, DOCX, etc.
If the results are overwhelming and you get a lot of files, then you can use the filters on the right. You can filter the extracted files on the basis of their type, file size, modification date, and other features to narrow down the results.
- Show Files: To show all files or just the deleted files
- File Type: Filter results for specific file types, such as photos, multiple file types, or view all file types
- System File: Toggle between the feature to show system files or hide system files
- File Size: To view all files irrespective of their size or files of a specific size (like 100-500 MB)
- Date Modified: This will let you filter files for specific dates on which they were modified
2 Pause or Stop the scanning
Even if Recoverit starts to scan the selected location for your lost data, you can pause or stop it at any time. You can suspend the scanning temporarily by clicking the pause button - , and continue the process after clicking the play button -
 .
.
If you have found something you want, you can stop the process at any point by clicking on the stop button - .
.
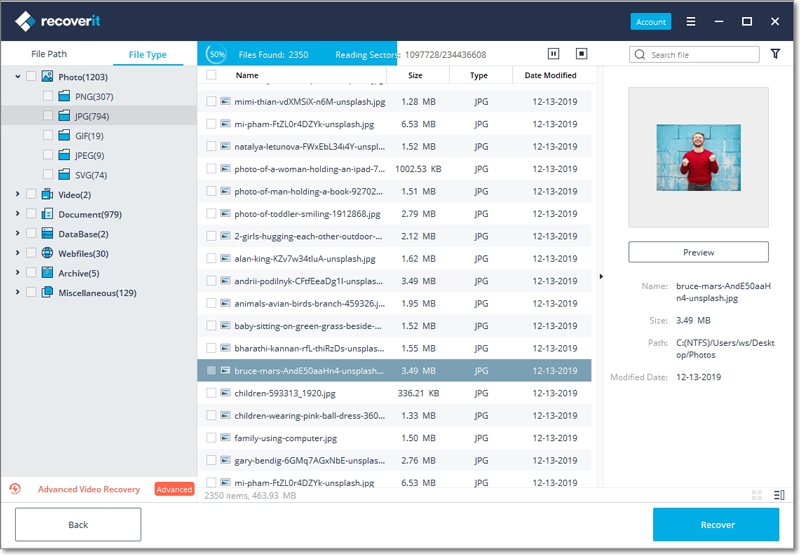
Step 3 Preview and recover files
Recoverit allows users to preview the recoverable files before proceeding to the recovery step. You can select the targeted files and click the "Recover" button to retrieve your files back.
1 Preview files after the scanning
As a Recoverit user, you can preview data by clicking on the file. A thumbnail will show you on the right panel.
Besides, a preview window will pop up after clicking the “Preview” button or double clicking a file.
Moreover, when you click on the file, some information about the file can display, including the file name, file size, file path and the modified date.
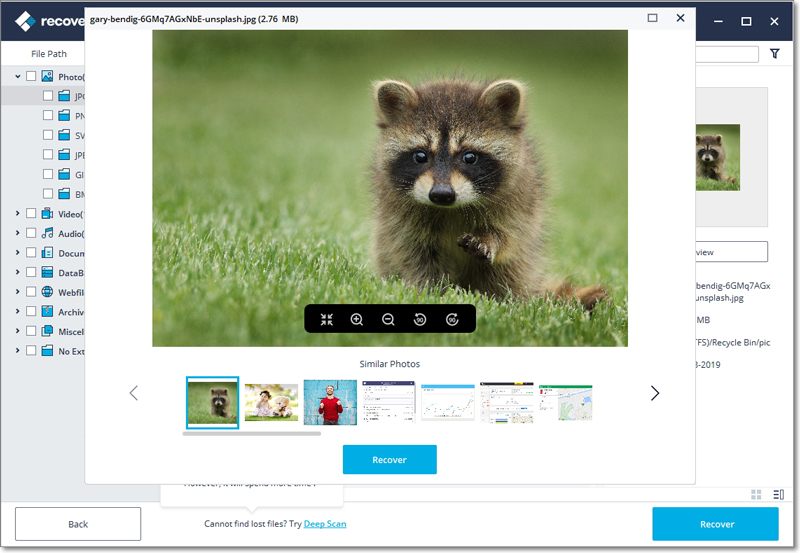
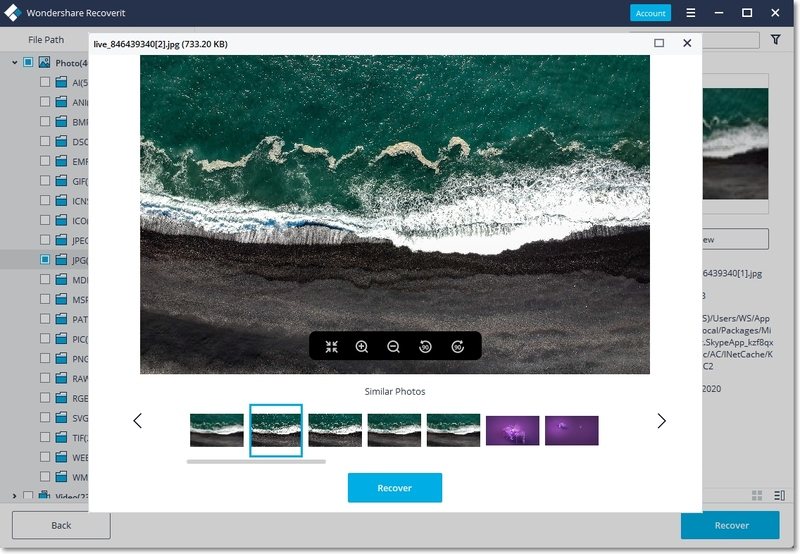
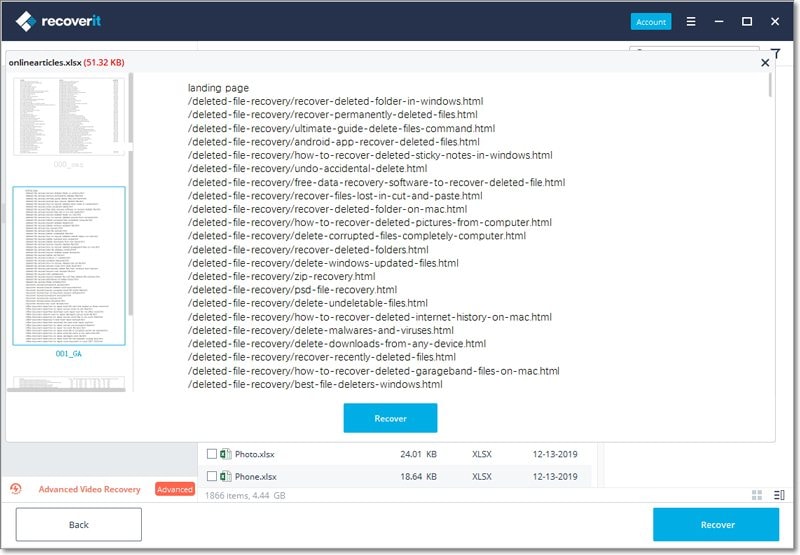
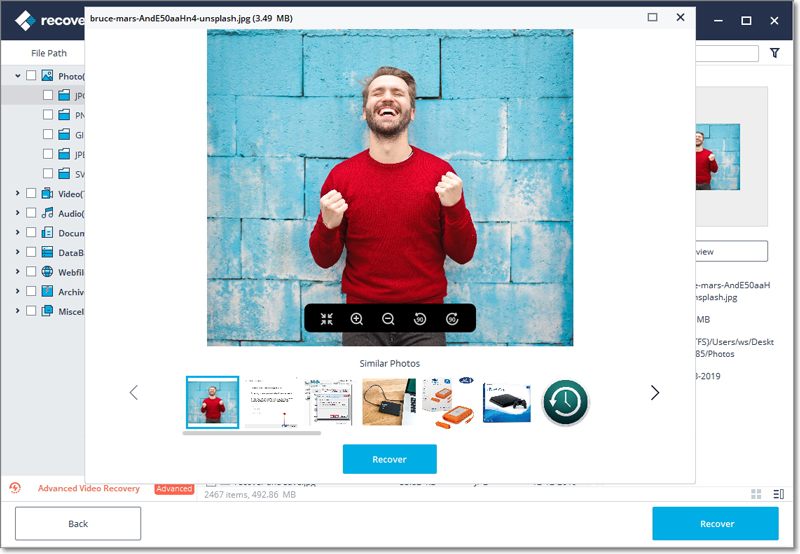
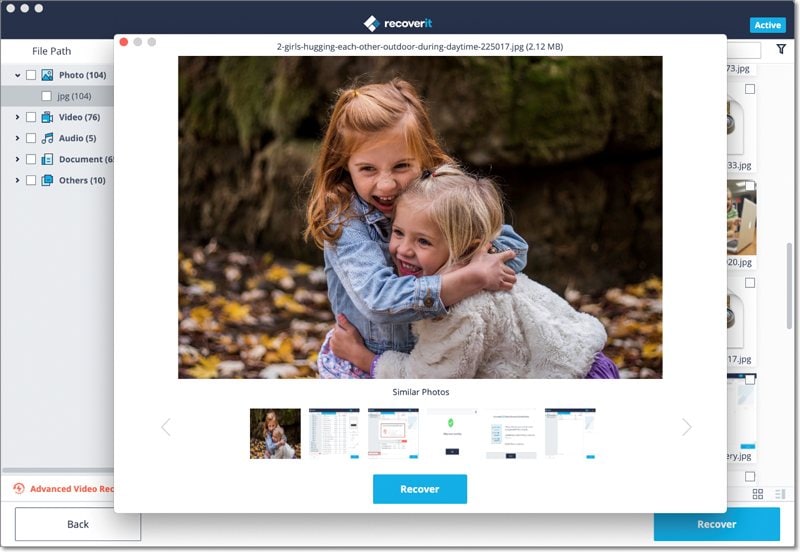
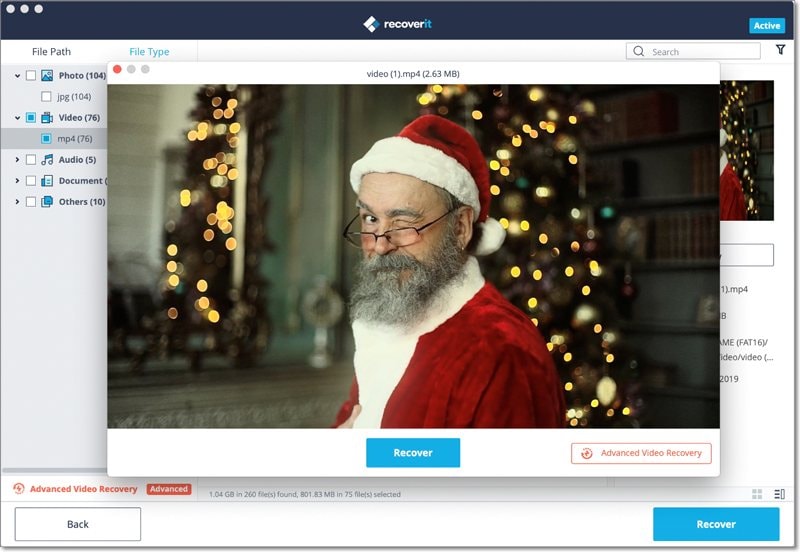
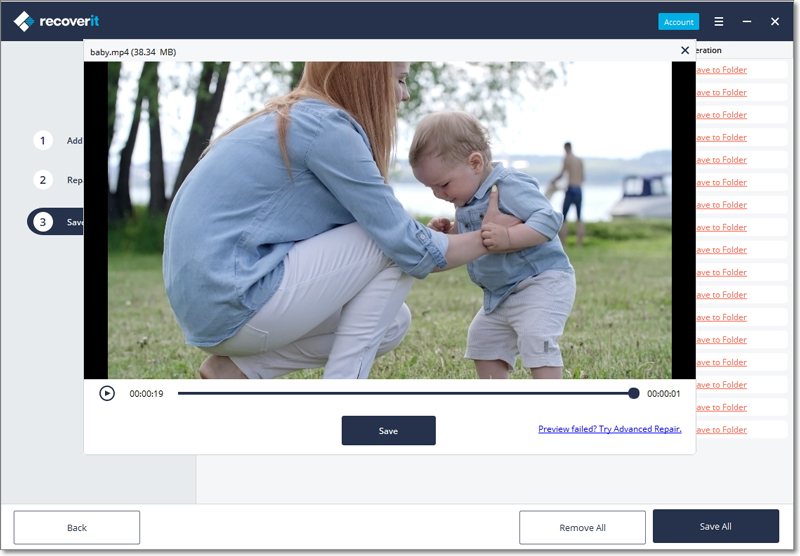
Recoverit provides a wide preview for photos on its interface. The interface also displays other similar photos for our reference at the bottom. Additionally, it also gives us an option to view the photo on full screen, zoom in, zoom out, or rotate it.
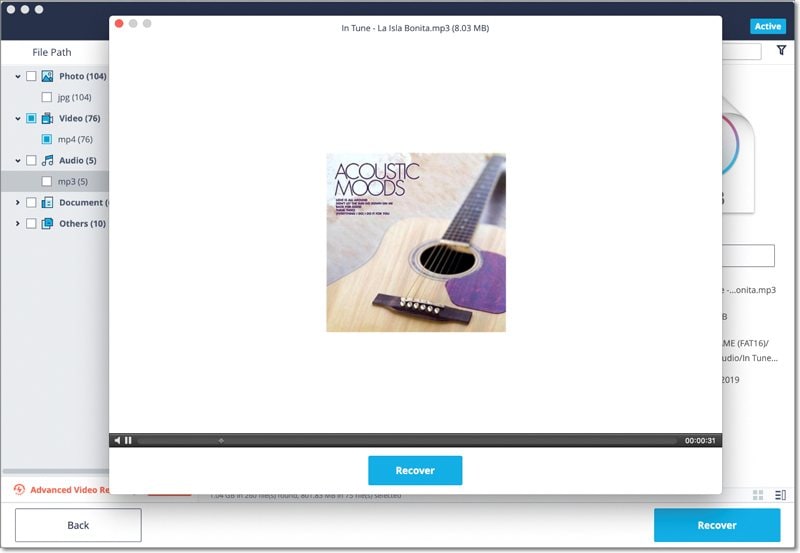
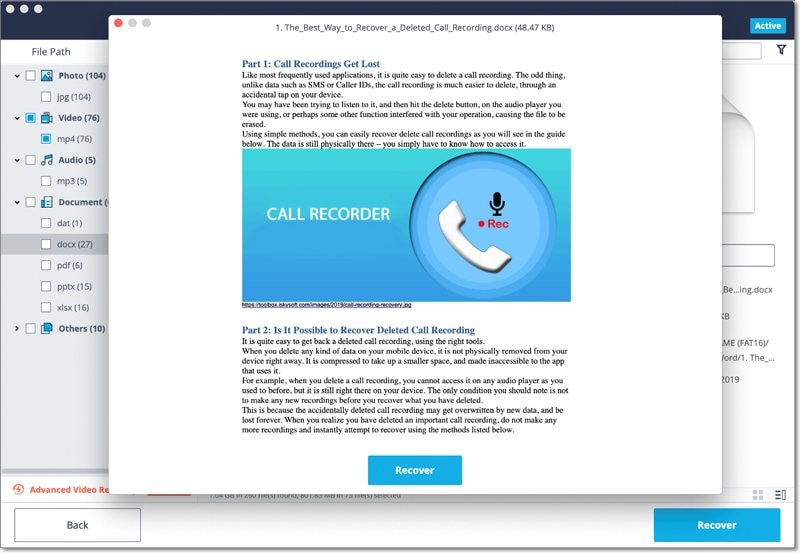
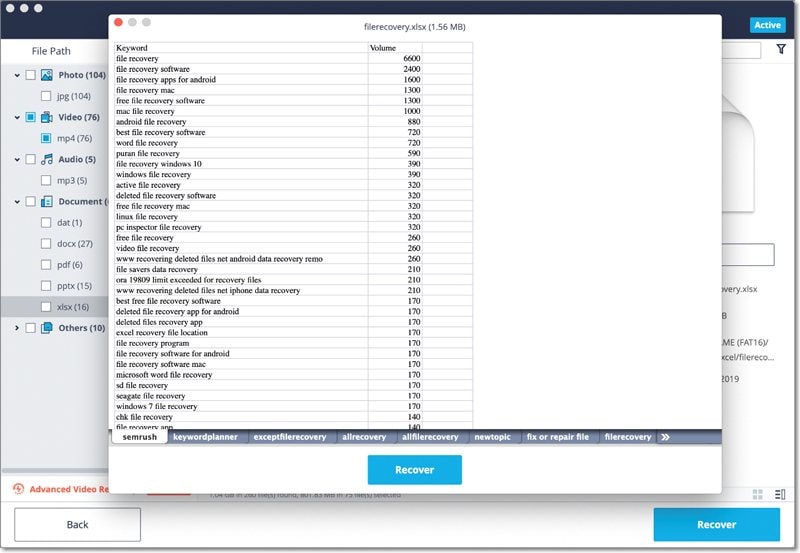
Recoverit supports to preview almost all the common types of files, such as images, videos, audios, Outlook emails, documents, and many more.
• Preview a Photo
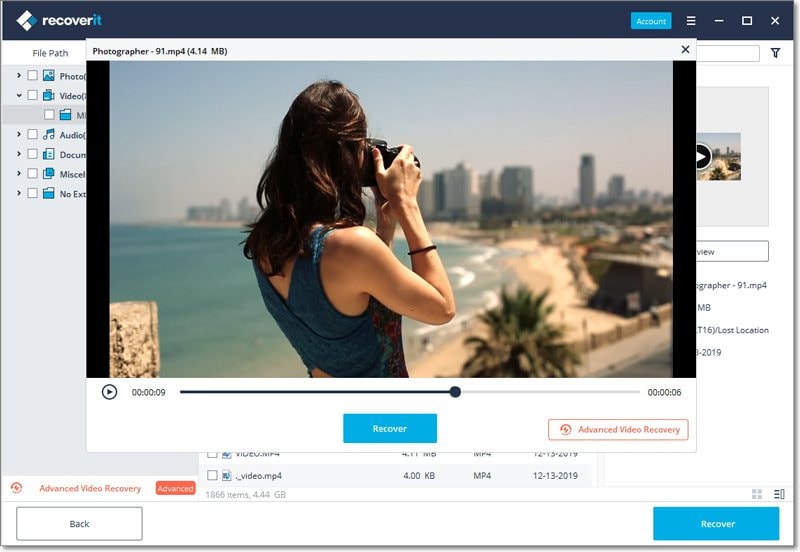
• Preview a Video
• Preview an Audio File
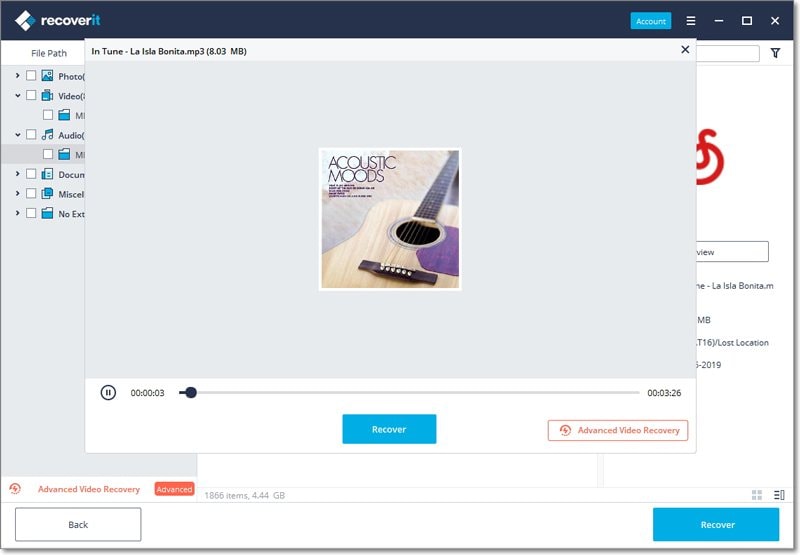
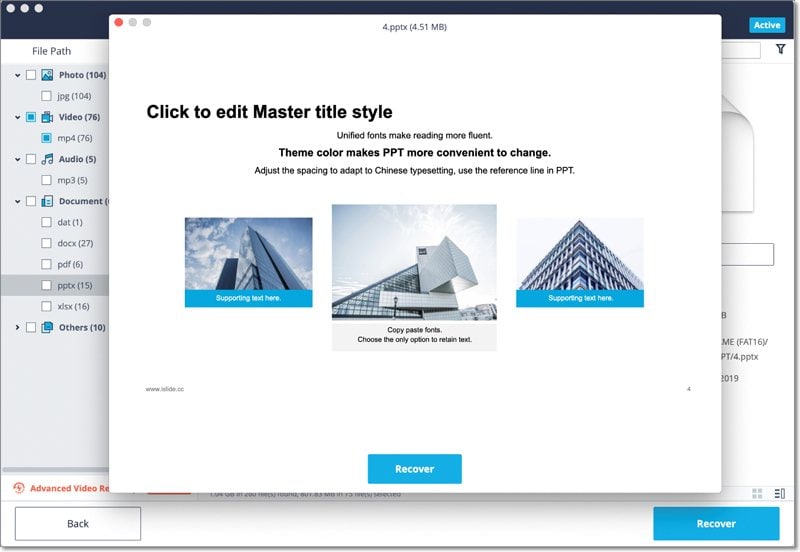
• Preview a PowerPoint File
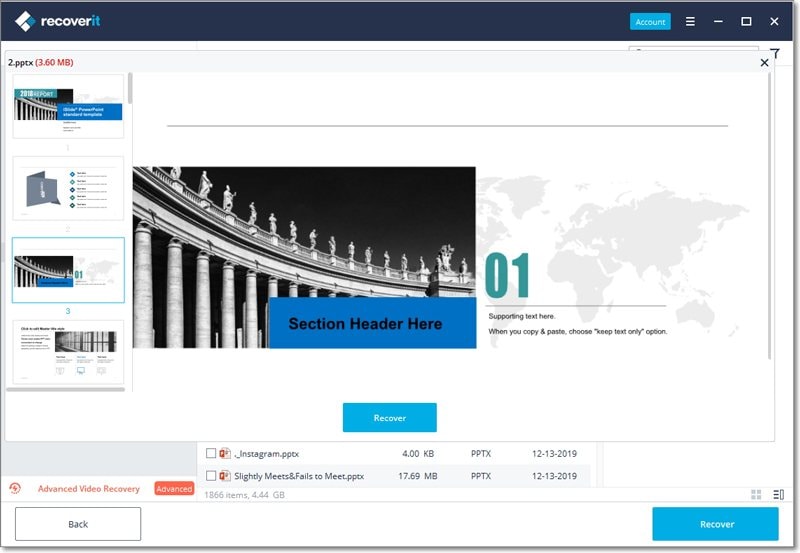
• Preview a Word File
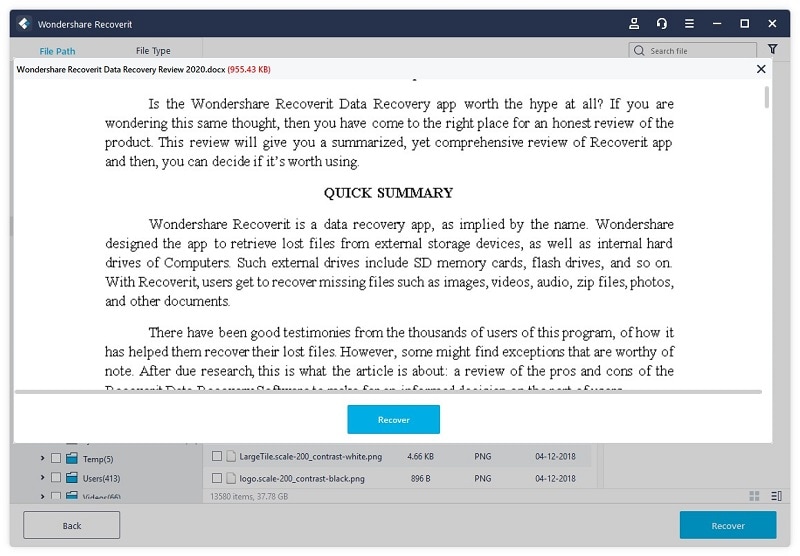
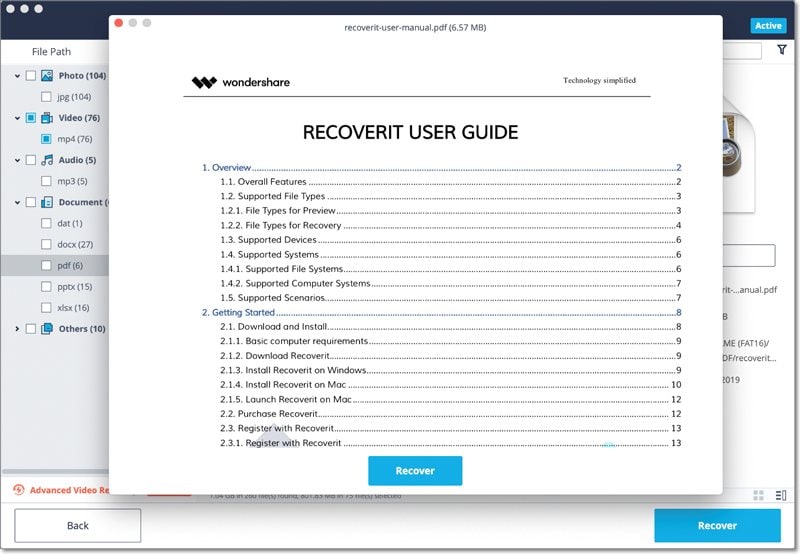
• Preview a PDF Document
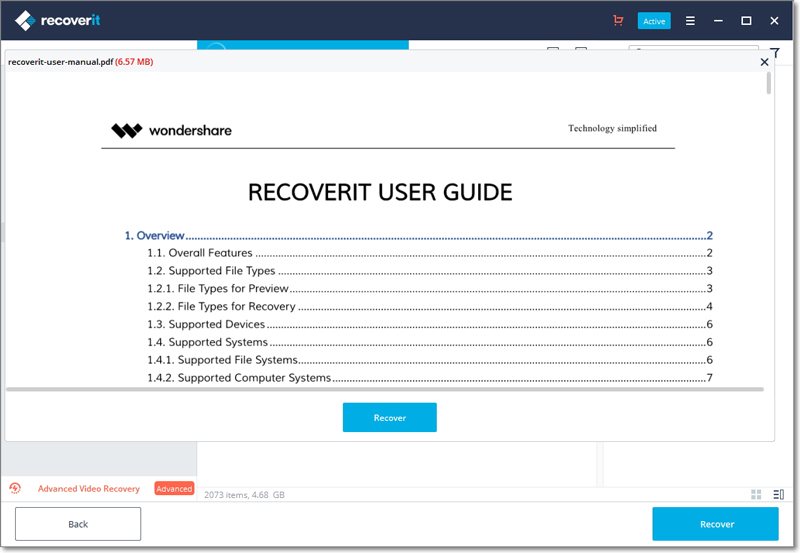
• Preview an Excel File
If you are not able to preview the files, we offer some inbuilt tips for you. Follow them and get the problems fixed. You can get the exact details in the page: Preview files with Recoverit
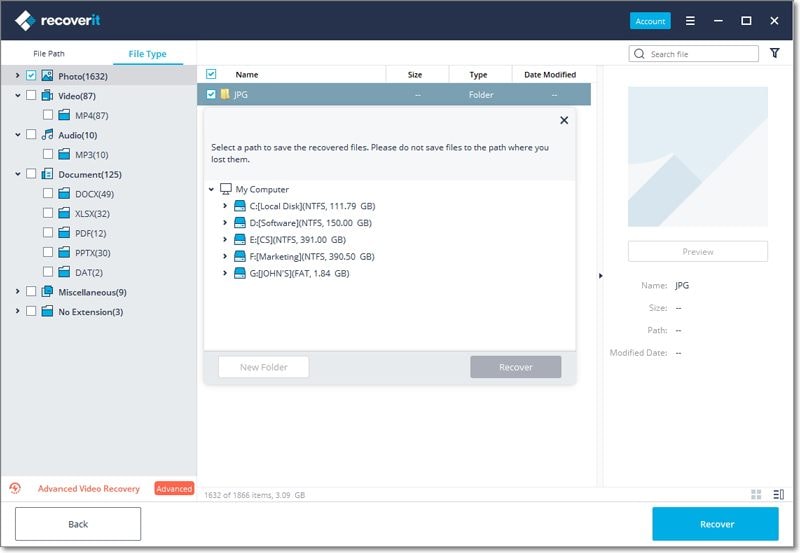
2 Recover Files from Windows Computer
After previewing the files and confirm they are what you want, you now can get them all back using Recoverit.
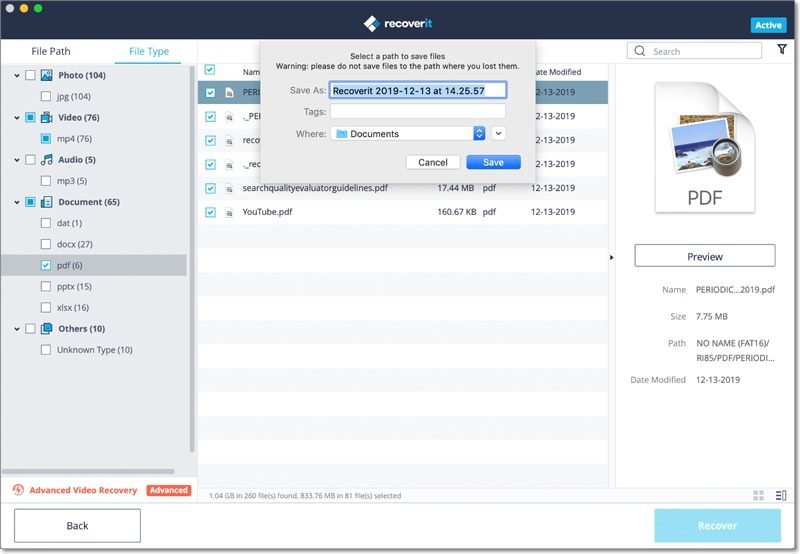
Directly hit on the “Recover” button to retrieve your lost data back and choose a path to save the recovered files.
Please do not save the files into the hard disk where you deleted or lost the data.
Note: The steps imply for recovering data from a Windows computer's internal hard drive. If you need to get data back from Recycle Bin, external devices or a crashed computer, please read a little further.
3.2.3. Do Advanved Video Recovery
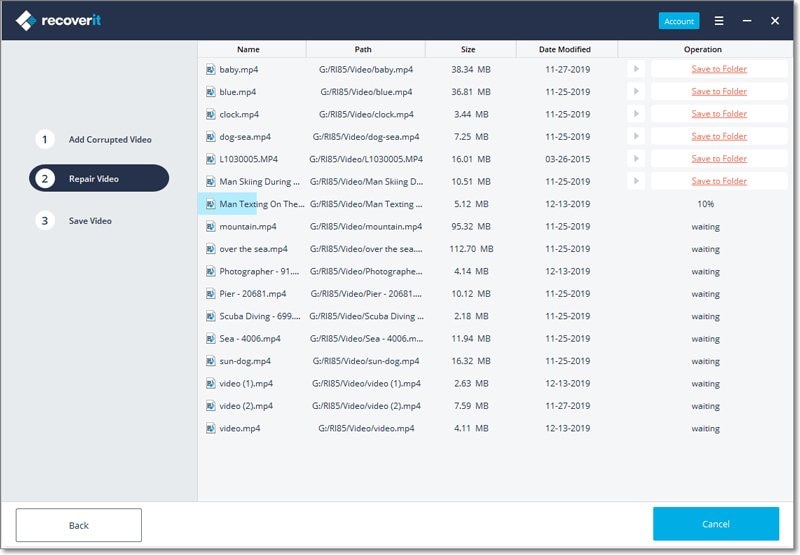
The application also provides a provision to look for large-sized and complex videos with the help of its deep video scanning feature.
Step 1 Select the “Advanced Video Recovery” option
To start with, you need to select the Advanced Video Recovery option that would be displayed in two different ways.
From the bottom-left corner: During the scanning process, you can view a feature for “Advanced Video Recovery” listed at the bottom-left panel of the interface. You can just click on it to load the feature.
From the video preview window: As you would open the window to preview a video, you can view an “Advanced Video Recovery” feature at the bottom. Just click on it to launch the option.
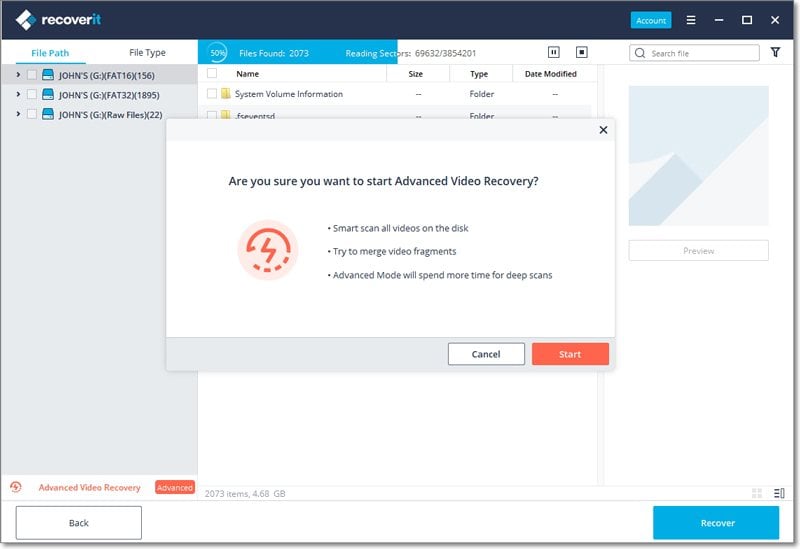
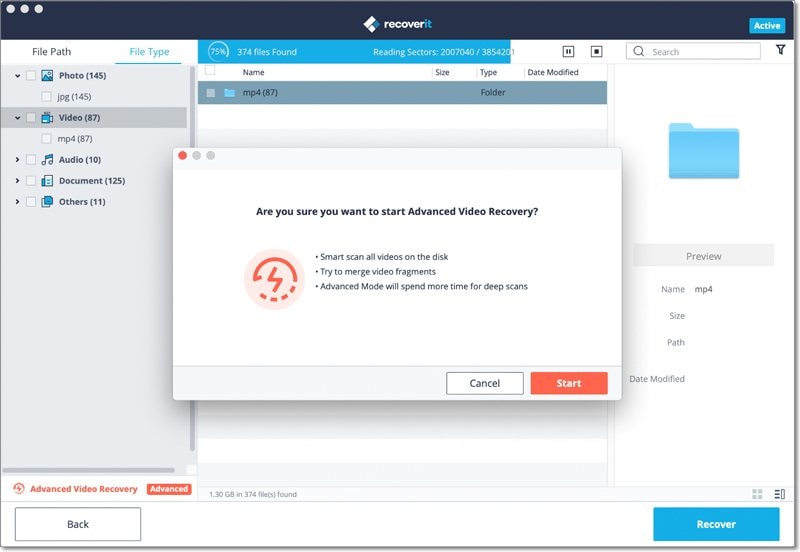
As you would launch the Advanced Video Recovery feature, you will get the following prompt informing you about its operation. It is a smart scan that can merge video fragments and will take more time to complete the scan. Just confirm your choice and click on the “Start” button to proceed.
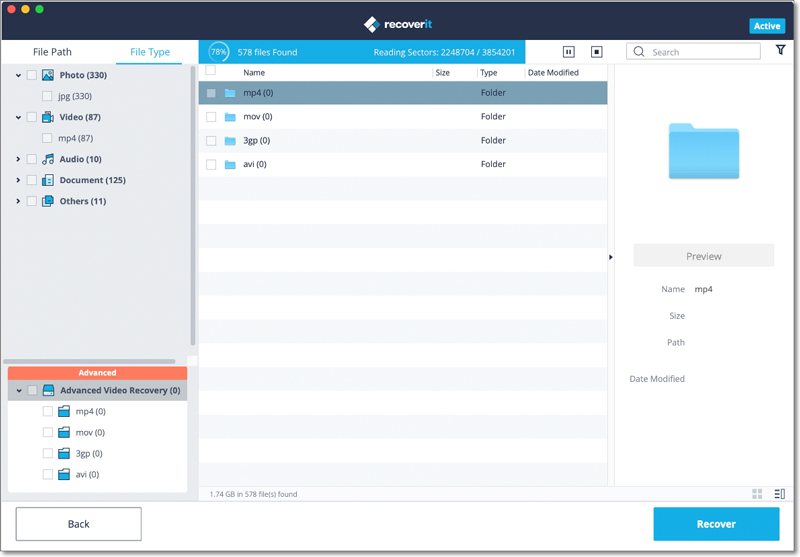
Step 2 Perform Deep Scan for the Videos
Simply wait for a while as the Deep Scan will take more time to merge and splice the video fragments to recover them. You can view the scanning results and pause/stop them whenever you want. You can also pinpoint the results, search for specific files, and use the available filters to narrow down the scan.
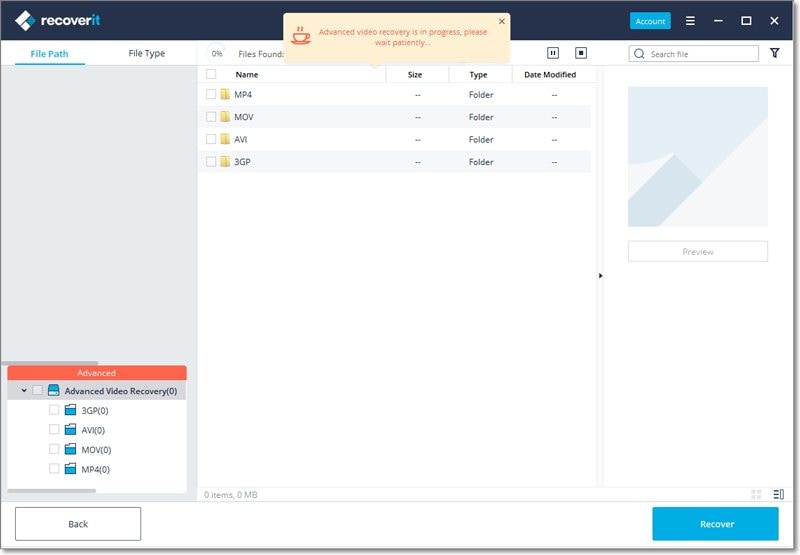
Note: Please wait patiently when the Advanced Video Recovery is in progress. Don't quit the program as it may interrupt the scanning and recovery.
Step 3 Preview and Recover
The application will display the results of the Advanced Video Recovery and will let you preview them. You can look for specific videos and view them on the interface of Recoverit. Select the videos that you wish to save and click on the “Recover” button. This will open a browse window so that you can select a location to save the video files. It is recommended to save them to another secure location and not where you lost them originally.

3.2.4. Restore Files from Emptied Recycle Bin
Each time the files are deleted from your computer by choosing the "Delete" option, they go to the Recycle Bin. The lost files can come from different sources of your computer, including the internal hard drive, partitions, sectors, and even external devices.
To recover the permanently deleted or emptied data from the Recycle Bin, scanning the whole computer is unreasonable. It will result in a very long scanning time.
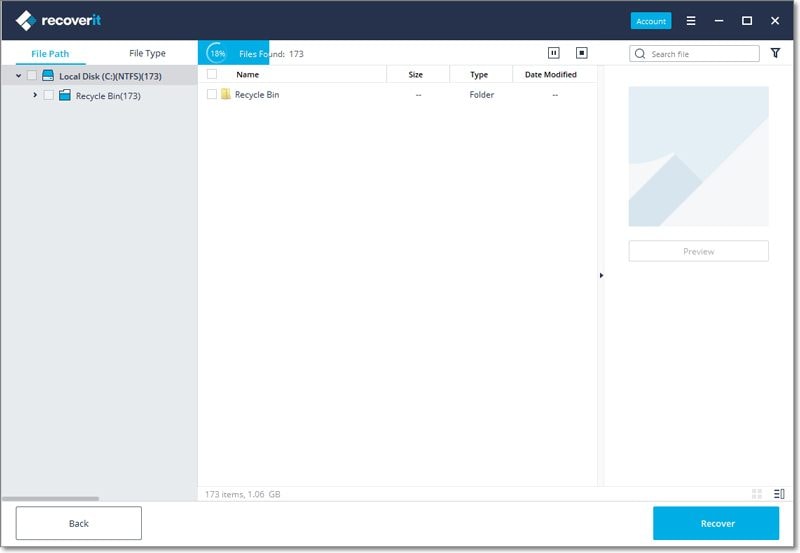
To save the scanning time, there are two scan modes for Recycle Bin recovery, namely all-around scan and deep scan. Once you find nothing through the all-around scan, you can turn to the deep scan mode. The deep scan will deeply search for your lost data.
Step 1 Select the Recycle Bin
To restore recycle bin, recover emptied recycle bin or retrieve permanently deleted files on a computer, you should select the recycle bin as the target location.

Step 2 Scan the recycle bin
As mentioned before, there are 2 scan modes to scan and recover files from the Recycle Bin.
1 All-Around Scan
It will automatically start an all-around scan to search for files from recycle bin. Usually, the scan can meet your needs of lost data.
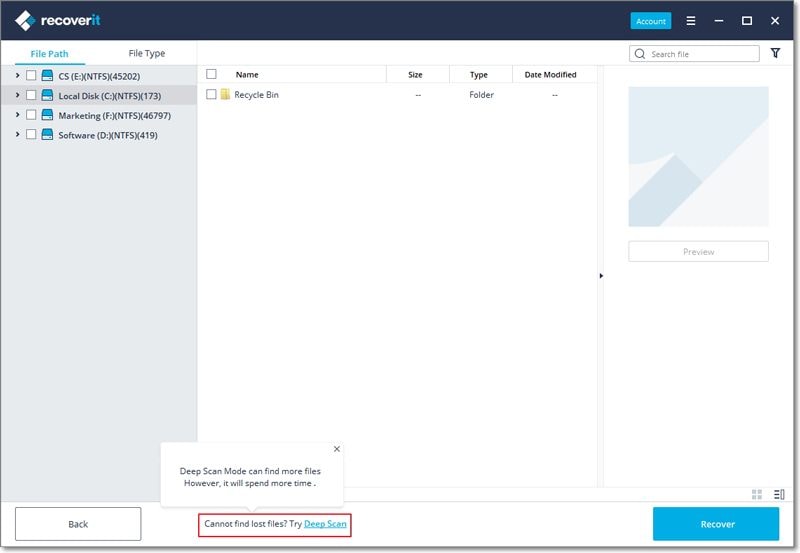
2 Deep Scan
After the all-around scan, if you still find nothing desired, you can resort to the deep scan mode to deep dig out more lost data from Recycle Bin.
During the scanning, you can filter the files from the file type categories on the left bar. The same, you can choose to pause or stop the scanning process at any time.
Simply let the application scan the files and don’t close it in between to get better results. Once the scan is completed, you can preview your files.
Step 3 Preview and recover your data
1 Select a file or files
Once the scan is completed, Recoverit will list all the files by classifying the file types on the left. You can filter and locate data through the options:
- Show Files: Show all files or just the deleted files
- File Type: Get results for specific file types (like photos), multiple file types, or all types
- System File: View all system files or hide system files
- File Size: Filter results to view all files (irrespective of their size) or files of specific sizes
- Date Modified: Specify the dates on which the files were modified the last time
2 Preview data
Before recovery, it would be better if you take advantage of the preview feature to confirm if the files are what you want.
- Thumbnails
- Double click the file
- Click on the “Preview” button
-
Toggle the 2 preview methods:
3 Recover and save files
Finally, you can select the targeted files and click “Recover” button to retrieve your data back from recycle bin.
Please do not save the recovered data on the same location to avoid data overwriting.
3.2.5. Recover Data from External Devices
If your data gets lost from an external device on Windows computer, Recoverit can also help you recover them. The external device can be an external hard drive, memory card, SD card, digital camera, Drone camera, USB flash drive, music player, sound recorder and so on.
Step 1 Connect the external device
Before getting Recoverit started, you need to connect the external device to your computer. Make sure that it can be recognized or detected.
Step 2 Select the external device
To recover lost or deleted files from the removable storage media, please select the device as the target location. And then hit on the “Start” button to move forward.
Even though the partition on the device has got lost, you can still use Recoverit to bring the lost data back.
Step 3 Scan the external device
An all-around scan will be launched on the external storage media. Wait a few minutes to finish the scanning. During the process, you can locate the targeted files, as well as pause or stop it.
Step 4 Preview and recover files
Once the scanning ends, you can preview the files from the scanning result. To get the files back, click “Recover” and save them into another safe location.
3.2.6. Recover Data from Crashed Computer
If your system is crashed or stops working in an ideal way, then you can get Recoverit to retrieve back your lost or inaccessible data. Download and install Recoverit on a working computer, prepare a blank USB drive or CD/DVD and connect it to the computer.
Step 1 Preparations for Crash Recovery
- Another working computer
- A blank USB drive or CD/DVD
- Connect the device to the computer
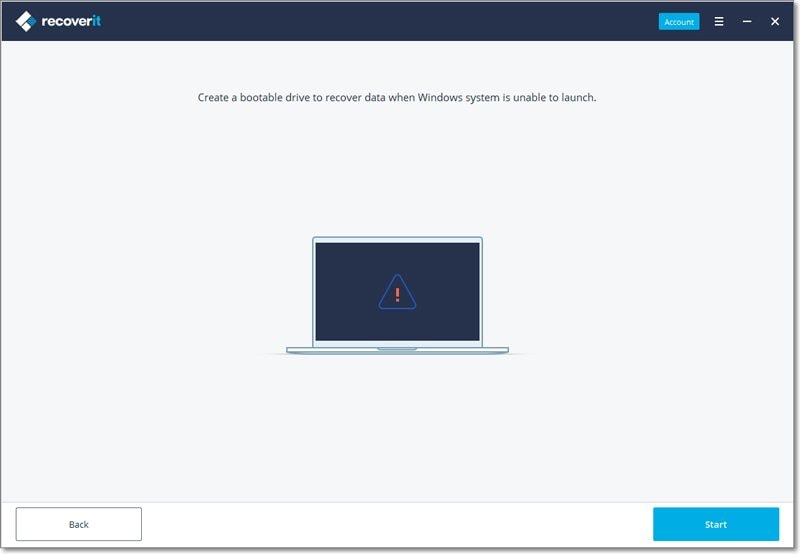
Step 2 Create a bootable media
To recover data from an unbootable computer, you need to create a bootable media to start it up first. Now, let’s have a look at how to create a bootable drive.
1 Start computer crash recovery
The first step is to launch the data recovery software on a working computer and choose "Recover from Crash Computer" under the last tab. Click "Start" to go on.
If you are unable to launch your Windows computer, you can use Recoverit to create a bootable media and recover data.
Make sure a blank USB drive or CD/DVD is connected to the working computer and can be recognized. If yes, click “Start” to go on.
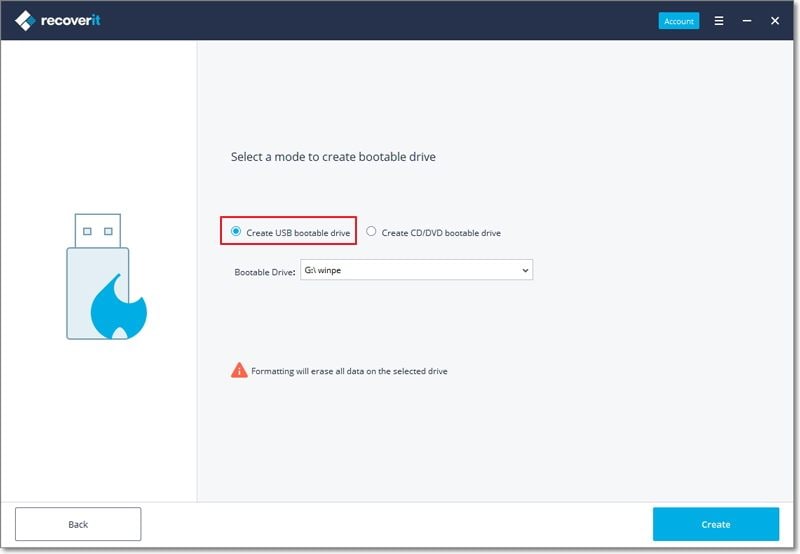
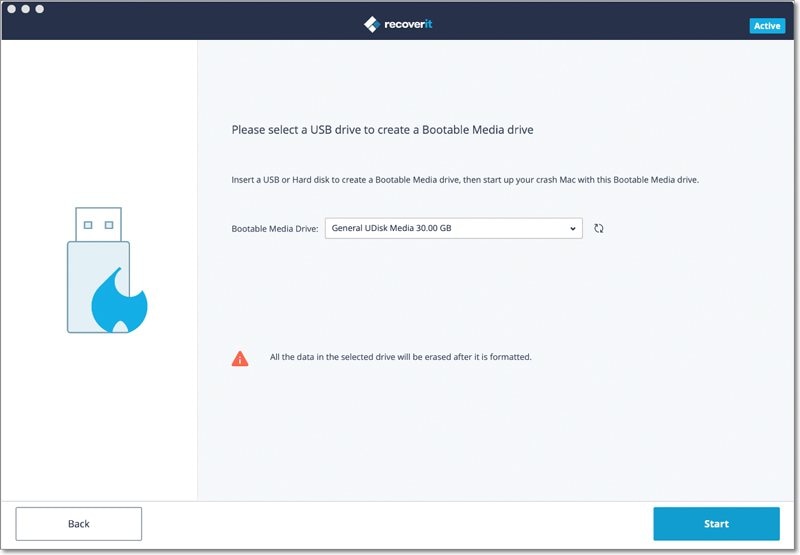
2 Select the type of your bootable drive
Then, select a mode to create a bootable drive. You can select USB bootable drive or CD/DVD bootable drive. If the bootable media is connected, it will show on the Bootable Drive. Click the "Create" button to start.
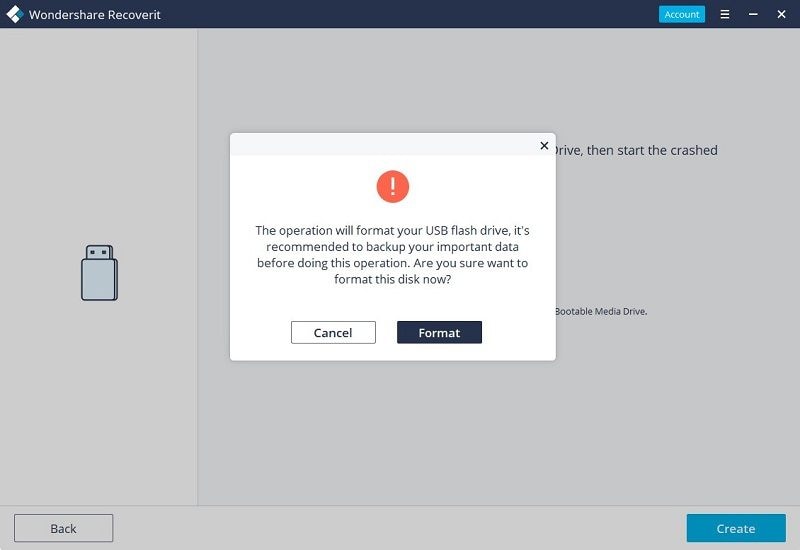
3 Backup and format data
Once you choose to create USB bootable drive or create CD/DVD bootable drive, an alert message about formatting USB flash drive will pop up.
Make sure you have backed up your important data before formatting the media. Click "Format " button to confirm.
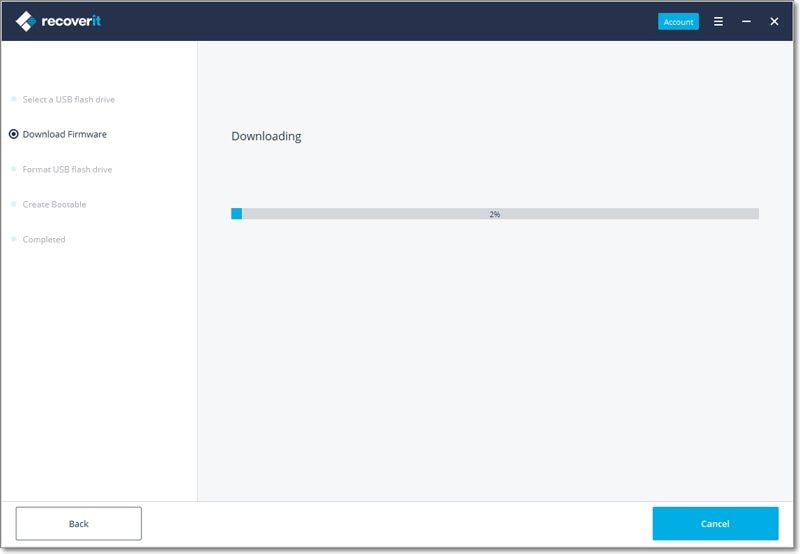
4 Downloading Firmware
On clicking the “Format” button, you can see an interface showing that the firmware is downloading. Firmware is a specific class of computer software embedded in some hardware devices. To create a bootable drive, the specific firmware is indispensable.
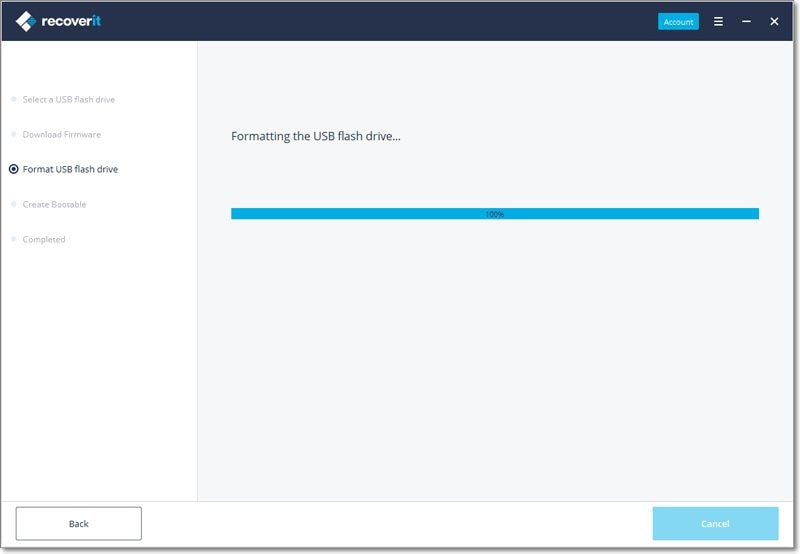
5 Formatting the bootable drive
Once Recoverit downloads the firmware successfully, it will start to format your bootable drive, like the USB flash drive. Formatting a device will erase all the data stored on it. So keep the data backup in mind.
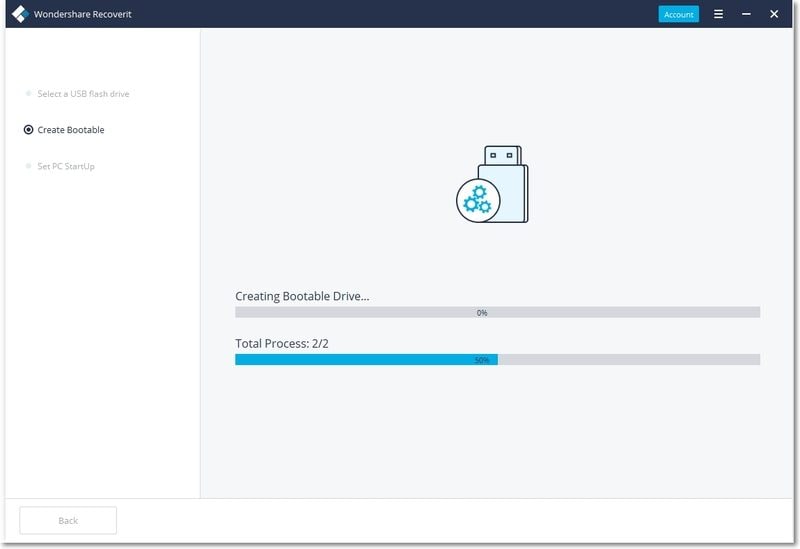
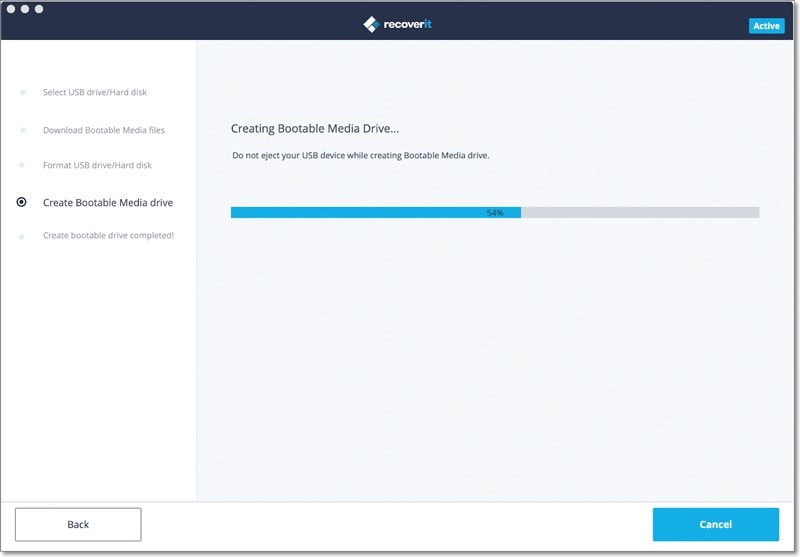
6 Creating the bootable media
It will just take a few minutes to finish the process of creating a bootable drive. During the process, please do not eject the USB flash drive or pull out the CD/DVD drive.
7 Finish creating the bootable media
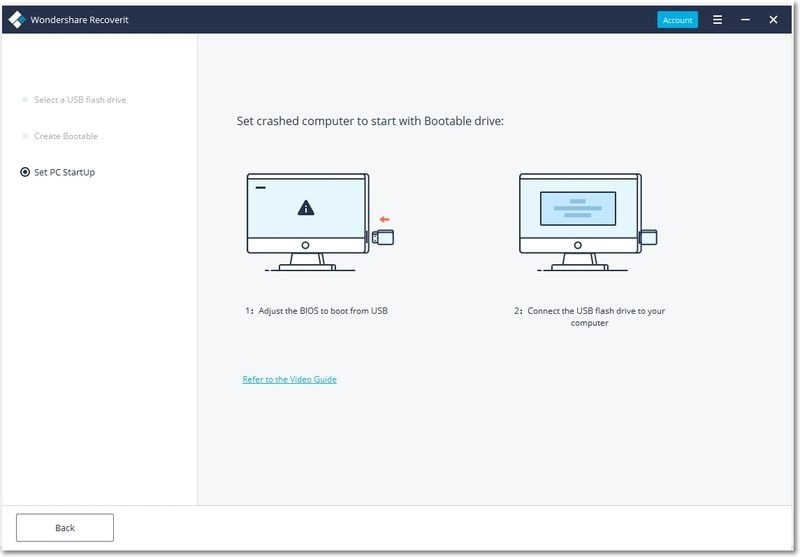
Now, the bootable drive used to boot your crashed computer up is created. What you need to do next is to follow the below steps.
- Adjust the BIOS to boot from USB/CD/DVD drive: restart your crashed computer and press the BIOS entry key when the first screen displayed.
- Connect the USB flash drive or insert CD/DVD drive to your computer.
- Restart your computer and start to recover data from the crashed system.
Step 3 Recover data from crashed computer
After following the above steps, you’ll find that the crashed computer becomes bootable now. Restart the computer and recover lost data in 3 steps.
1 Select a location
To save the scanning and recovery time, please select a hard disk where you lost data. Click “Start” to go on.
2 Scan the location
Please wait for a while until the scanning is over. Usually it lasts for a few minutes.
3 Preview and recover data
Finally, you can preview the files, select the wanted ones and click “Recover” to get them all back.
Notes: You can make the preview of different types and formats of data, such as photos, videos, audios, documents and many more.
After recovering data, please save them to another safe location, like an external hard drive or removable device.
3.3. Recover Data on Mac
Recoverit Data Recovery can recover 1000+ types and formats of data from all storage devices in a variety of data loss situations. The main file types can be photos, videos, audios, documents, archives, emails and many more. The storage devices include Windows or Mac hard drive, external hard drive, USB flash drive, SSD, digital camera, Drone camera, SD card, CF card, etc. It can also repair corrupted video files via its inbuilt video repairing tool as well. For more information, you can turn to the first part – what Recoverit supports.
3.3.1. Launch Recoverit on Mac
The same is that we need to launch Recoverit before recovering data on Mac.
To launch Recoverit Data Recovery on Mac, double click the “Recoverit” icon on the Mac Desktop.
Not there? Please go to “Finder” > “Applications” > “Recoverit” and double click the software. For those who set a password, please input the password and press “Enter” or “Return” to enable Recoverit.
3.3.2. Recover Files on Mac
Generally, the steps on recovering data are very similar no matter which kind of computer you own, Windows or Mac.
To recover data on a Mac computer, please follow the 3 steps.
- Select a location
- Scan the location
- Preview and recover data
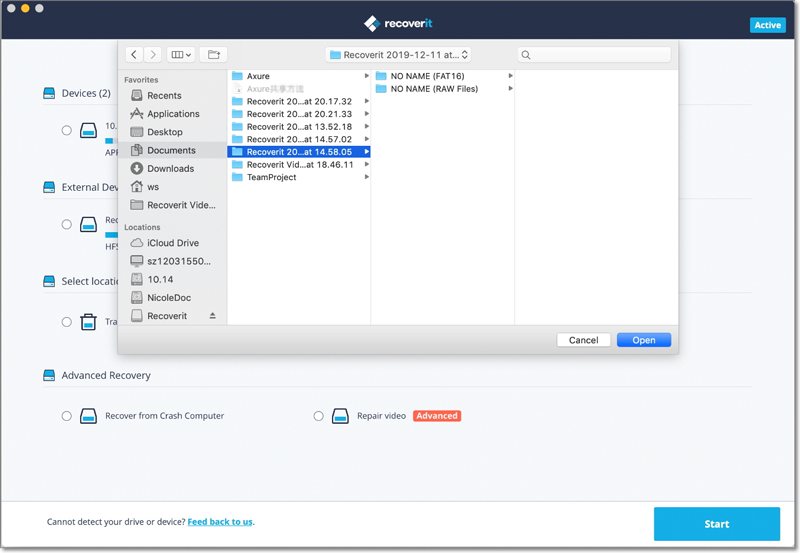
Step 1 Select a device
Launch Recoverit Data Recovery on your computer
To recover data from Mac computer, please select a drive under the "Devices" tab or "Desktop" under the "Select location" tab. Click on the "Start" button to move forward.

If you know the exact file path of your lost data, you can also choose "Select Folder" under the "Select location" tab. Afterward, click on the "Start" button to proceed.
Step 2 Scan the location
Recoverit will start an all-around scan. With the advanced scanning and searching algorithm, all your lost, deleted or formatted data can be found.
You can pause or stop the scanning process if you find your data at any time.
If you wish to recover large-sized or complex videos, then you can also click on the “Advanced Video Recovery” feature on the bottom-left corner of the screen. This will perform a deep scan, particularly to recover lost videos. You can read further to know about this feature in detail.
1 Pinpoint files during the scanning
In case the results would yield an overwhelming amount of data, then you can filter the results. There is a panel on the right that can help you filter the results on the basis of various parameters.

- Show Files: You can either view all files or just the files that were deleted
- File Type: This can filter results for specific file types (like photos), various file types, or all file types
- System File: To filter either all system files or hide system files
- File Size: You can view files of all sizes or a specific size (like 100-500 MB)
- Date Modified: To filter the files for the specific dates on which they were last modified
2 Pause or Stop the scanning
As the application would recover your data, you can pause or stop the process anytime you want. To simply halt the process, click on the pause button -  . You can later continue the process, by clicking on the resume button -
  .
If you are satisfied with the results and found what you were looking for, then you can suspend the process by clicking on the stop button -
.
If you are satisfied with the results and found what you were looking for, then you can suspend the process by clicking on the stop button -  .
.
Step 3 Preview and recover files
Recoverit allows users to preview the recoverable files before proceeding with the recovery step. You can select the targeted files and click the "Recover" button to retrieve your files back.
1 Preview files on Mac
Recoverit offers four options of previewing accessible data on Mac
- Thumbnails
- Click the “Preview” button on the right panel
- Double click a single file from the result menu
-
Toggle between the two preview angles -

As long as the file can be viewed on Mac and it is smaller than 15 MB, Recoverit can help you preview the files on Mac.
Recoverit also provides a bigger and better way to preview photos. It will display similar photos at the bottom panel to make it easier for you to recover your photos.
Preview an image
Preview a video
Preview an audio file
Preview a Word document
Preview an Excel file
Preview a PDF document
Preview a Powerpoint document
2 Recover and save Mac files
Once you preview your data and have got what you were looking for, click on the "Recover" button to restore your files. Select a different location to save the recovered files.
Please do not save the files on the hard disk where you deleted or lost the data before to prevent the overwriting of data.
Note: The steps are applicable for recovering data from Mac’ internal hard drive. If you need to get data back from Mac’s Trash, external devices or a crashed Mac, please read a little further.
3.3.3. Do Advanced Video Recovery
If you have lost your videos and can’t find them with the standard recovery method, then you can try the Advanced Video Recovery feature of Recoverit. It will perform a deep scan on the system and will let you get back heavy or complex videos with its advanced splicing algorithm.
Step 1 Select the “Advanced Video Recovery” mode
There are two different ways to launch the Advanced Video Recovery module of Recoverit.
During the scanning process, you can click on the “Advanced Video Recovery” option at the bottom-left corner of the screen.
Besides that, you can also access the Advanced Video Recovery feature from the video preview screen at the bottom of the interface.
Once you launch the Advanced Video Recovery option, the application will display the following prompt informing about its smart scan features. Simply confirm your choice by clicking on the “Start” button.
Step 2 Complete the Deep Scan operation
Wait for a while as the application would look for the needed video fragments and would recover your videos with its splicing technique. If you want, you can pause and resume the scanning or just stop the process whenever you want. There are also additional filters to narrow down the results.
Step 3 Preview and Recover
In the end, you can just preview the recovered videos on the native interface of Recoverit. Simply select the videos you wish to get back and click on the “Recover” button. This will open a browser window, letting you locate the folder where you wish to save the videos. It is recommended to save them to another location instead of its original location to avoid the overwriting of data.

3.3.4. Recover Files from Emptied Trash
Every time you delete a file temporarily, it is moved to Mac’ Trash. You can usually go to the Mac Trash to restore it afterward. However, if you delete files permanently or empty the Trash, Recoverit becomes an indispensable tool for you to get them back.
The data present on the Mac Trash can come from different sectors, partitions, hard drives or even external devices connected on Mac. Thus, scanning the Mac Trash for all data types will require a lot of time and bring some burden on your Mac.
To fix the problem, Recoverit offers 2 kinds of recovery modes, namely quick recovery and all-around recovery. The quick recovery mode is to scan some frequently used files on the Trash, while the all-around recovery mode can do the deep scan and even dig out the system files.
Step 1 Select the Trash
To restore Trash and retrieve deleted files from emptied Trash, select "Trash" under the "Select location" tab. Click "Start" to commence the scan.

Step 2 Scan the Trash
When it comes to Mac Trash recovery, there are two kinds of recovery modes. The quick scan will be initiated first. It will take you a few minutes to finish it.
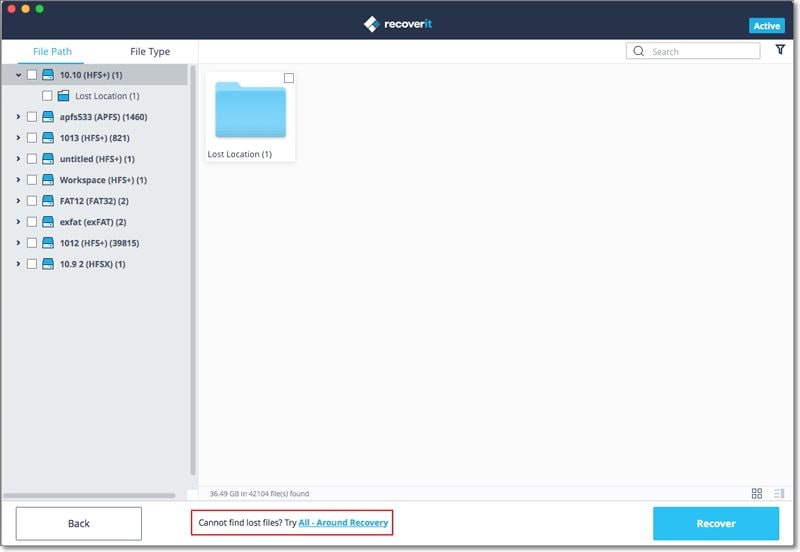
Can't find files on Mac Trash? Try All-Around Recovery.
If you cannot find the deleted or lost files, then you can try the "All-Around Recovery" option from the bottom of the interface. It will scan and search for more files from emptied Trash deeply, although more time is needed.
Sit back and wait as the application would scan your Mac and recover the data deleted from its Trash folder. You can preview your files and even halt the scanning process as per your requirements.
Step 3 Preview and recover your data
After the scanning, you can locate, preview and select files before recovery. Finally, click "Recover" to retrieve the files back.
1 Locate Files
بمجرد اكتمال الفحص ، يمكنك الاستفادة من الميزات أدناه لتحديد موقع بعض البيانات المحددة بسرعة أكبر.
- اعرض الملفات: لتصفية جميع الملفات أو المحتوى المحذوف فقط
- نوع الملف: نتائج تصفية لأنواع ملفات معينة (مثل الصور) ، أو أنواع ملفات متعددة ، أو جميع ملفات العرض من جميع الأنواع
- ملف النظام: لعرض ملفات النظام أو إخفاء ملفات النظام
- حجم الملف: نتائج تصفية لأحجام ملفات معينة أو ملفات من جميع الأحجام
- التاريخ عدل: أدخل تاريخًا محددًا عندما تم تعديل الملفات في المرة الأخيرة
2 معاينة الملفات مع Recoverit
يدعم Recoverit معاينة أنواع وتنسيقات البيانات المختلفة ، والتراجع عن الخيارات المختلفة.
- الصور المصغرة
- الزر "معاينة"
- انقر نقرًا مزدوجًا فوق الملف
- التبديل بين أوضاع المعاينة المختلفة
3 استعادة وحفظ الملفات من Mac Trash
بعد ذلك ، يمكنك تحديد الملفات المستهدفة والنقر فوق الزر "استرداد" لاسترداد بياناتك مرة أخرى من سلة المهملات.
بعد استعادة الملفات ، يرجى عدم حفظها في نفس الموقع. يوصى باستخدام موقع مختلف مثل القرص الصلب الخارجي أو أي مصدر آخر.
3.3.5. استعادة البيانات من الأجهزة الخارجية
بمجرد العثور على البيانات المخزنة على جهاز خارجي تضيع ، لا تقلق! يمكن أن يساعدك Recoverit في استعادة البيانات المفقودة من وسائط خارجية على جهاز كمبيوتر يعمل بنظام Windows أو Mac. بغض النظر عن نوع وطراز الجهاز الخارجي ، لديك فرصة جيدة لاستعادتها باستخدام Recoverit. على سبيل المثال ، الأقراص الصلبة الخارجية ، وبطاقات الذاكرة ، والكاميرات ، ومشغلات الموسيقى ، ومحرك الأقراص ، وما إلى ذلك.
الخطوة 1 حدد الوسائط الخارجية
لاستعادة الملفات المفقودة أو المحذوفة من وسائط خارجية ، يجب عليك اختيارها كموقع مستهدف لفحص البيانات والبحث عنها.
الخطوة 2تفحص الوسائط القابلة للإزالة
يبدأ الفحص الشامل بمجرد اختيارك. عادة ما يستغرق بضع دقائق.
أثناء العملية ، يمكنك تصفية وتحديد الملفات التي تختارها.

الخطوة 3 معاينة واستعادة الملفات
بعد ذلك ، يوفر Recoverit وظيفة المعاينة لك قبل الاسترداد. يمكن معاينة مجموعة متنوعة من الملفات ، مثل الصور ومقاطع الفيديو والأفلام والتسجيلات الصوتية والموسيقى والمستندات وما إلى ذلك.
بعد ذلك ، حدد ملفًا واحدًا أو أكثر تريد استعادته وانقر على "استرداد" لاستعادتها جميعًا.
3.3.6. استعادة البيانات من Crashed Mac
جهاز كمبيوتر Mac أقل عرضة لتعطل النظام مقارنة بأجهزة الكمبيوتر التي تعمل بنظام Windows. ومع ذلك ، فهذا لا يعني أن تعطل جهاز Mac لن يحدث أبدًا. لاستعادة البيانات من جهاز Mac معطل أو غير قابل للتمهيد ، تحتاج إلى تشغيله في البداية.
الخطوة 2 الاستعدادات لـ Mac Crash Recovery
- محرك أقراص USB محمول فارغ أو قرص مضغوط / قرص DVD
- جهاز كمبيوتر جديد يعمل بشكل طبيعي
- قم بتوصيل الوسائط القابلة للتمهيد بالكمبيوتر الجديد
الخطوة 2 قم بإنشاء وسائط قابلة للتمهيد
لاستعادة البيانات المفقودة على جهاز Mac المعطل ، يجب عليك استخدام Recoverit لإنشاء محرك أقراص قابل للتمهيد لبدء تشغيل جهاز Mac. يمكن أن تساعدك الخطوات أدناه على القيام بذلك.
1 حدد Mac Crash Recovery
تتمثل الخطوة الأولى في تشغيل برنامج استعادة البيانات على الكمبيوتر الجديد واختيار "الاسترداد من Crash Computer" ضمن علامة التبويب الأخيرة. انقر فوق "ابدأ" للمتابعة.
2ابدأ في إنشاء محرك أقراص قابل للتمهيد
يمكن استخدام Recoverit لإنشاء وسائط قابلة للتمهيد لمساعدتك في استخراج البيانات من نظام معطل. قم بإنشاء محرك أقراص قابل للتمهيد لاستعادة البيانات عندما يتعذر تشغيل نظام Mac. انقر فوق الزر "ابدأ" للبدء.

3 حدد محرك أقراص USB
الرجاء إدخال محرك أقراص USB لإنشاء محرك وسائط قابل للتمهيد. بمجرد توصيله بجهاز الكمبيوتر الخاص بك ، سيظهر بجانب علامة التبويب "Bootable Media Drive". أدخل أكثر من محركات أقراص خارجية؟ انقر فوق السهم لعرض القائمة المنسدلة واختر واحدة فارغة. انقر فوق "ابدأ" للمتابعة.
4 بيانات النسخ الاحتياطي والتنسيق
لضمان المساحة الكافية على محرك أقراص USB ، سيتم تهيئته ، وبالتالي ، سيتم مسح جميع البيانات الموجودة عليه. لذا قم بعمل نسخة احتياطية من الملفات المهمة مسبقًا.
يمكن استخدام Recoverit لإنشاء وسائط قابلة للتمهيد لمساعدتك في استخراج البيانات من نظام معطل. قم بإنشاء محرك أقراص قابل للتمهيد لاستعادة البيانات عندما يتعذر تشغيل نظام Mac. انقر فوق الزر "ابدأ" للبدء.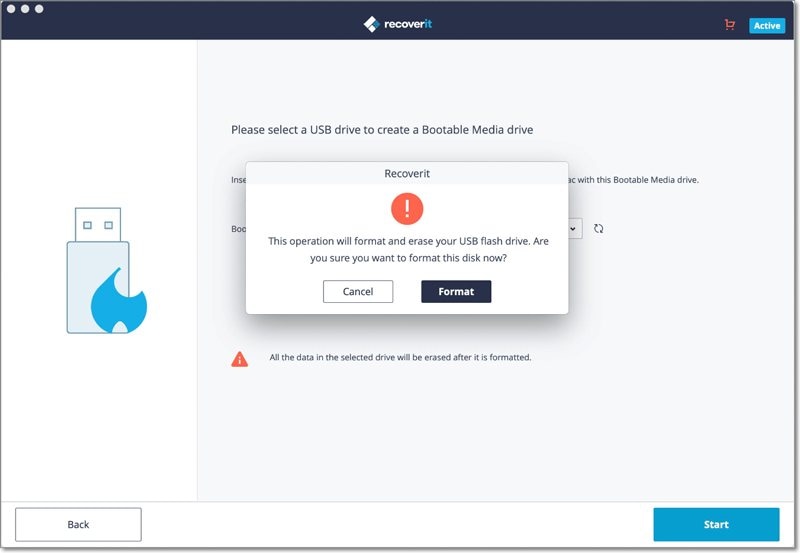
انقر فوق "تهيئة" وستظهر لك الواجهة التالية إجراء تهيئة محرك أقراص USB.
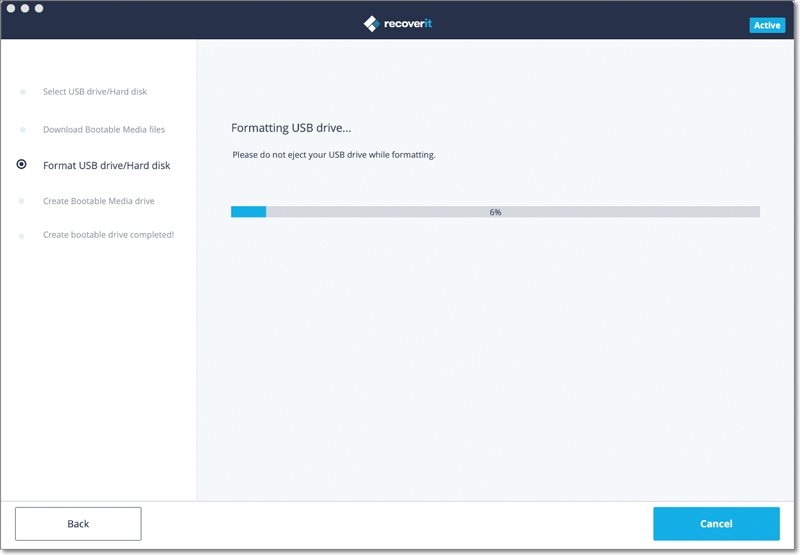
5إنشاء الوسائط القابلة للتمهيد
بعد تهيئة محرك الأقراص ، يبدأ Recoverit في إنشاء محرك وسائط قابل للتمهيد على نظام Mac. أثناء العملية ، لا تقم بإزالة محرك أقراص فلاش USB من كمبيوتر Mac الخاص بك.
6 الانتهاء من إنشاء الوسائط القابلة للتمهيد
عادةً بعد بضع دقائق ، سيتم إنشاء محرك أقراص فلاش USB قابل للتمهيد. ويمكنك الحصول على دليل لاستعادة البيانات الخاصة بك مرة أخرى.
- قم بتوصيل محرك الوسائط القابل للتمهيد بجهاز Mac غير القابل للتمهيد وأعد تشغيله
- اضغط مع الاستمرار على مفتاح الخيار عند إعادة تشغيل الكمبيوتر.
- حدد Recoverit Bootable Media Drive عندما يظهر.

الخطوة 3 استعادة البيانات المفقودة من جهاز Mac المعطل
الآن ، قمت بإنشاء محرك أقراص USB قابل للتمهيد لبدء تشغيل جهاز Mac المعطل. يمكنك اتباع الخطوات الثلاث التالية لبدء استعادة البيانات.
1 حدد القرص الصلب
تحتاج إلى تحديد قرص ثابت أو جهاز كموقع للمسح والبحث. عادةً ، لاستخراج البيانات المفقودة من جهاز Mac المعطل ، يمكنك تحديد القرص الثابت ضمن علامة التبويب "الأجهزة".
إذا كنت ترغب فقط في استعادة البيانات المفقودة من مجلد معين ، فيمكنك تحديد "تحديد مجلد" ضمن علامة التبويب "تحديد الموقع" وإدخال مسار الملف المحدد. ثم انقر فوق "ابدأ" للمضي قدمًا.
2 افحص القرص الصلب
سيبدأ على الفور فحص سريع ولكن شامل. سوف يستمر لبضع دقائق.
ولكن بالنسبة لنظام التشغيل Mac المستند إلى نظام ملفات HFS + ، يمكنك أيضًا اللجوء إلى الفحص العميق لإجراء مزيد من البحث الدقيق في الجهاز بحثًا عن الملفات المفقودة.
3معاينة واستعادة البيانات
بعد الفحص ، يمكنك معاينة الملفات بتنسيقات وأنواع مختلفة. بعد ذلك ، حدد البيانات التي تريدها وانقر على "استرداد" لاستعادتها جميعًا. يرجى عدم حفظها في نفس الموقع لتجنب الكتابة فوق البيانات.
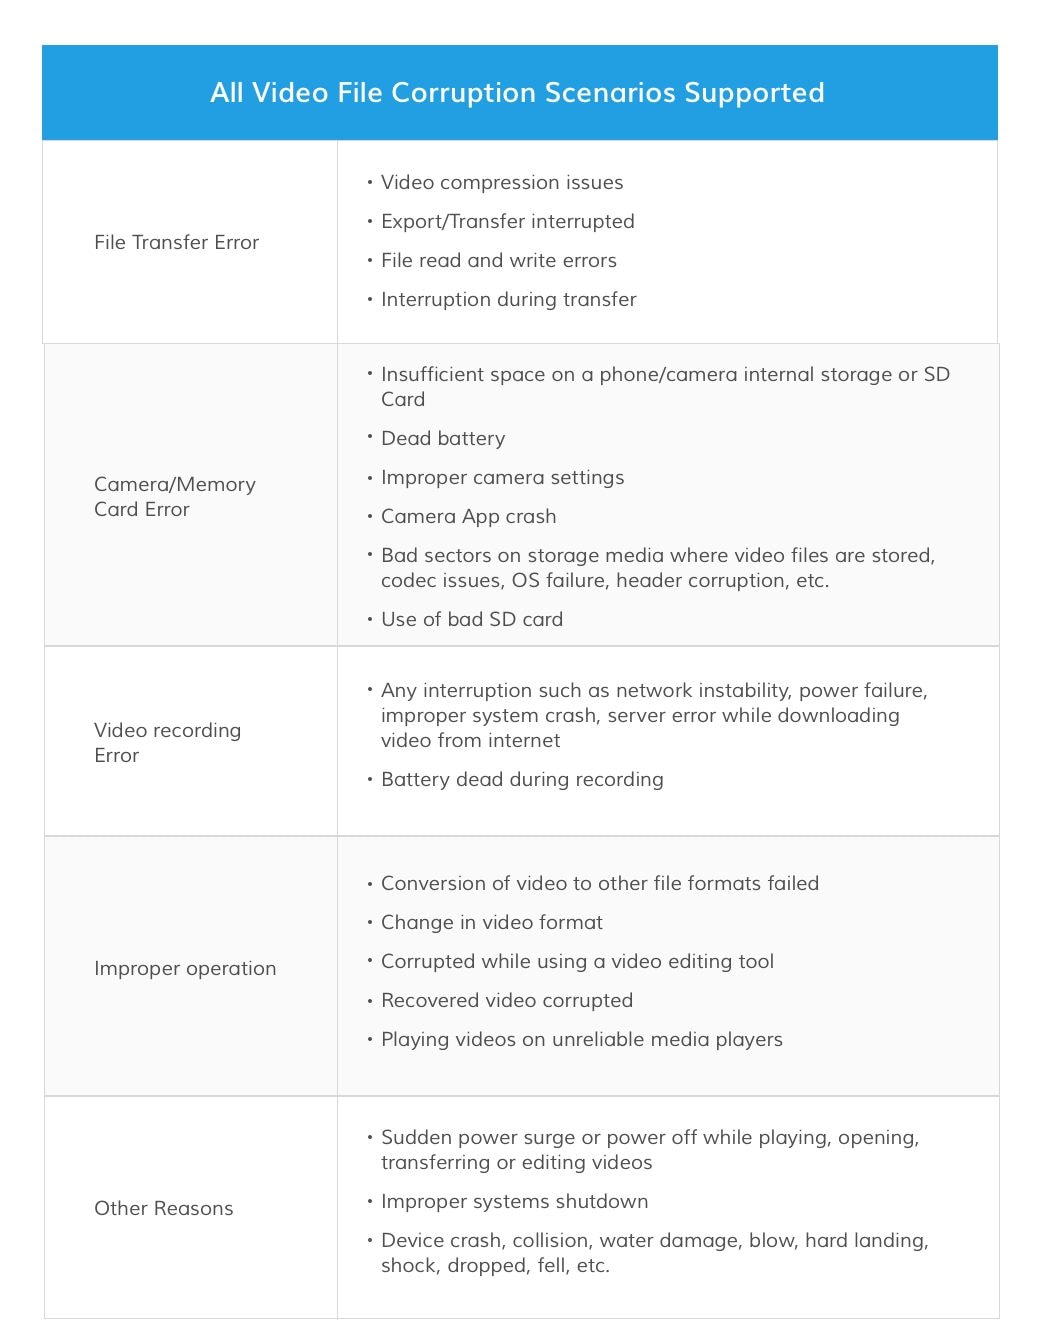
3.4. إصلاح مقاطع الفيديو التالفة
إنه لأمر فظيع أن تواجه حوادث الفيديو في منتصف المهمة. لإصلاح ملف فيديو تالف ، يوفر Recoverit ميزة إضافية لإصلاح الفيديو لنظامي التشغيل Windows و Mac. له مزايا مثل إصلاح الكثير من ملفات الفيديو الفاسدة ، وإصلاح مقاطع الفيديو بتنسيقات مختلفة في نفس الوقت ، ولا توجد قيود على حجم ملفات الفيديو المراد إصلاحها ، وواجهة سهلة الاستخدام وما إلى ذلك.
3.4.1. إصلاح مقاطع الفيديو التالفة على Windows
يمكن للأداة إصلاح أي ملف فيديو تقريبًا ، بغض النظر عن حجم الملف ومشكلته. ما عليك سوى فتح التطبيق سهل الاستخدام ، وتحديد خيار "إصلاح الفيديو" ، والنقر فوق الزر "ابدأ" من الصفحة الرئيسية لتشغيل الوحدة.
الخطوة 1 أضف أي فيديو تالف
أولاً ، يمكنك فقط إضافة ملفات الفيديو التالفة إلى التطبيق. لهذا ، يمكنك النقر فوق الزر "إضافة" الذي من شأنه تشغيل نافذة المتصفح. يمكنك فقط تصفح الموقع حيث يتم تخزين مقاطع الفيديو التالفة وتحميلها إلى التطبيق. بالإضافة إلى ذلك ، يمكنك فقط سحب ملفات الفيديو التالفة وإفلاتها في الواجهة.

الخطوة 2إصلاح مقاطع الفيديو التالفة
انتظر بعض الوقت لأن Recoverit Video Repair سيصلح مقاطع الفيديو المحملة. يمكنك عرض التقدم من مؤشر على الشاشة والانتظار ببساطة حتى تكتمل العملية.
1 معاينة الفيديو الإصلاح
بعد اكتمال عملية الإصلاح ، سيتيح لك التطبيق معاينة مقاطع الفيديو التي تم إصلاحها على واجهته.
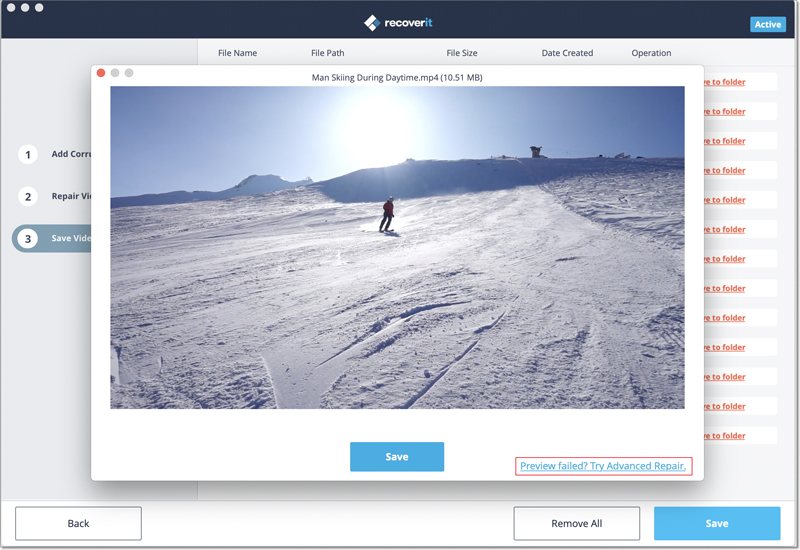
2إصلاح متقدم- إضافة فيديو نموذجي
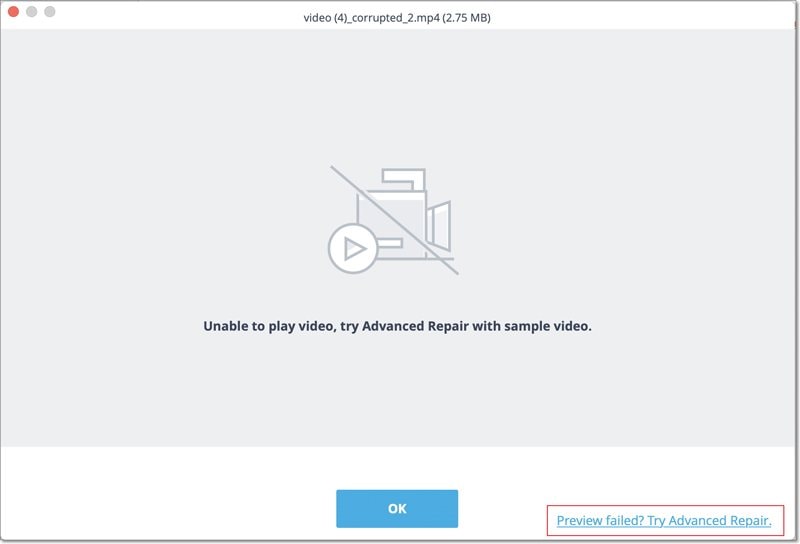
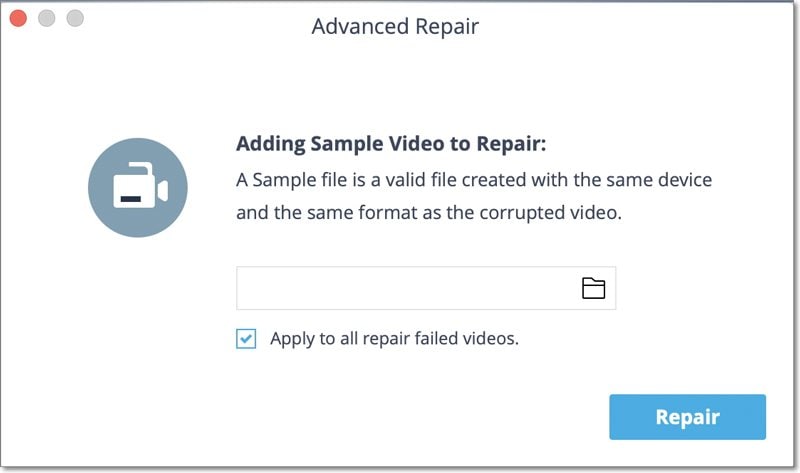
إذا تعرض الفيديو لأضرار بالغة أو لم يكن الفحص القياسي قادرًا على تحقيق النتائج المتوقعة ، فيمكنك فقط النقر فوق خيار "الإصلاح المتقدم" بدلاً من ذلك.
1. أضف عينة فيديو
سيحتاج منك برنامج الإصلاح المتقدم إلى إضافة نموذج فيديو. من الناحية المثالية ، فإن نموذج الفيديو هو ملف فيديو صالح يجب أن يكون بنفس تنسيق ملف الفيديو التالف ويجب تصويره على نفس الجهاز أيضًا.
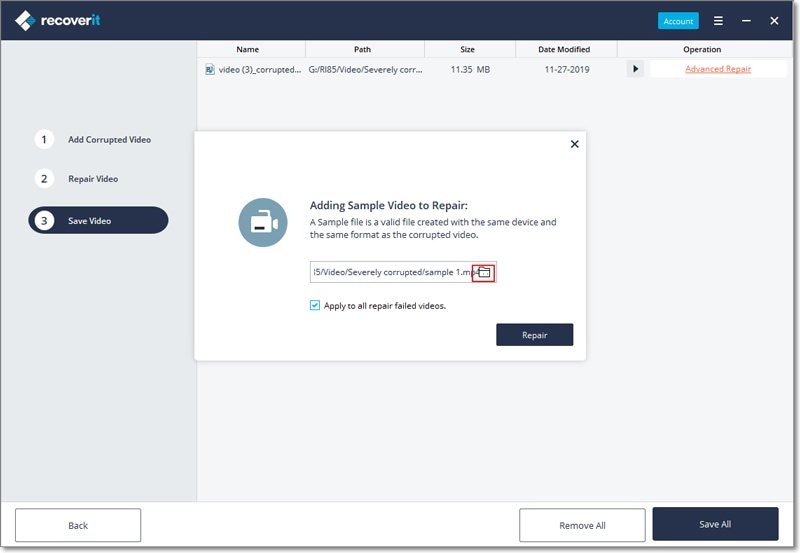
2. الإصلاح
بمجرد إضافة نموذج الفيديو ، ما عليك سوى النقر فوق الزر "إصلاح" لبدء عملية إصلاح الفيديو.
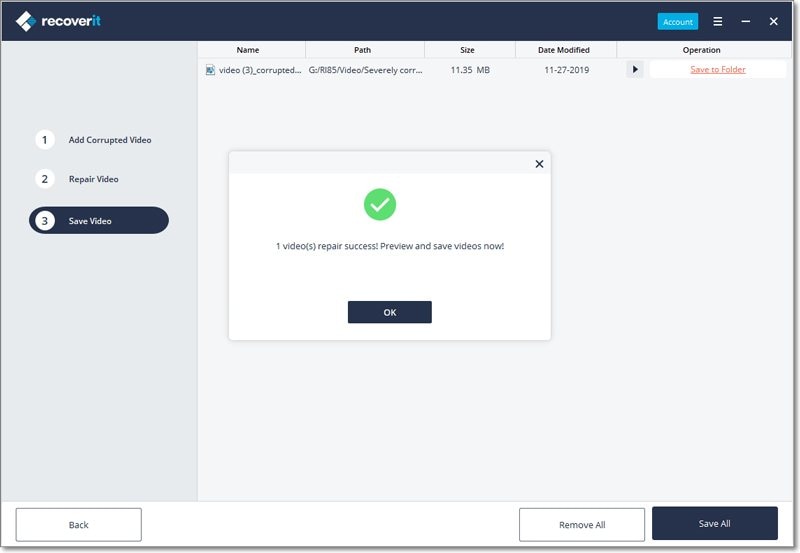
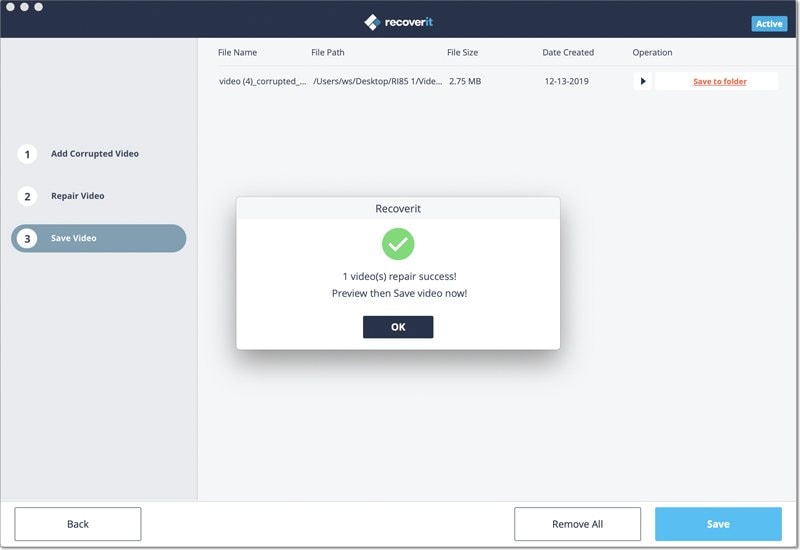
الخطوة 3 احفظ مقاطع الفيديو التي تم إصلاحها
عند اكتمال عملية الإصلاح ، يمكنك فقط حفظ مقاطع الفيديو التي تم إصلاحها في الموقع الذي تختاره. ستفتح نافذة متصفح تتيح لك الانتقال إلى الموقع المحدد لحفظ مقاطع الفيديو (أو إضافة مجلد جديد).
3.4.2. إصلاح مقاطع الفيديو التالفة على نظام Mac
يحتوي إصدار Mac من Recoverit أيضًا على ميزة مخصصة لإصلاح الفيديو يمكنك الوصول إليها من المنزل. ما عليك سوى تحديد خيار "إصلاح الفيديو" من شاشة الترحيب والنقر فوق الزر "ابدأ". يحتوي التطبيق على وضعين مختلفين لإصلاح الفيديو - سريع ومتقدم يمكنك تشغيلهما وفقًا لاحتياجاتك.

الخطوة 1 أضف أي فيديو تالف
نظرًا لأنه سيتم تشغيل تطبيق Video Repair ، يمكنك ببساطة إضافة مقاطع الفيديو التالفة عليه. لا توجد قيود على حجم الفيديو الذي يمكنك إضافته. ما عليك سوى سحب وإفلات مقاطع الفيديو من أي مكان إلى Recoverit. يمكنك أيضًا النقر فوق الزر "إضافة" لبدء تشغيل نافذة متصفح لتحديد موقع مقاطع الفيديو التي تريد إصلاحها.

الخطوة 2 إصلاح مقاطع الفيديو التالفة
نظرًا لأن Recoverit سيبدأ عملية الإصلاح ، يمكنك ببساطة الانتظار حتى تكتمل. يوجد مؤشر لإعلامك بتقدم عملية الإصلاح.
1 معاينة الفيديو الإصلاح
بعد اكتمال عملية الإصلاح ، يمكنك معاينة النتائج على الواجهة. فقط انقر فوق الزر "تشغيل" لمعاينته.
2 إصلاح متقدم (إضافة نموذج فيديو)
إذا كان الفحص السريع غير قادر على تحقيق النتائج المتوقعة ، فهذا يعني أن الفيديو الخاص بك قد تعرض لأضرار بالغة. لإصلاح ذلك ، ما عليك سوى النقر فوق ميزة "الإصلاح المتقدم".
1. أضف عينة فيديو
لإجراء إصلاح متقدم للفيديو ، تحتاج أولاً إلى إضافة عينة فيديو إلى التطبيق. يجب أن يكون نموذج الفيديو من نفس تنسيق ملف الفيديو التالف وأن يتم تصويره على نفس الجهاز أيضًا. سيتيح لك التطبيق تصفح دليل جهاز Mac لإضافة نموذج الفيديو.
2. الإصلاح
بمجرد إضافة نموذج الفيديو ، ما عليك سوى بدء عملية إصلاح الفيديو وانتظر بعض الوقت لأن الإصلاح المتقدم قد يستغرق وقتًا أطول لإصلاح ملف الفيديو الخاص بك.
الخطوة 3احفظ مقاطع الفيديو التي تم إصلاحها
في النهاية ، يمكنك فقط معاينة نتائج إصلاح الفيديو على الواجهة وحفظها في الموقع الذي تختاره. سيتم تشغيل نافذة متصفح ، مما يتيح لك حفظ مقاطع الفيديو التي تم إصلاحها في مكان آمن على جهاز Mac الخاص بك أو أي مصدر آخر.
3.5 استعادة النصائح المنبثقة
لمساعدة المستخدمين على متابعة استعادة البيانات بشكل أكثر فعالية وراحة ، يأتي Recoverit بالعديد من النصائح التي تظهر كنوافذ منبثقة صغيرة.
3.5.1. Tips for Previewing Data
يقدم Recoverit بعض النصائح والتحليلات المراعية لك إذا وجدت الملفات غير قادرة على المعاينة أو تالفة. سيتم أيضًا توفير الحلول ، والتي ستجعل استعادة البيانات بسلاسة باستخدام Recoverit. هناك 3 نصائح رئيسية هنا.
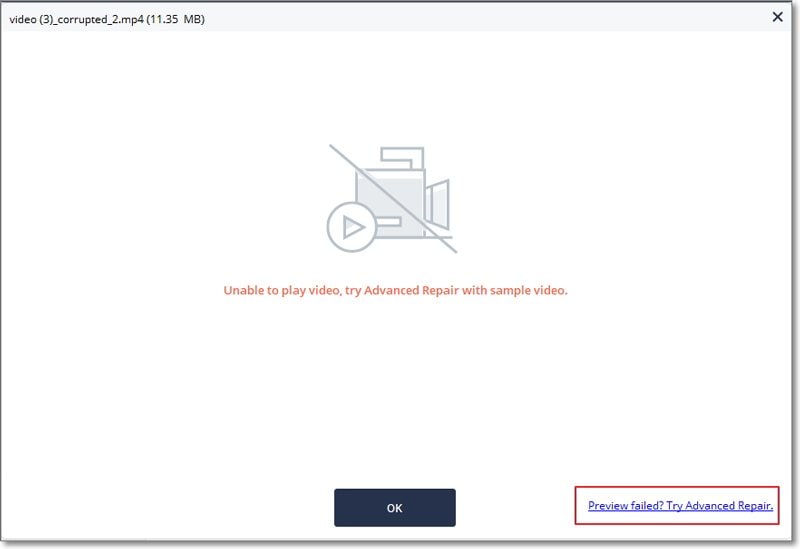
تلميح 1. غير قادر على المعاينة بسبب تلف الملف
السبب الأول المحتمل لتلف الملف هو أن الملف غير مكتمل. يمكنك الانتظار حتى اكتمال عملية المسح ثم معاينتها مرة أخرى. علاوة على ذلك ، إذا كان الملف نفسه تالفًا ، فمن الصعب معاينته واستعادته. وإذا تم الكتابة فوق البيانات ، فإن الاسترداد يكون أيضًا صعبًا للغاية.

تلميح 2. نوع الملف هذا غير مدعوم للمعاينة
لا يدعم Recoverit 8.0 معاينة جميع تنسيقات الملفات لمساعدتك على تقليل السعة التي يأخذها على جهاز الكمبيوتر. يمكنك استعادة الملفات مباشرة. عادة ما تكون صحية ومبتكرة.

نصيحة 3. يتجاوز هذا الملف الحجم الأقصى للمعاينة
يدعم Recoverit 8.0 معاينة الملفات التي يقل حجمها عن 30 ميجابايت ، للتأكد من أن البرنامج يمكنه الاستمرار في العمل بشكل طبيعي دون تعطل أو تجميد. إلى جانب ذلك ، مثل البرامج الأخرى في السوق ، يمكن أن تؤثر معاينة الملفات الأكبر حجمًا على سرعة التثبيت وتتطلب سعة أكبر.

3.5.2. نصائح لاستخدام Recoverit
يوفر Recoverit أيضًا بعض النصائح حول كيفية استخدام Recoverit بشكل أكثر ملاءمة وتجنب الكتابة فوق البيانات أو تلفها.
تلميح 1. إلغاء المسح
بمجرد العثور على بياناتك أو اتخاذ قرار بعدم استرداد البيانات ، يمكنك النقر فوق زر التوقف لإنهاء عملية المسح. في حالة النقر فوق الزر عن طريق الخطأ ، ستظهر رسالة التنبيه أدناه.

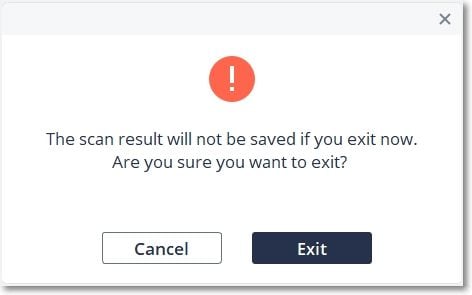
تلميح 2. الخروج من Recoverit أثناء المسح
نفس الشيء ، من أجل تجنب عمليات الإهمال من قبل المستخدمين ، سيقدم Recoverit رسالة خاصة لتذكيرهم.
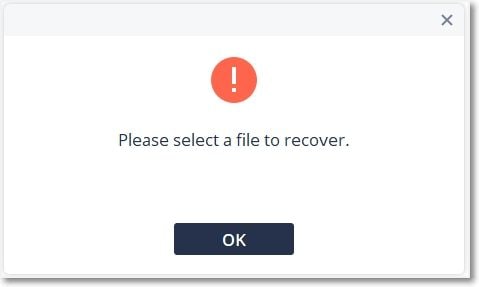
تلميح 3. حدد ملفًا لاستعادته
لاستعادة الملفات المفقودة ، تحتاج إلى تحديد ملف واحد أو أكثر حتى يتمكن Recoverit من التعرف على الملفات المحددة واستعادتها.
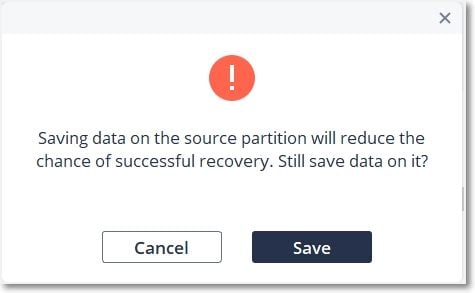
نصيحة 4. حفظ البيانات في موقع آخر
سيؤدي حفظ البيانات في نفس الموقع أو قسم المصدر إلى الكتابة فوق البيانات. لتجنب ضياع البيانات إلى الأبد ، يرجى حفظها على جهاز أو قسم مختلف.